Jeep Cherokee 1984-2001: How to Read OBD Trouble Codes
OBD trouble codes were first implemented for emission testing. These codes are now heavily relied upon to provide quick and accurate information about a troubled system or part. Checking for trouble codes is always one of the first steps during diagnostics.
This article applies to the Jeep Cherokee XJ (1984-2001).
In addition to the OBD connector found on most Jeep Cherokees, Chrysler implemented a system for the owner to record the error number with nothing more than the key. Although this system does not give you the capabilities of the average scan tool, it comes in handy during times when you need a quick vehicle check performed.

Materials Needed
- Scan tool
- 10mm and 12mm wrench
If your vehicle is pre-1990, it doesn't have an on board diagnostics port and trouble codes cannot be read with a scan tool. For pre-OBD vehicles, Chrysler also developed a system of check engine light flashes that can be used to record a number and compare it with the corresponding trouble code. Instead of check engine light flashes, newer models use the digital odometer to read out the trouble code.
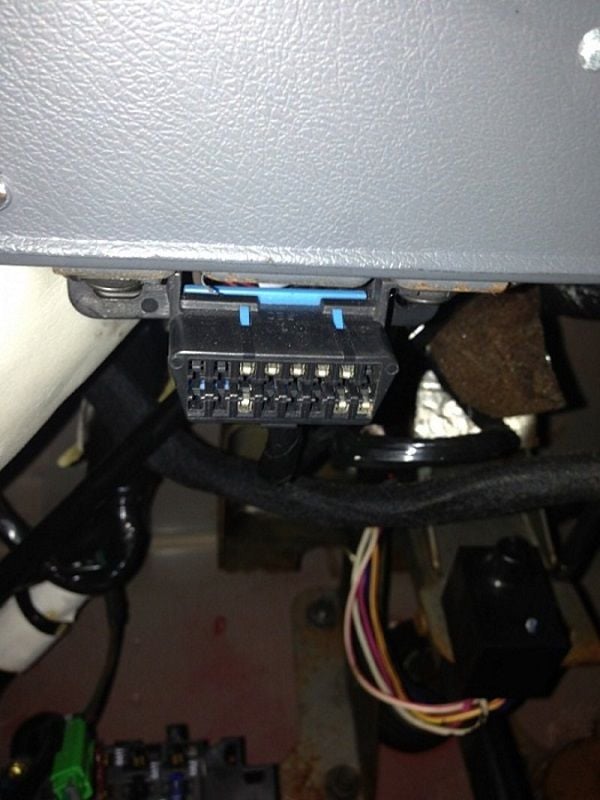
If it is a 1990-1996 model, it has the first generation OBD-I port and basic codes and information can be retrieved. 1997+ is the modern OBD-II, which offers more detailed information; again, available from the on board diagnostics port. This is commonly located to the side of the steering column, on the driver's side.

Figure 1. The OBD port on the bottom of the driver's side dashboard. 
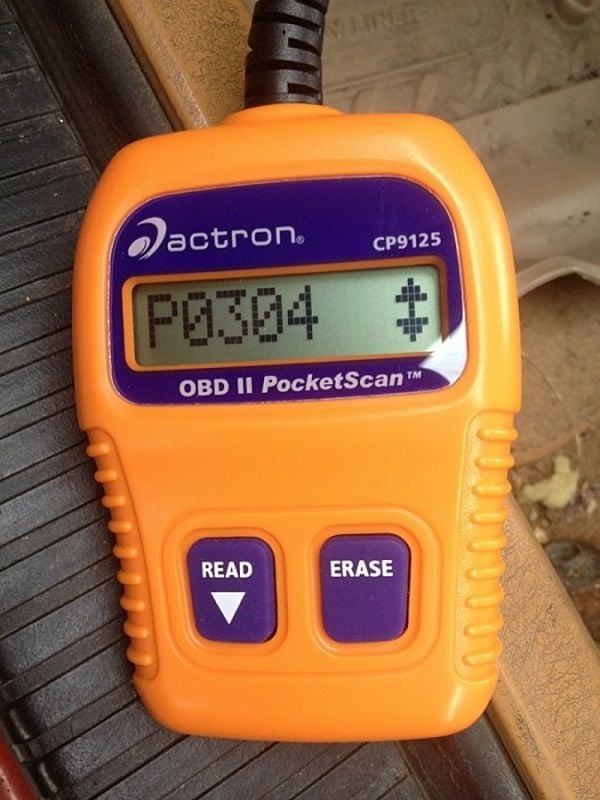
Figure 2. An ODB code scanner.
Step 1 – Begin the code display operation
If your vehicle is an OBD-era Jeep and you do not have a code reader, this is alternative method to see stored trouble codes.
- Begin by setting the emergency parking brake.
- For OBD-I systems, begin by switching the key in this order: 1. on 2. off 3. on 4. off. 5. on.
- The check engine light will flash. The check engine light will flash repeatedly (between 0-9 times). The number of flashes is your first digit. When the flashing pauses, you will know the first digit is finished. Count the flashes again after the pause to determine the second digit.
If your Jeep is OBD-II, the process is a bit more simple.
- Begin by putting the key in the ignition.
- Press and hold down the odometer reset button, turn the key to the run position, then release the reset button.
- The odometer display will cycle through the digits 1-9, then display the vehicle's serial number. The full trouble code will then display.
Featured Videos: Jeep Code Check
-
OBD-I Code Check
-
OBD-II Code Check
Step 2 – Find your trouble code
Use this list to find your code. Some codes may not be present in the list:
OBD-I Codes
- 11 - No ignition reference signal detected during cranking OR timing belt skipped one or more teeth; OR loss of either camshaft or crankshaft position sensor
- 12 - Battery or computer recently disconnected
- 13 - MAP sensor or vacuum line may not be working
- 14 - MAP sensor voltage below 16V or over 4.96V
- 15 - No speed/distance sensor signal
- 16 - Loss of battery voltage detected with engine running
- 17 - Engine stays cool too long (bad thermostat or coolant sensor)
- 17 - (1985 turbo only): knock sensor circuit
- 21 - Oxygen sensor signal doesn't change (stays at 4.3-4.5V); probably bad oxygen sensor
- 22 - Coolant sensor signal out of range; may have been disconnected to set timing
- 23 - Incoming air temperature sensor may be bad
- 24 - Throttle position sensor over 4.96V
- 25 - Automatic Idle Speed (AIS) motor driver circuit shorted or target idle not reached
- 26 - Peak injector circuit voltage has not been reached (need to check computer signals, voltage reg, injectors)
- 27 - Injector circuit isn't switching when it's told to (TBI), OR (MPI injector circuit #1 not switching right, OR (turbo) injector circuit #2 not switching right, OR (all 1990-) injector output driver not responding; check computer and connections
- 31 - Bad evaporator purge solenoid circuit or driver
- 32 - (1984 only) power loss/limited lamp or circuit
- 32 - EGR gases not working (1988) - check vacuum, valve
- 32 - (1990-92) computer didn't see change in air/fuel ratio when EGR activated - check valve, vacuum lines, and EGR electrical
- 33 - Air conditioning clutch relay circuit open or shorted (may be in the wide-open-throttle cutoff circuit or normal on early 80's models if you don't have air conditioning)
- 34 - (1984-86) EGR solenoid circuit shorted or open
- 34 - (1987-1991) speed control shorted or open
- 35 - Cooling fan relay circuit open or shorted
- 35 - idle switch motor fault - check connections
- 36 - (turbo only) Wastegate control circuit open or shorted
- 37 - Shift indicator light failure, 5-speed, OR part throttle lock/unlock solenoid driver circuit (87-89), OR solenoid coil circuit (85-87 Turbo only), OR Trans temperature sensor voltage low (1995 and on)
- 41 - Alternator field control circuit open or shorted
- 42 - Automatic shutdown relay circuit open or shorted
- 42 - Fuel pump relay control circuit
- 42 - Fuel level unit - no change over miles
- 42 - Z1 voltage missing when auto shutdown circuit energized (The Z1 voltage is the voltage of the circuits fed by the auto shutdown relay. This typically includes fuel pump and switched-battery feed to the ignition coil)
- 43 - Peak primary coil current not achieved with max dwell time
- 43 - Cylinder misfire
- 43 - Problem in power module to logic module interface
- 44 - No FJ2 voltage present at logic board
- 44 - Logic module self-diagnostics indicate problem
- 44 - Battery temperature out of range
- 45 - Turbo boost limit exceeded (engine was shut down by logic module)
- 46 - Battery voltage too high during charging or charging system voltage too low
- 47 - Battery voltage too low and alternator output too low
- 51 - Oxygen sensor stuck at lean position (this may be tripped by a bad MAP sensor system causing a rich condition. If you get hot rough idle and stalling, especially on deceleration, accompanied by flooded engine and difficulty restarting, that can be a bad MAP sensor causing the O2 sensor to try to compensate. If you get poor cold driveability, stumbling and bucking, and acceptable warm driving with poor gas mileage (a drop of 10 mpg or more), that is usually the O2 sensor.
- 51 - Internal logic module fault ('84 turbo only).
- 52 - Oxygen sensor stuck at rich position
- 52 - Internal logic module fault ('84 turbo only)
- 53 - Logic module internal problem
- 54 - No sync pickup signal during engine rotation (turbo only)
- 54 - Internal logic module fault ('84 turbo only) - or camshaft sensor/distributor timing
- 55 - End of codes
- 61 - "Baro" sensor open or shorted
- 62 - EMR mileage cannot be stored in EEPROM
- 62 - PCM failure SRI mile not stored
- 63 - Controller cannot write to EEPROM
- 64 - Catalytic converter efficiency failure
- 65 - Power steering switch failure
- 66 - No CCD Message From TCM and/or No CCD Message From BCM
OBD-II (Specific Codes)
- 30 - Sensor heater relay problem
- 36 - Sensor heater relay problem
- 106 - MAP sensor voltage out of range detected at startup
- 107 - MAP sensor voltage too low
- 108 - MAP sensor voltage too high
- 112 - Intake air temperature sensor voltage low
- 113 - Intake air (charge) temperature sensor voltage high
- 116 - Coolant temparature sensor reading doesn't make sense
- 117 - Engine coolant temperature sensor voltage low
- 118 - Engine coolant temperature sensor voltage high
- 121 - Throttle position sensor and MAP sensor disagree with each other
- 122 - Throttle position sensor voltage low
- 123 - Throttle position sensor voltage high
- 125 - Taking too long to reach proper operating temparature and switch to energy-efficient mode
- 130 - Sensor heater relay problem
- 130 - O2 Sensor Circuit Malfunction (Bank 1 Sensor 1)
- 131 - O2 Sensor Circuit Low Voltage (Bank 1 Sensor 1)
- 132 - O2 Sensor Circuit High Voltage (Bank 1 Sensor 1)
- 133 - O2 Sensor Circuit Slow Response (Bank 1 Sensor 1)
- 134 - O2 Sensor Circuit No Activity Detected (Bank 1 Sensor 1)
- 135 - O2 Sensor Heater Circuit Malfunction (Bank 1 Sensor 1)
- 136 - O2 Sensor Circuit Malfunction (Bank 1 Sensor 2)
- 137 - O2 Sensor Circuit Low Voltage (Bank 1 Sensor 2)
- 138 - O2 Sensor Circuit High Voltage (Bank 1 Sensor 2)
- 139 - O2 Sensor Circuit Slow Response (Bank 1 Sensor 2)
- 140 - O2 Sensor Circuit No Activity Detected (Bank 1 Sensor 2)
- 141 - O2 Sensor Heater Circuit Malfunction (Bank 1 Sensor 2)
- 142 - O2 Sensor Circuit Malfunction (Bank 1 Sensor 3)
- 143 - O2 Sensor Circuit Low Voltage (Bank 1 Sensor 3)
- 144 - O2 Sensor Circuit High Voltage (Bank 1 Sensor 3)
- 145 - O2 Sensor Circuit Slow Response (Bank 1 Sensor 3)
- 146 - O2 Sensor Circuit No Activity Detected (Bank 1 Sensor 3)
- 147 - Oxygen sensor heater element not working properly (this device helps to reduce emissions more quickly)
- 151 - Oxygen sensor voltage problem - short circuit to ground?
- 152 - Oxygen sensor voltage problem - short circuit to active 12V?
- 153 - Oxygen sensor response too slow
- 154 - Oxygen sensor does not show either a rich or lean condition - may need replacement
- 155 - Oxygen sensor heater element not working properly (this device helps to reduce emissions more quickly)
- 157 - Oxygen sensor voltage problem - short circuit to ground?
- 158 - Oxygen sensor voltage problem - short circuit to active 12V?
- 159 - Oxygen sensor response too slow
- 160 - Oxygen sensor does not show either a rich or lean condition - may need replacement
- 161 - Oxygen sensor heater element not working properly (this device helps to reduce emissions more quickly)
- 171 - The oxygen sensor is saying that the system air/fuel mix is far too lean (too much fuel is being added as a correction).
- 172 - The oxygen sensor is saying that the system air/fuel mix is far too rich (too much air is being added as a correction).
- 174 - The oxygen sensor is saying that the system air/fuel mix is far too lean (too much fuel is being added as a correction).
- 175 - The oxygen sensor is saying that the system air/fuel mix is far too rich (too much air is being added as a correction).
- 176 - Flex fuel sensor can't be seen
- 178 - Flex fuel sensor problem
- 179 - Flex fuel sensor problem
- 182 - Compressed natural gas temperature sensor problem
- 183 - Compressed natural gas temperature sensor problem
- 201 - Injector #1 control circuit problem (open or shorted)
- 202 - Injector #2 control circuit problem (open or shorted)
- 203 - Injector #3 control circuit problem (open or shorted)
- 204 - Injector #4 control circuit problem (open or shorted)
- 205 - Injector #5 control circuit problem (open or shorted)
- 206 - Injector #6 control circuit problem (open or shorted)
- 207 - Injector #7 control circuit problem (open or shorted)
- 208 - Injector #8 control circuit problem (open or shorted)
- 300 - Misfire detected in multiple cylinders.
- 301 - Misfire detected in cylinder #1.
- 302 - Misfire detected in cylinder #2.
- 303 -Misfire detected in cylinder #3.
- 304 - Misfire detected in cylinder #4.
- 305 - Misfire detected in cylinder #5.
- 306 - Misfire detected in cylinder #6.
- 307 -Misfire detected in cylinder #7
- 308 - Misfire detected in cylinder #8.
- 320 - Crankshaft position sensor reference signal cannot be found while the engine is cranking.
- 325 - Knock sensor (#1) signal is wrong.
- 330 - Knock sensor (#2) signal is wrong.
- 340 - No camshaft signal being received by the computer
- 350 - A coil is drawing too much current.
- 351 - Coil #1 is not reaching peak current at the right time
- 352 - Coil #2 is not reaching peak current at the right time
- 353 - Coil #3 is not reaching peak current at the right time
- 354 - Coil #4 is not reaching peak current at the right time
- 355 - Coil #5 is not reaching peak current at the right time
- 356 - Coil #6 is not reaching peak current at the right time
- 357 - Coil #7 is not reaching peak current at the right time
- 358 - Coil #8 is not reaching peak current at the right time
- 401 - A required change in air/fuel mixture was not detected during diagnostic test.
- 403 - An problem was detected in the EGR solenoid control circuit.
- 404 - The EGR sensor's reported position makes no sense
- 405 - EGR position sensor voltage wrong.
- 406 - EGR position sensor voltage wrong.
- 412 - The secondary air solenoid control circuit seems bad (this is used for the aspirator).
- 420 - The catalyst seems inefficient (#1).
- 432 - The catalyst seems inefficient (#2).
- 441 - Evaporative purge flow system not working properly
- 442 - A leak has been detected in the evaporative system!
- 443 - Evaporative purge flow system solenoid not working properly
- 455 - A large leak has been detected in the evaporative system!
- 456 - A small leak has been detected in the evaporative system!
- 460 - The fuel level sender is not reporting any change over a long distance. Something seems wrong.
- 461 - The fuel level sender is not reporting any change over a long time. Something seems wrong.
- 462 - Fuel level sender voltage wrong.
- 463 - Fuel level sender voltage wrong.
- 500 - Haven't heard from the speed sensor lately.
- 505 - The idle speed air control motor doesn't seem to be working correctly.
- 522 - Oil pressure sensor problems
- 523 - Oil pressure sensor problems
- 551 - The power steering switch may not be working. (Neons: high pressure is showing up at high speed)
- 600 - Oh-oh! The coprocessors aren't talking to each other within the computer!
- 601 - Internal computer error!
- 604 - Internal computer error! (RAM check)
- 605 - Internal computer error! (ROM)
- 615 - Starter relay circuit problem
- 622 - Generator field control problem
- 645 - A/C clutch relay circuit problem.
- 700 - The automatic transmission computer or Aisin computer has a problem - ask it what's going on. I don't know.
- 703 - Brake switch circuit information seems wrong.
- 711 - Based on the transmission temperature and its operations, it looks like the transmission temperature sensor's gone bad.
- 712 - Transmission fluid temperature sensor voltage wrong.
- 713 - Transmission fluid temperature sensor voltage wrong.
- 720 - The Output Shaft Speed Sensor doesn't match the reported vehicle speed.
- 740 - The engine's running faster than it should for these speeds, so I think thetorque convertor clutch lock-up system is bad
- 743 - Torque converter clutch (part throttle unlock) solenoid circuit problem - shift solenoid C electrical fault
- 748 - Governor Pressure Solenoid circuit problem (Transmission relay circuit problem in Jeep RE transmissions)
- 751 - Overdrive override switch has been pressed for over five minutes. Just thought you should know.
- 753 - Overdrive solenoid control circuit problem (transmission relay circuit in Jeep RE transmissions.)
- 756 - Shift solenoid B (2-3) fault
- 783 - The overdrive solenoid can't go from 3rd gear to the overdrive gear.
- 801 - Transmission reverse gear lockout solenoid circuit problem!
- 833 - Problem with the clutch-released switch circuit?
- 1192 - Inlet air temperature sensor voltage is wrong
- 1193 - Inlet air temperature sensor voltage is wrong
- 1194 - Oxygen sensor heater performance is faulty
- 1195 - Oxygen sensor is slow
- 1196 - The oxygen sensor switched too slowly (bank 2).
- 1197 - The oxygen sensor switched too slowly (bank 1).
- 1198 - Radiator coolant temperature sensor voltage is wrong.
- 1199 - Radiator coolant temperature sensor voltage is wrong.
- 1281 - The engine is staying cold too long - check your thermostat.
- 1282 - The fuel pump relay circuit seems to be having a problem.
- 1288 - The intake manifold short runner tuning valve circuit seems to be having a problem.
- 1289 - There's a problem in the manifold tuning valve solenoid control circuit.
- 1290 - Compressed natural gas system pressure is too high
- 1291 - The heated air intake sensor does not seem to be working.
- 1292 - Natural gas pressure sensor issue
- 1293 - Natural gas pressure sensor issue
- 1294 - Can't get to target engine speed, check for vacuum leaks and idle speed motor issues.
- 1295 - The throttle position sensor doesn't seem to be getting enough electricity.
- 1296 - The MAP sensor doesn't seem to be getting enough electricity.
- 1297 - The MAP sensor doesn't change its reading when the engine is running!
- 1298 - During wide-open throttle, the engine runs lean.
- 1299 - MAP Sensor and Throttle Position Sensor signals don't match, check for a vacuum leak.
- 1388 - Auto shutdown relay circuit problems?
- 1389 - No Z1 or Z2 voltage seen by the computer when the auto shutdown relay is used.
- 1390 - Cam and crank signals don't match - did the timing belt skip a tooth?
- 1391 - Sometimes, I can't see the crank or cam sensor signal.
- 1398 - I can see the Crank Sensor's signal when I prepare for Misfire Diagnostics. Try replacing it.
- 1399 - Problem in the Wait to Start Lamp circuit - (diesels only?)
- 1403 - EGR position sensor not getting (enough) voltage.
- 1476 - Too little secondary air injection during aspirator test.
- 1477 - Too much secondary air injection during aspirator test.
- 1478 - Battery temperature sensor voltage wrong.
- 1479 - Transmission fan relay circuit problems?
- 1480 - PCV solenoid circuit problems?
- 1481 - Transmission RPM pulse generator signal for misfire detection seems wrong.
- 1482 - Catalyst temperature sensor circuit shorted low.
- 1483 - Catalyst temperature sensor circuit shorted high.
- 1484 - The catalyst seems to be overheating!
- 1485 - Air injection solenoid circuit problems.
- 1486 - Pinched or blocked hose in the evaporative hose system.
- 1487 - Control circuit of the #2 high-speed radiator fan control relay is having problems.
- 1488 - Auxiliary 5-volt sensor feed is too low.
- 1489 - High speed radiator fan control circuit problem.
- 1490 - Low speed radiator fan control circuit problem.
- 1491 - Radiator fan control circuit problem (may be solid state relays as well as other circuits).
- 1492 - Ambient or battery temperature sensor voltage wrong
- 1493 - Ambient or battery temperature sensor voltage wrong
- 1494 - Leak Detection Pump (LDP) pressure switch problem - electrical or the pump itself.
- 1495 - Leak Detection Pump (LDP) pressure switch problem - the solenoid circuit.
- 1496 - Sensor feed is below an acceptable limit. (under 4v for 4 seconds - should be 5v).
- 1498 - High speed radiator fan control circuit problem. (#3 control relay)
- 1594 - Voltage too high in charging system.
- 1595 - Speed control vacuum or vent solenoid control circuits shorted or lost.
- 1596 - Speed control switch always high
- 1597 - Speed control switch always low
- 1598 - A/C pressure sensor voltage high
- 1599 - A/C pressure sensor voltage low
- 1681 - No messages received from the cluster control module (dashboard computer).
- 1682 - Charging system doesn't seem to be working well. Check alternator, etc.
- 1683 - Speed control servo power control circuit problem.
- 1684 - The battery has been disconnected within the last 50 starts.
- 1685 - Invalid key received from the Smart Key Immobilizer Module.
- 1686 - No messages received from the Smart Key Immobilizer Module.
- 1687 - No messages received from the Mechanical Instrument Cluster module.
- 1 693 - The companion engine control module has shown a fault.
- 1694 -No messages received from the powertrain control module-Aisin transmission.
- 1695 - No messages received from the body control module.
- 1696 - Unsuccessful attempt to write to an EEPROM location!
- 1697 - Unsuccessful attempt to update Service Reminder Indicator (SRI or EMR) mileage!
- 1698 - No messages received from the electronic transmission control module or the Aisin transmission controller.
- 1719 - Transmission 2-3 gear lockout solenoid control circuit problem.
- 1740 - Either the tcc solenoid or overdrive solenoid systems doesn't seem to be making much sense.
- 1756 - Transmission control pressure not equal to target. (Mid pressure problem)
- 1757 - Transmission control pressure not equal to target. (Zero pressure problem)
- 1762 - The Governor Pressure Sensor input was too high or too low for 3 consecutive park/neutral calibrations.
- 1763 - The Governor Pressure Sensor input is too high
- 1764 - The Governor Pressure Sensor input is too low.
- 1765 - Open or short in the Transmission Relay control circuit.
- 1899 - The Park/Neutral switch seems to be stuck!
Step 3 – Clear the check engine light
Remove the negative (black) battery cable. Leave the cable disconnected for five minutes. This resets the Engine Control Unit (ECU), and should clear the code. If the code comes back after driving the car, it was not a fluke and the issue needs to be investigated further.
Related Discussions
- Jeep Computer Codes, OBD1 and OBD2 - cherokeeForum.com
- Computer Codes, Long Blink - cherokeeForum.com
- Diagnositc Trouble Codes, Pre-'95 - cherokeeForum.com


