Help Broken NSS
#1
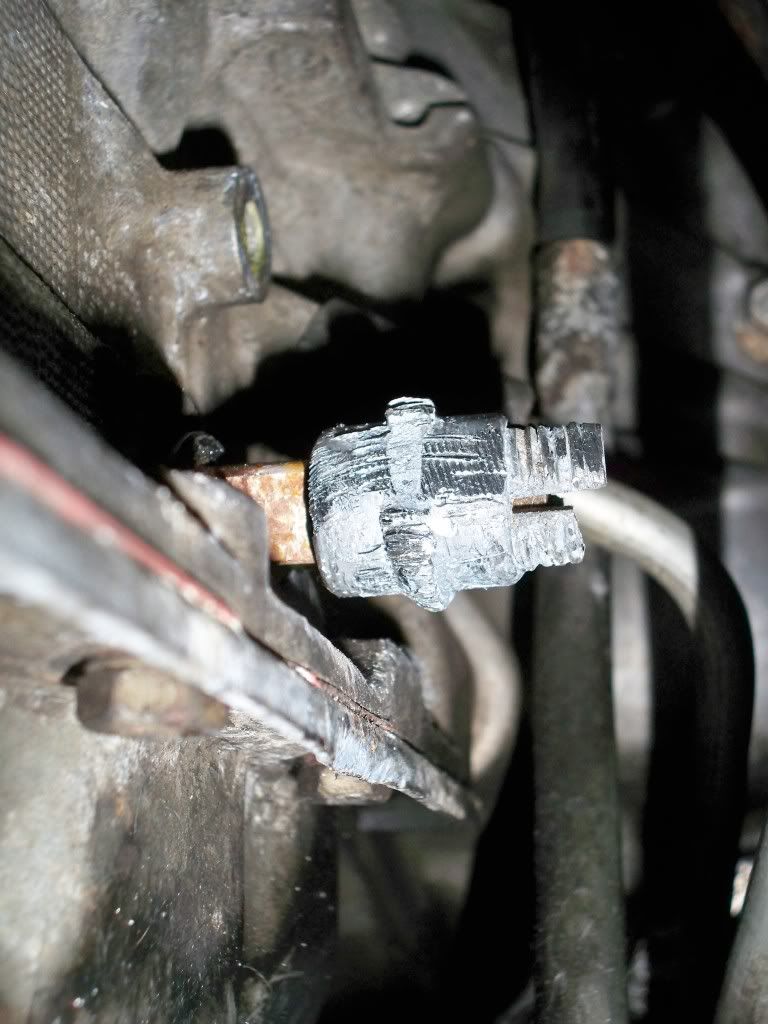
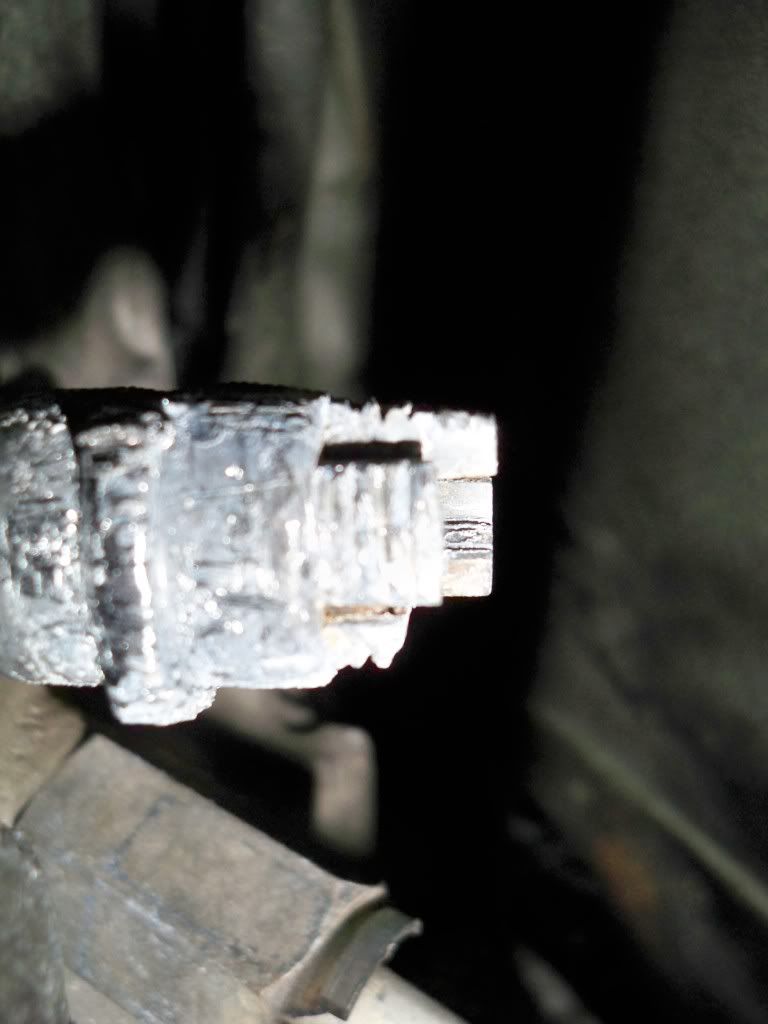
Hey everyone I was having issues with my Jeep not starting unless it was in natural earlier this winter. So I searched online to find this was a common problem with jeep Cherokees because of the way the jeep NSS was built. So I found ways to clean it online and decided this was the way to go about fixing my problem. Well after a few hours fighting to try and get it off I started to make some headway, then I heard this loud crack and the NSS comes flying off. But not all of the NSS came off, only most of it did and what was left on there was the inner ring of the NSS that moved the lever inside of itÖ.. The issue is I have no clue how to get this part off and Iím stuck with a jeep I canít even start. This little ring doesnít move a bit even with all of my force. Anyone else ever have this problem? And if so how do I go about fixing it?


Oh and the reason the end of it is broken up is I tried putting the nut back on it and using that for leverage and it was working, until the end chipped apart.


Oh and the reason the end of it is broken up is I tried putting the nut back on it and using that for leverage and it was working, until the end chipped apart.
#2
Mine did the same exact thing the other day. Just spray it with pb blaster, Let it set for a while, then put vice grips on it and hit the bottom of the vice grips with a hammer toward the oil pan and it will pop right off. DON'T order a new NSS from autozone or the stealership. EBAY sells them for $48 brand new. Thats where I got mine and it works great.
#4
Can I have the old busted one? I'm collecting parts...
As far as removing the broken nut, you might have good luck using a "door panel trim remover tool" (something like the pix here):

to get that nut. You may end up wanting to grind the middle fork open a bit more, which can be done using a grinding wheel, an angle grinder, and a steady hand.
This will allow you to get behind both sides of the nut at once.
Before installing the new NSS:
- Use a small wire wheel to clean the end of the shift shaft. Get as much as you can.
- Paint the exposed shift shaft with never-seez.
- Then slide the NSS on. Push it as far as it will go, thread the nut on.
- The collet nut gets torqued to 61 pound-inches (a shade over five pound-feet. I usually put a socket on it and turn the socket using only my fingertips.)
Adjust the NSS thus (get a helper):
- Block the wheels
- Turn the key to ON (no need to start)
- Shift into Reverse
- Post your helper behind the vehicle, watching the reverse lamps
- Take a Sharpie pen and the upper NSS lockscrew and crawl under
- Put the NSS lockscrew in loosely
- Move the NSS housing one way (doesn't matter which) until it reaches the limit
- Make a mark on the NSS housing
- Slowly turn the NSS housing toward the other limit
- When your helper tells you that the reverse lamps are ON, make a mark lining up with the mark you made on the NSS
- Slowly turn the NSS in the direction you were just going
- When the reverse lamps turn OFF, make another mark
- Set the NSS in between the two marks you just made
- Verify that the reverse lamps are ON
- Tighten the NSS lockscrew - not more than 15 pound-feet, so you don't crack the housing on the piece you just bought
- Verify that you can start the engine in both Park and Neutral
- Return vehicle to service
As far as removing the broken nut, you might have good luck using a "door panel trim remover tool" (something like the pix here):

to get that nut. You may end up wanting to grind the middle fork open a bit more, which can be done using a grinding wheel, an angle grinder, and a steady hand.
This will allow you to get behind both sides of the nut at once.
Before installing the new NSS:
- Use a small wire wheel to clean the end of the shift shaft. Get as much as you can.
- Paint the exposed shift shaft with never-seez.
- Then slide the NSS on. Push it as far as it will go, thread the nut on.
- The collet nut gets torqued to 61 pound-inches (a shade over five pound-feet. I usually put a socket on it and turn the socket using only my fingertips.)
Adjust the NSS thus (get a helper):
- Block the wheels
- Turn the key to ON (no need to start)
- Shift into Reverse
- Post your helper behind the vehicle, watching the reverse lamps
- Take a Sharpie pen and the upper NSS lockscrew and crawl under
- Put the NSS lockscrew in loosely
- Move the NSS housing one way (doesn't matter which) until it reaches the limit
- Make a mark on the NSS housing
- Slowly turn the NSS housing toward the other limit
- When your helper tells you that the reverse lamps are ON, make a mark lining up with the mark you made on the NSS
- Slowly turn the NSS in the direction you were just going
- When the reverse lamps turn OFF, make another mark
- Set the NSS in between the two marks you just made
- Verify that the reverse lamps are ON
- Tighten the NSS lockscrew - not more than 15 pound-feet, so you don't crack the housing on the piece you just bought
- Verify that you can start the engine in both Park and Neutral
- Return vehicle to service
#5
Well I have been at it for the last two days with the PB Blaster and it still refuses to budge after 3 coats of the stuff I'm not sure what else to do but it looks like I might need to get it towed 
Also I had already bought my new NSS for 150 off some online store. I really wish I had checked Ebay now.

Also I had already bought my new NSS for 150 off some online store. I really wish I had checked Ebay now.
#6
Well I have been at it for the last two days with the PB Blaster and it still refuses to budge after 3 coats of the stuff I'm not sure what else to do but it looks like I might need to get it towed 
Also I had already bought my new NSS for 150 off some online store. I really wish I had checked Ebay now.

Also I had already bought my new NSS for 150 off some online store. I really wish I had checked Ebay now.
Clean behind the NSS housing until the shaft is as fully de-crudded as you can make it.
Push the NSS back onto the shaft, repeat with the part of the shaft you've just exposed.
Switch the wire wheel/flap wheel for a grinding stone, and lightly bevel the very end of the shaft (they sometimes get things hitting them and get buggered up.)
The switch should come off much more easily now. Even if you don't have a flap wheel and a grinding stone you can chuck in your drill motor, you can pick them both up at your local hardware store for much less than a tow these days...
Thread
Thread Starter
Forum
Replies
Last Post
xjcarolina
Stock XJ Cherokee Tech. All XJ Non-modified/stock questions go here
5
09-29-2015 09:43 PM
Joshuapn
Other Vehicles. Other Jeep models & cars and trucks of other makes
1
09-25-2015 09:16 PM
Currently Active Users Viewing This Thread: 1 (0 members and 1 guests)


