
RMS How I Hate You
 04-11-2014, 10:57 AM
#61
CF Veteran
Thread Starter
Well, I tried bolting it up again late last night and it squished out, again. Fortunately, it was to the outside so I saw it poking out unevenly between the pan and flexplate. I find it strange that the gasket is so substantial in that particular area. Is there really such a large gap between the pan and bearing cap to require a 1/4" of rubber? When I removed the pan originally the gasket material on the pan around the bearing cap was the same thickness as the gasket material everywhere else. Why is it so thick in that area on the replacement gasket. I'm seriously considering cutting that "U" portion of the gasket out and using RTV (which some of you may know, I HATE) in its place. That part of the gasket isn't reinforced so it should be fairly simple to just trim it off. I don't know. Thoughts?
A few questions:
1. Am I over-torquing the pan? I'm using a stubby 1/4" drive to tension the bolts so I don't feel like I would be able to.
2. The gasket I'm using is a Felpro _________. Can anyone with a similar era XJ confirm that this is the proper gasket?
3. Are there any actual torque specifications for the pan bolts and if so, can you provide a link to the recommended tightening sequence and torque. I'm going in an X pattern using a stubby 1/4" drive ratchet and two 8" extensions and I'm tightening them in three stages: (1) Extensions only (no ratchet)> (2) Snug (with ratchet)> (3) 1/2 turn past snug.
4. I asked this earlier but I'll ask again. There is a pan mating surface on the bearing cap, a strip of what I assume was once rubber. Is this something I should be replacing?
 04-11-2014, 11:12 AM
#62
CF Veteran
Thread Starter


Since Saturday I've gone through 12 quarts of oil, four pan gaskets, and three RMSs. I've missed 2 days of work, 6 nights of sleep and my hands and arms look like I've been attacked by a rabid armadillo. A job that should have taken 4 hours and $60 has taken 7 days and almost $200.
Last edited by F1Addict; 04-16-2014 at 04:54 PM.
04-11-2014, 12:49 PM
#64
CF Veteran
Thread Starter
Mr. Overland, you are my hero and if this works I am going to send you an expensive bottle of something.
04-11-2014, 01:26 PM
#66
CF Veteran
Join Date: May 2008
Location: Bristol,Pa
Posts: 5,188
Likes: 0
Received 6 Likes
on
6 Posts
Year: 94
Model: Cherokee
Engine: 4.0L
Sorry.. i didnt read the whole thread..
Pull the gasket off that pan and adhere to block, you'l note how the ends need to be seated correctly which imho cant be done along with pan.
Pull the gasket off that pan and adhere to block, you'l note how the ends need to be seated correctly which imho cant be done along with pan.
04-11-2014, 06:32 PM
#67
CF Veteran
Thread Starter
No problem, I wouldn't have waded through all 5 pages, either. Anyway, it's fixed. I didn't pry the gasket off the pan, I just installed it as I'd planned. You're supposed to put a bead of RTV on the gasket where it meets the block on either side of the bearing cap and where it crosses from the block to the timing chain cover to prevent leaks there. I've let it idle for 20 minutes then stopped it and started several times, driven 12 miles and there isn't a drop of oil anywhere. I went around the entire pan with my fingers and a flashlight and my fingers came out dry and clean.
Thank you everybody for your help and encouragement and a special thanks to Overland for stating what was probably obvious to most but clearly not to me. I feel like a complete idiot but my Jeep doesn't leak anymore so I can live with that.
EDIT: The seal that OverlandZJ is referring to (and the one I should have removed) is pictured in post #40 of this thread. I would like to point out that this thread is now 1 year old and I have not a drop of oil leaking from my RMS or oil pan.
Last edited by F1Addict; 03-21-2015 at 06:12 PM.
04-12-2014, 01:22 AM
#68
CF Veteran
Join Date: Aug 2011
Location: Nor-Cal Coast
Posts: 10,489
Likes: 0
Received 18 Likes
on
18 Posts
Year: 90,84
Model: Cherokee
Engine: 4.0,2.5
What, you are done already? There waz Just an interesting article in Scientific American on how they tricked chess masters into not seeing a simple solution. Can't pronounce it or spell it without digging it up. "Eighnstllung" effect. Doctors, Jurys, (chess players), miss the truth because their eye is on something else. 
04-12-2014, 11:10 AM
#71
CF Veteran
Thread Starter
What, you are done already? There waz Just an interesting article in Scientific American on how they tricked chess masters into not seeing a simple solution. Can't pronounce it or spell it without digging it up. "Eighnstllung" effect. Doctors, Jurys, (chess players), miss the truth because their eye is on something else.
Just checked the driveway... not a drop.
 (You better watch out now.....
 )
04-12-2014, 04:30 PM
)
04-12-2014, 04:30 PM
#73
CF Veteran
Thread Starter
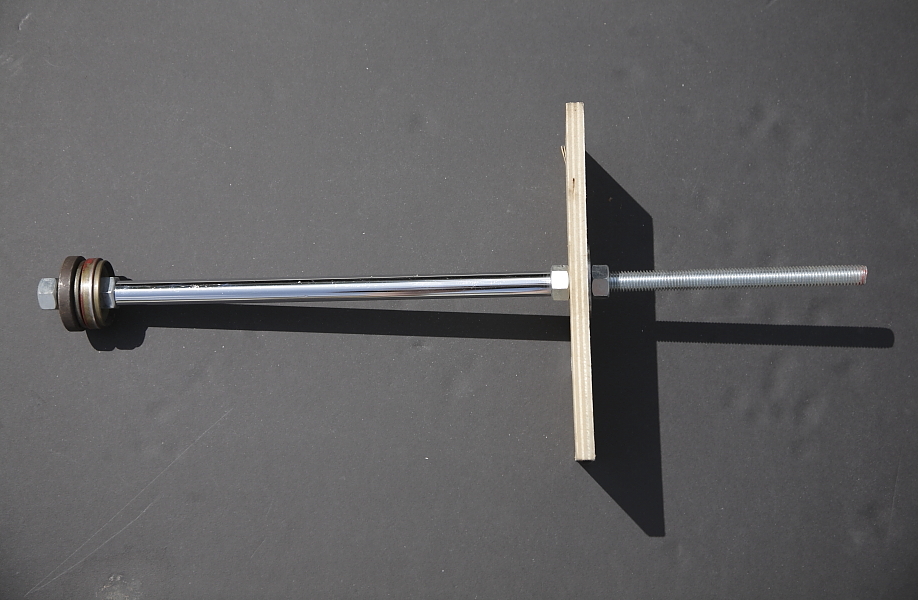
Well, since that's all done, here are the pictures of the axle seal press...
To use, I remove the components that make up the mandrel on the left side and slide the assembly into the axle until the threads are visible inside the disco orifice. I then place a new seal on the threads inside the orifice followed by the old seal (and associated washers), then the large steel disc and finally, the hex nut. With the plywood on the other end of the press I tighten the outer hex nut until the wood is seated flat against the hub carrier. From there it's just a matter of slowly tightening that outer hex bolt which evenly pulls the seal into the axle. There is an unmistakable "stop" when the seal is fully seated that you can feel when tightening the outer nut. Reverse the process to get the press out of the axle and you're done. It takes about 15 minutes, start to finish.
Overall view of the entire assembly.
The business end

The hub carrier seat

Exploded view of the seal end of the press

To use, I remove the components that make up the mandrel on the left side and slide the assembly into the axle until the threads are visible inside the disco orifice. I then place a new seal on the threads inside the orifice followed by the old seal (and associated washers), then the large steel disc and finally, the hex nut. With the plywood on the other end of the press I tighten the outer hex nut until the wood is seated flat against the hub carrier. From there it's just a matter of slowly tightening that outer hex bolt which evenly pulls the seal into the axle. There is an unmistakable "stop" when the seal is fully seated that you can feel when tightening the outer nut. Reverse the process to get the press out of the axle and you're done. It takes about 15 minutes, start to finish.
Overall view of the entire assembly.
The business end
The hub carrier seat
Exploded view of the seal end of the press
Last edited by F1Addict; 06-24-2014 at 09:40 PM.
04-12-2014, 05:18 PM
#74
CF Veteran
Join Date: Aug 2011
Location: Nor-Cal Coast
Posts: 10,489
Likes: 0
Received 18 Likes
on
18 Posts
Year: 90,84
Model: Cherokee
Engine: 4.0,2.5
Zat 3/8 all-thread? God I hate the idea of going back there. Looks very similar to what I did, but I didn't double nut to help hold the seal perpendicular to the shaft. Thanks! No rush here. Gonna check the juice and see if it's noticeably down one of these days. (got radial spin out lines inside the tire). This old girl with 279K and the uni-body crumbling, I'm trying to maintain it so in 2017, the whole thing falls apart all at once. Preferably on a Monday!
04-12-2014, 06:33 PM
#75
CF Veteran
Thread Starter
Zat 3/8 all-thread? God I hate the idea of going back there. Looks very similar to what I did, but I didn't double nut to help hold the seal perpendicular to the shaft. Thanks! No rush here. Gonna check the juice and see if it's noticeably down one of these days. (got radial spin out lines inside the tire). This old girl with 279K and the uni-body crumbling, I'm trying to maintain it so in 2017, the whole thing falls apart all at once. Preferably on a Monday!
I'm pretty sure it's 3/8ths but don't remember for sure.