When you click on links to various merchants on this site and make a purchase, this can result in this site earning a commission. Affiliate programs and affiliations include, but are not limited to, the eBay Partner Network.
Stock XJ Cherokee Tech. All XJ Non-modified/stock questions go hereXJ (84-01)
All OEM related XJ specific tech. Examples, no start, general maintenance or anything that's stock.
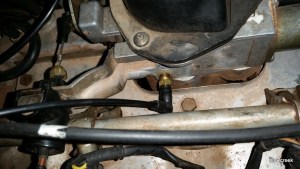
This is on a 1989 Cherokee 4.0L auto transmission. Can someone tell me what the side rubber plug with a small diameter line is for? This is facing toward the passenger side mid level towards the rear of the throttle body. Also there is a torx screw plug on the opposite side in the center? I have removed the throttle body for cleaning and I am not sure if I might have a vacuum leak causing a high idle problem. Thanks for your help...
There should be a tube running from the throttle body to the MAP sensor. Not sure about that torx screw. Screw might be the thottle body adjustment, maybe? See post #3 for the tube im talking about.
Thank you... Yes that is it... MAP sensor tube.I also found out about the torx screw. It is a throttle plate adjustment... So now I just have to find another "o" ring for my IAC the new one that came with the sensor is to large to allow the sensor to seat. Guess it will be a trip to the parts store...
First off, that’s not an idle adjustment screw. It’s a throttle butterfly stop screw. It’s purpose is to allow the butterfly to be as close to completely closed as it can be without binding or wearing into the throttle body. It was never intended to be adjusted in the field. But, Uncle Bob didn’t know that, did he?
Engine off. Back off the butterfly stop screw with a 3/32″ allen wrench until the butterfly is completely closed. Now. turn the screw in until the FAINTEST movement of the butterfly opening is detected. If you have a .003″ feeler gauge, or something that thick as measured with a caliper, use that to set the clearance. We’re talking sticky note paper here.
This can be done more easily with the throttle body removed. If you remove the throttle body, be sure to replace the gasket underneath it after thoroughly cleaning the old one off.
Readjust your Throttle Position Sensor.
The Renix throttle bodies have a strange and failure prone connector on the side where the MAP supply originates and then runs up to the MAP sensor located on the firewall. This hose/pipe assembly is no longer available for purchase.
The real kicker here is how critical this line is in supplying the correct vacuum signal to the MAP, the most relied upon sensor for the ECU to read regarding air/fuel ratio. Any cracks, melted spots, or loose rubber connectors can cause major starting and driveability issues.
There’s a simple fix though. All that’s required is a 1/8” NPT tap, a new throttle body gasket ( Napa FPG 60742 ), a vacuum fitting (Napa 05703-B102), two vacuum elbows (Napa2-670), and a length of new plastic piping (Napa 2-672).
Remove the throttle body and take it to the workbench.
Using an oiled tap along with a driver, carefully thread the lower of the 2 holes of the throttle body where the old fitting was plugged in. Don’t go too deep. These are pipe threads.
Flush the hole with carb cleaner and inspect for any left over cuttings.
This is an excellent time to do a complete throttle body and IAC cleaning. See Tip 11.
Take the vacuum fitting (05703-B102 ) and apply a LITTLE bit of thread sealer on the threads only. I prefer Permatex #2 but almost anything is fine.
.
Carefully screw the fitting in until snug.
Install one of the vacuum elbows on the MAP sensor so it points toward the throttle body, and the other vacuum elbow on your new throttle body fitting so it points up to the MAP sensor.
Cut a length of the new plastic tubing (approximately 13 inches) to fit between the vacuum elbows and install it making sure there is enough slack for some engine movement. Route it according to the photo. We don’t want any rubbing or chafing with engine movement. Not a bad idea to use some contact cement or Gasga-Cinch sparingly on the tubing to elbow connectors.
Thank you so much for all the help and information. I did know about the throttle blade adjustment screw and the MAP sensor plug. The plug/screw still in question is this...
Idle air bleed. Usually has a plug over it.
Set the butterfly and get everything stabilized after a few starts. Then carefully back the Torx screw out a bit at a time.
1990 XJ - Mine had been set almost all the way out, clearly past the cap which was there. It was running rich so I turned it almost all the way in ~1/2 turn out. Exhaust at tailpipe is now much cleaner.
I was just wondering if the was an optimal setting.
1990 XJ - Mine had been set almost all the way out, clearly past the cap which was there. It was running rich so I turned it almost all the way in ~1/2 turn out. Exhaust at tailpipe is now much cleaner.
I was just wondering if the was an optimal setting.
Maybe there is now!! At least a good starting point. So, maybe one turn out?
How about attaching a vacuum gauge to a manifold source and adjusting that screw for the maximum reading? Maybe adjust it out 1/8th more after that. I still use that procedure for adjusting carbs.
Meanlemons.com, who bores both Renix and HO throttle bodies should do a sampling of how far the screws are out from bottom to give us a baseline.........

 12-16-2018, 06:09 PM