

 09-21-2015, 03:49 PM
Last edit by: IB Advertising
See related guides and technical advice from our community experts:
Browse all: General Overview
- Jeep Grand Cherokee WJ 1999 to 2004 Crash Test and Safety Ratings
Important Information to help you understand your Jeep Grand Cherokee.
Browse all: General Overview

XJ Ask the Question Thread
07-29-2013, 09:19 AM
Herp Derp Jerp
Join Date: Nov 2011
Location: Parham, ON
Posts: 18,251
Likes: 0
Received 13 Likes
on
12 Posts
Year: 1999
Model: Cherokee
Engine: 4.0L OBD-II
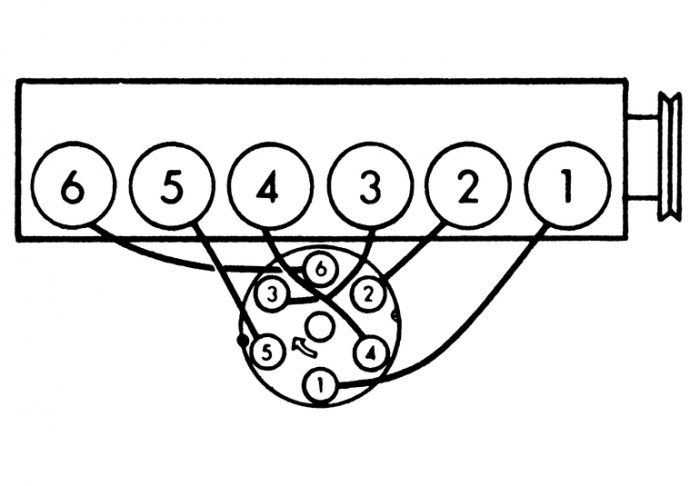
So I was planing on changeing my distributor cap, rotor, wires and plugs today but then I was looking up how to do the rotor/cap and it seams a bit more complacaited then I thought I tried to look up some how to's but couldnt find one that seamed to make sense I haven't done it before I'm kinda new to it I know little about mechanics but just got my jeep a few months ago
Thanks!
Thanks!
The only 'tricky' part I guess is remembering where all the wires go. My suggestion is to use a Sharpie to label the posts on the cap as you remove everything, set the new and old on a table and orient them identically, label the posts on the new one, and install it.
 07-29-2013, 09:38 AM
Moderator of Jeeps
Join Date: Jul 2011
Location: Frederick, MD from Cleveland, OH
Posts: 21,029
Likes: 0
Received 3 Likes
on
3 Posts
Year: 1993 YJ Wrangler
Engine: 4.0 I6
Nothing hard about the cap at all. Two screws off, two screws on. Rotor is keyed, can't screw it up.
The only 'tricky' part I guess is remembering where all the wires go. My suggestion is to use a Sharpie to label the posts on the cap as you remove everything, set the new and old on a table and orient them identically, label the posts on the new one, and install it.
07-29-2013, 09:49 AM
CF Veteran
Join Date: Feb 2012
Location: Kansas
Posts: 2,652
Likes: 0
Received 2 Likes
on
2 Posts
Year: 1994
Model: Cherokee
Engine: 190-hp, 4.0-liter I-6
Tap the muffler with a mallet. Only tap the front of the muffler, or the inlet side. Tap to the left and right of the inlet, back and forth. If its mega clamped on your going to have to cut it. I removed my stock muffler because the rocks had gotten to it. Ordered a $35 cherry bomb glasspack and it takes up a lot less room and sounds mean. Thats with a high flow cat however. I did the same muffler/cat combo on my friends xj except his doesnt have a tailpipe and is pretty darn loud. In a good way.
07-29-2013, 10:00 AM
Member
Join Date: Jun 2013
Location: middlebury vt
Posts: 107
Likes: 0
Received 0 Likes
on
0 Posts
Year: 1996
Model: Cherokee
Engine: 4.0 6cyl
Nothing hard about the cap at all. Two screws off, two screws on. Rotor is keyed, can't screw it up.
The only 'tricky' part I guess is remembering where all the wires go. My suggestion is to use a Sharpie to label the posts on the cap as you remove everything, set the new and old on a table and orient them identically, label the posts on the new one, and install it.
The only 'tricky' part I guess is remembering where all the wires go. My suggestion is to use a Sharpie to label the posts on the cap as you remove everything, set the new and old on a table and orient them identically, label the posts on the new one, and install it.
Okay thanks! I thought you could mess up the rotor like that it had to go in just the right way. Thats a good idea Thanks again!
07-29-2013, 10:03 AM
Member
Join Date: Jun 2013
Location: middlebury vt
Posts: 107
Likes: 0
Received 0 Likes
on
0 Posts
Year: 1996
Model: Cherokee
Engine: 4.0 6cyl
07-29-2013, 10:06 AM
Junior Member
 07-29-2013, 10:28 AM
Moderator of Jeeps
Join Date: Jul 2011
Location: Frederick, MD from Cleveland, OH
Posts: 21,029
Likes: 0
Received 3 Likes
on
3 Posts
Year: 1993 YJ Wrangler
Engine: 4.0 I6
07-29-2013, 10:31 AM
Member
Join Date: Jun 2013
Location: middlebury vt
Posts: 107
Likes: 0
Received 0 Likes
on
0 Posts
Year: 1996
Model: Cherokee
Engine: 4.0 6cyl
Is that the one from the wayne man book? (I think I spelled it wrong) I heard that that one had the screws wrong and so it had you doing it out of order?
Here's one that I was told was correct I don't know thats way I am asking also its my daily driver so I cant really do it wrong
Here's one that I was told was correct I don't know thats way I am asking also its my daily driver so I cant really do it wrong
07-29-2013, 10:42 AM
Member
Join Date: Jun 2013
Location: middlebury vt
Posts: 107
Likes: 0
Received 0 Likes
on
0 Posts
Year: 1996
Model: Cherokee
Engine: 4.0 6cyl
 07-29-2013, 11:31 AM
Member
Join Date: Jan 2013
Location: hambleton, wv
Posts: 126
Likes: 0
Received 0 Likes
on
0 Posts
Year: 1997
Model: Cherokee
Engine: 4.0
Well... On my 97 xj 3 in on 31s, I put new front brakes and calipers, rear brakes new fluid took rotors and a drum off my other jeep to put on it and we blead the brakes over and over and they still go to the floor. So my question is why do they still have little pressure and prettying no brakes?
07-29-2013, 11:40 AM
Seasoned Member

Join Date: May 2012
Location: Ware Shoals, SC
Posts: 436
Likes: 0
Received 0 Likes
on
0 Posts
Year: 1993
Model: Cherokee
Engine: 4.0L
Well... On my 97 xj 3 in on 31s, I put new front brakes and calipers, rear brakes new fluid took rotors and a drum off my other jeep to put on it and we blead the brakes over and over and they still go to the floor. So my question is why do they still have little pressure and prettying no brakes?
07-29-2013, 12:31 PM
CF Veteran
Join Date: Sep 2010
Location: Mercer County, NJ
Posts: 12,692
Likes: 0
Received 4 Likes
on
4 Posts
Year: 2001
Model: Cherokee
Engine: 4.0L I6 HO
Well... On my 97 xj 3 in on 31s, I put new front brakes and calipers, rear brakes new fluid took rotors and a drum off my other jeep to put on it and we blead the brakes over and over and they still go to the floor. So my question is why do they still have little pressure and prettying no brakes?
07-29-2013, 12:37 PM
CF Veteran
Join Date: May 2011
Location: Glendale,Az
Posts: 1,458
Likes: 0
Received 2 Likes
on
2 Posts
Year: 1990
Model: Cherokee
Engine: 4.0l 6Cyl
Well... On my 97 xj 3 in on 31s, I put new front brakes and calipers, rear brakes new fluid took rotors and a drum off my other jeep to put on it and we blead the brakes over and over and they still go to the floor. So my question is why do they still have little pressure and prettying no brakes?
Make sure breaks are adjusted properly.
Make sure there is no air in the lines.
If it still does not hold pressure and it barely did before I'd assume the master cylinder is bad.
I recently had this issue with mine and after replacing everything re bleeding and adjusting. I ended up swapping the master and it works way better than before. Much firmer pedal.
07-29-2013, 02:32 PM
CF Veteran
Join Date: Aug 2010
Location: The Florida State University
Posts: 8,387
Likes: 0
Received 1 Like
on
1 Post
Year: 2001
Model: Cherokee
Engine: I-6 4.0 L
Installing bumper tomorrow. It ties in to the steering box on the driver side and the same layout of holes on the passenger side. So it adds 3 extra bolts per side. However my oem bumper is missing one bolt per side. Does anyone have the bolt size for the oem bumper brackets or should I buy more? Additionally, can I re use the steering box bolts or do I need new ones? Do I need the same size bolts for the passenger side as well? What size are the steering box bolts?
All for an 01 XJ. 10 points for whoever answers this one.
All for an 01 XJ. 10 points for whoever answers this one.
07-29-2013, 02:38 PM
CF Veteran
Join Date: Apr 2011
Location: Carrollton, GA
Posts: 14,553
Likes: 0
Received 1 Like
on
1 Post
Year: 1994
Model: Cherokee
Engine: Inline 6 4.0L High Output
Installing bumper tomorrow. It ties in to the steering box on the driver side and the same layout of holes on the passenger side. So it adds 3 extra bolts per side. However my oem bumper is missing one bolt per side. Does anyone have the bolt size for the oem bumper brackets or should I buy more? Additionally, can I re use the steering box bolts or do I need new ones? Do I need the same size bolts for the passenger side as well? What size are the steering box bolts?
All for an 01 XJ. 10 points for whoever answers this one.
All for an 01 XJ. 10 points for whoever answers this one.
Passenger side: same, 3.5" long (3)
Grade 8 7/16 washers (9)
Grade 8 7/16 lock washer (3)
Grade 8 7/16 14 nut (3)
Bumper bolts are M10x1.5mm. Pick whatever length you want. The two on top of each other up front new washers and nuts. The third hole on each side threads into a weld but in the body.