

 09-21-2015, 03:49 PM
Last edit by: IB Advertising
See related guides and technical advice from our community experts:
Browse all: General Overview
- Jeep Grand Cherokee WJ 1999 to 2004 Crash Test and Safety Ratings
Important Information to help you understand your Jeep Grand Cherokee.
Browse all: General Overview

XJ Ask the Question Thread
01-09-2015, 07:01 AM
CF Veteran
Join Date: Mar 2010
Location: Broward County Fl.
Posts: 47,923
Likes: 0
Received 29 Likes
on
28 Posts
Year: 1989 xj sport 2dr
Model: Cherokee
Engine: 12 hole bosch Injectors
 01-09-2015, 07:08 AM
::CF Moderator::
Join Date: Aug 2011
Location: Prescott, Az
Posts: 43,971
Received 1,559 Likes
on
1,263 Posts
Year: 1990
Model: Cherokee (XJ)
Engine: 4.0
01-09-2015, 07:10 AM
Herp Derp Jerp
Join Date: Nov 2011
Location: Parham, ON
Posts: 18,251
Likes: 0
Received 13 Likes
on
12 Posts
Year: 1999
Model: Cherokee
Engine: 4.0L OBD-II
01-09-2015, 07:11 AM
CF Veteran
Join Date: Mar 2010
Location: Broward County Fl.
Posts: 47,923
Likes: 0
Received 29 Likes
on
28 Posts
Year: 1989 xj sport 2dr
Model: Cherokee
Engine: 12 hole bosch Injectors
01-09-2015, 07:13 AM
::CF Moderator::
Join Date: Aug 2011
Location: Prescott, Az
Posts: 43,971
Received 1,559 Likes
on
1,263 Posts
Year: 1990
Model: Cherokee (XJ)
Engine: 4.0
This help....http://www.toobigforemail.com/
But, I happen to have my own personal IT specialist on retainer. His name is Ross.
01-09-2015, 07:15 AM
::CF Moderator::
Join Date: Aug 2011
Location: Prescott, Az
Posts: 43,971
Received 1,559 Likes
on
1,263 Posts
Year: 1990
Model: Cherokee (XJ)
Engine: 4.0
01-09-2015, 07:18 AM
CF Veteran

Join Date: Nov 2013
Location: Wetumpka, AL
Posts: 1,347
Likes: 0
Received 0 Likes
on
0 Posts
Year: 1987
Model: Cherokee
Engine: 4.0
Question: are the 4 relays together under the hood on a renix 4.0 the same? I'm gonna clean up my wiring in the area (complete birds nest at the starter relay) and wanted to replace them since the did have some corrosion. I know they are the same type...but is the amperage the same?
01-09-2015, 07:19 AM
::CF Moderator::
Join Date: Aug 2011
Location: Prescott, Az
Posts: 43,971
Received 1,559 Likes
on
1,263 Posts
Year: 1990
Model: Cherokee (XJ)
Engine: 4.0
Getting an early start today huh Pete....
Question: are the 4 relays together under the hood on a renix 4.0 the same? I'm gonna clean up my wiring in the area (complete birds nest at the starter relay) and wanted to replace them since the did have some corrosion. I know they are the same type...but is the amperage the same?
Question: are the 4 relays together under the hood on a renix 4.0 the same? I'm gonna clean up my wiring in the area (complete birds nest at the starter relay) and wanted to replace them since the did have some corrosion. I know they are the same type...but is the amperage the same?
01-09-2015, 09:56 AM
Herp Derp Jerp
Join Date: Nov 2011
Location: Parham, ON
Posts: 18,251
Likes: 0
Received 13 Likes
on
12 Posts
Year: 1999
Model: Cherokee
Engine: 4.0L OBD-II
01-09-2015, 12:35 PM
Senior Member
Join Date: Feb 2014
Location: Minnesota
Posts: 854
Likes: 0
Received 1 Like
on
1 Post
Year: 1996
Model: Cherokee
Engine: 4.0
01-09-2015, 02:36 PM
Herp Derp Jerp
Join Date: Nov 2011
Location: Parham, ON
Posts: 18,251
Likes: 0
Received 13 Likes
on
12 Posts
Year: 1999
Model: Cherokee
Engine: 4.0L OBD-II
Booster Push Rod Adjustment
The Booster Push Rod projects from the front of the Brake Booster and activates the master cylinder. The push rod is adjustable and the clearance must be checked any time the master cylinder or booster is replaced. This is required to ensure the correct gap between the master cylinder piston and the booster push rod.
Problems can occur if the push rod is improperly adjusted:
- If the gap is too small, it may cause brake drag and premature brake wear.
- If the gap is too large, it may cause brake delay and reduced pedal reserve distance.
- Check the brake pedal freeplay to ensure the booster is not partially applied.
- Make the adjustment with the engine running to ensure the booster has vacuum. The booster body will change shape when a vacuum is applied and may reduce the clearance.
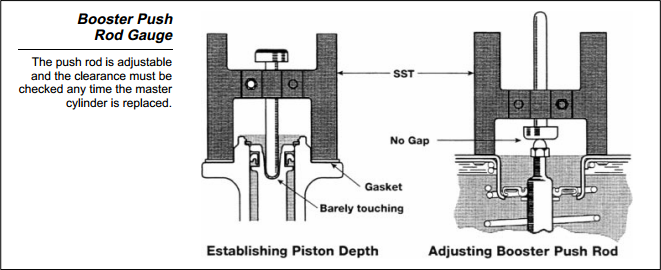
Adjusting Procedure:
- Place a new gasket on the flange of the master cylinder. Set the push rod gauge over the end of the master cylinder with the rounded end of the tool plunger toward the piston.
- Push the plunger down until it just touches the bottom of the piston bore.
- Turn the gauge over and set the flat plunger end of the gauge on the booster and over the push rod. There should be no clearance between the booster push rod and the plunger.
- Adjust the booster push rod if necessary. (If the brake pedal is depressed to expose the adjustment nut, be sure to start the engine before checking the adjusted clearance.)
Alternate Method for Booster Adjustment
The preferred method of adjustment is the Booster Push Rod Gauge procedure just described. If the special service tool is not available the measurement procedure described here can be used to ensure a calculated clearance prior to installation of the master cylinder.
In this procedure, measure the distance between the bottom of the bore in the master cylinder primary piston to the top of the flange gasket using a depth micrometer or vernier caliper.
- Measure from the rim of the cylinder bore to the new gasket on the flange, measurement "A".
- Measure from the rim of the cylinder bore to the bottom of the bore in the primary piston, measurement "B".
- Subtracting "A" from "B" will give the depth of the piston bore from the master cylinder flange gasket, measurement "C".
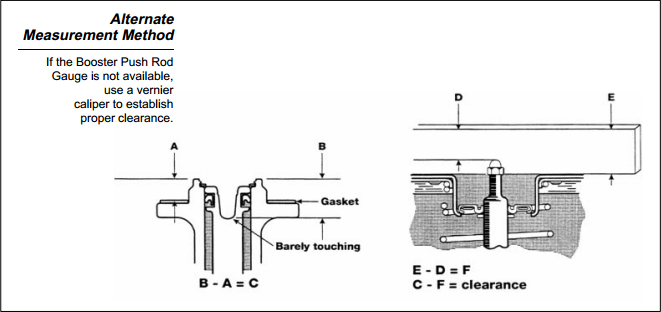
Next, measure the height of the booster push rod.
- Place a precision straight edge across the face of the booster body adjacent to the push rod.
- Measure from the top of the straight edge to the top of the push rod, measurement "D".
- Measure the width of the straight edge. (Measurement "E")
- Subtracting measurement "D" from "E" will give the height of the push rod, measurement "F".
- Clearance is determined by subtracting "F" from "C".
- Adjust the push rod to obtain approximately 0.1 mm to 0.5 mm clearance.
01-09-2015, 02:39 PM
Herp Derp Jerp
Join Date: Nov 2011
Location: Parham, ON
Posts: 18,251
Likes: 0
Received 13 Likes
on
12 Posts
Year: 1999
Model: Cherokee
Engine: 4.0L OBD-II

It was fine. Light fluffy stuff, sun was out and felt like only -5�C or so. Too lazy to convert, that's roughly 20�F I guess. Did most of it with no toque or coat.
01-09-2015, 04:10 PM
Junior Member

Join Date: Jan 2014
Location: Maui
Posts: 49
Likes: 0
Received 0 Likes
on
0 Posts
Year: 1999
Model: Cherokee
Engine: 4.0
This weekend I'm installing a couple Spicer X series u-joints on my 99 XJ. How often will these need to be greased? Also, would just standard suspension grease be what I use?
01-09-2015, 04:31 PM
Senior Member
Join Date: Feb 2014
Location: Minnesota
Posts: 854
Likes: 0
Received 1 Like
on
1 Post
Year: 1996
Model: Cherokee
Engine: 4.0
About 9" in most places. Tons of drifts, nothing less than 6". Went outside to shovel, came back in after 10 minutes, and I hear "How bad is it out there?" "Well I just got the landing in front of the door done. Next I'm doing the steps." "Guess you want some help huh?"
It was fine. Light fluffy stuff, sun was out and felt like only -5�C or so. Too lazy to convert, that's roughly 20�F I guess. Did most of it with no toque or coat.
I wish i could get some help shoveling

But my wife is carrying my child, so i guess i can't complain too much haha