
'99 "The Jeep"
 02-21-2012, 02:07 PM
#1
CF Veteran
Thread Starter
Join Date: Jan 2010
Location: Virginia Beach by way of Michigan
Posts: 5,482
Likes: 0
Received 25 Likes
on
25 Posts
This build thread has been a long time coming and I've had a few ask for it so here it is....
May 13, 2008 - Gave in to 18 years of cravings and bought my first Jeep. Thus, my addiction started. Couldn't think of a name so I went with what sounded pretty good at the time - "The Jeep" - and it stuck. I know, it's a lame name, but everyone's called it "The Jeep" for so long that I can't change it now - read enough of this thread and you'll discover it changed. Then I got sick of it and changed it back. Once it has a name it stays. Even if it's a lame name.
Bone stock
4.0 w/113k
AW4
NP 231
D30/8.25 axles w/ 3.55 gears

Immediately discovered that a stock Jeep, though capable, can only do so much


Grabbed a set of 30" BFG A/T's and some Canyons off a ZJ at the JY. Traded my old rims and tires for a roof rack and lights. Also added a set of window vents.

Decided to take her out for a little trip with one of my buds and let her hit some trails for the first time.


That's when I realized I was going to need recovery points, armor, more clearance, and of course a bunch of other stuff that many people (non-Jeep owners) see as completely useless. The addiction was well set in and no cure was in sight, nor was one sought for.
May 13, 2008 - Gave in to 18 years of cravings and bought my first Jeep. Thus, my addiction started. Couldn't think of a name so I went with what sounded pretty good at the time - "The Jeep" - and it stuck. I know, it's a lame name, but everyone's called it "The Jeep" for so long that I can't change it now - read enough of this thread and you'll discover it changed. Then I got sick of it and changed it back. Once it has a name it stays. Even if it's a lame name.
Bone stock
4.0 w/113k
AW4
NP 231
D30/8.25 axles w/ 3.55 gears
Immediately discovered that a stock Jeep, though capable, can only do so much
Grabbed a set of 30" BFG A/T's and some Canyons off a ZJ at the JY. Traded my old rims and tires for a roof rack and lights. Also added a set of window vents.
Decided to take her out for a little trip with one of my buds and let her hit some trails for the first time.
That's when I realized I was going to need recovery points, armor, more clearance, and of course a bunch of other stuff that many people (non-Jeep owners) see as completely useless. The addiction was well set in and no cure was in sight, nor was one sought for.
Last edited by no rdplz; 08-07-2014 at 03:49 PM.
 02-21-2012, 02:19 PM
#2
CF Veteran
Thread Starter
Join Date: Jan 2010
Location: Virginia Beach by way of Michigan
Posts: 5,482
Likes: 0
Received 25 Likes
on
25 Posts
Buddy of mine hooked me up with a free hitch, so I at least had something on the rear for recovery

Another friend was getting rid of his XJ and sold me his front brush guard


After a year of owning The Jeep, I finally saved up enough for my lift - Rusty's Offroad 3" Spring Pack. It's honestly not a bad lift, but I wish I would've waited a little longer and gone a better route (read Long Arms).


Little odds and ends got done - 4x4 badges from a 89 Laredo to replace the crappy sticker ones, repainted the bumper caps and door trim, traded my 30's for 31's, air intake off Craigslist, 48" Hi-lift, blah, blah, blah.
 12462_666938153988_5213162_n.jpg?t=1407444336
12462_666938178938_658022_n.jpg?t=140744433612462_666938183928_1844929_n.jpg?t=1407444336


Next big item was the Tailbone system from Detours. If you want a spare tire carrier and can't build/afford a new rear bumper with a carrier, this is the way to go. It's a great set up and I recommend it to anyone. One nice thing about the Tailbone is that you get rear d-ring recovery points
The Before:

The Process:

And the Finished Product:

Another friend was getting rid of his XJ and sold me his front brush guard
After a year of owning The Jeep, I finally saved up enough for my lift - Rusty's Offroad 3" Spring Pack. It's honestly not a bad lift, but I wish I would've waited a little longer and gone a better route (read Long Arms).
Little odds and ends got done - 4x4 badges from a 89 Laredo to replace the crappy sticker ones, repainted the bumper caps and door trim, traded my 30's for 31's, air intake off Craigslist, 48" Hi-lift, blah, blah, blah.
12462_666938153988_5213162_n.jpg?t=140744433612462_666938178938_658022_n.jpg?t=140744433612462_666938183928_1844929_n.jpg?t=1407444336
Next big item was the Tailbone system from Detours. If you want a spare tire carrier and can't build/afford a new rear bumper with a carrier, this is the way to go. It's a great set up and I recommend it to anyone. One nice thing about the Tailbone is that you get rear d-ring recovery points
The Before:
The Process:
And the Finished Product:
Last edited by no rdplz; 08-07-2014 at 03:53 PM.
The following users liked this post:
AudioFreq (04-19-2020)
02-21-2012, 02:50 PM
#3
CF Veteran
Thread Starter
Join Date: Jan 2010
Location: Virginia Beach by way of Michigan
Posts: 5,482
Likes: 0
Received 25 Likes
on
25 Posts
Tried the "Niteshades" thing on the taillights and front markers and I can honestly say it's a total waste of time. After 3 months of Virginia Beach summer I had to do it again because it faded. That was with proper wet-sanding before, between coats (3), and between clear-coats (2). If it works for you, great. For me, it ain't worth it and in hindsight it looks kinda gay. I'm glad I don't have it anymore.

Next up, I wanted to help my under-hood temps while wheeling and decided on homebrew hood vents. (thanks to MrJCRod for the template design) Stole the design off of here, bought some black door trim from AutoZone, got a Marine buddy to hook me up with the filter screens from an F-18 engine he was rebuilding, and made my hood vents.


While doing the vents, I also did the 784 injector swap.
Decided it was time for some more serious changes to take place. I sold the brush guard and lights on it so I could have some money to build a new front bumper. I also decided to remove the door trim and paint the lower doors and rocker panels black. While I was at it I trimmed the fenders as well as the front and rear bumper caps.


IMG_0368.jpg?t=1329858152
Got a set of JKS Quicker Disconnects off a member here. Also added YJ front lines and extended bump stops.
IMG_0369.jpg?t=1329857180
Got sick of not having any door pockets, so I snagged a couple rear nets off of 2 early-mid 90's ext. cab rangers at the JY. They work pretty well.
IMG_0365.jpg?t=1329857409
Next up, I wanted to help my under-hood temps while wheeling and decided on homebrew hood vents. (thanks to MrJCRod for the template design) Stole the design off of here, bought some black door trim from AutoZone, got a Marine buddy to hook me up with the filter screens from an F-18 engine he was rebuilding, and made my hood vents.
While doing the vents, I also did the 784 injector swap.
Decided it was time for some more serious changes to take place. I sold the brush guard and lights on it so I could have some money to build a new front bumper. I also decided to remove the door trim and paint the lower doors and rocker panels black. While I was at it I trimmed the fenders as well as the front and rear bumper caps.
IMG_0368.jpg?t=1329858152
Got a set of JKS Quicker Disconnects off a member here. Also added YJ front lines and extended bump stops.
IMG_0369.jpg?t=1329857180
Got sick of not having any door pockets, so I snagged a couple rear nets off of 2 early-mid 90's ext. cab rangers at the JY. They work pretty well.
IMG_0365.jpg?t=1329857409
Last edited by no rdplz; 07-25-2013 at 08:28 AM.
02-21-2012, 03:17 PM
#4
CF Veteran
Thread Starter
Join Date: Jan 2010
Location: Virginia Beach by way of Michigan
Posts: 5,482
Likes: 0
Received 25 Likes
on
25 Posts
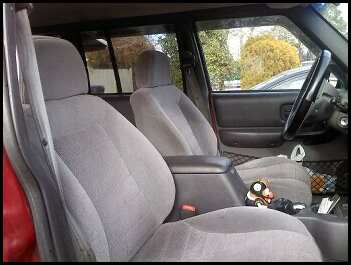
Swapped out the factory seats for those from a 98 ZJ.
Sold the roof rack for some extra funds and had to relocate the hi-lift. The Tailbone tire carrier works pretty well pulling double duty as a hi'lift carrier.
IMG_0360.jpg?t=1329858257
Got to visit my parents in Michigan for Christmas and spent a few hours each day using my dad's welder to build a new bumper.


Picked up a set of TJ flares for $50. I built the front bumper anticipating the TJ flares, so they line up really nicely with each other. Ran the lights from the factory side markers to the ones in the flares and painted the factory markers to match the body. At some point those will be sanded down and fiber-glassed over.

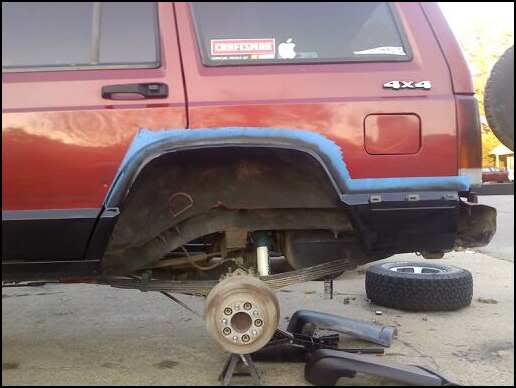
After building the bumper, I realized I wanted a little more lift so I put in some RC 1.5" coil spacers and some shackles off of a '90 MJ to bring it out to about 4.5" up front and 4" in the rear. Eventually 1.5" shackles will be put in to level it all out.
Wanted some different rims and ended up finding a set of MT Classic I's on CL so they replaced the Canyons. Didn't really care for the TJ flares extending all the way down to the rockers so i trimmed those to the body line.

Snagged an ARB snorkel off of Craigslist to replace the AIRAID intake. Now I don't have to worry about dunking the hood under water.

Added a few skids - front diff skid from Warn painted to match the body, a gas tank skid from a 93 XJ with a 16 gallon tank cut to fit my 99's 20 gal tank, and a t-case skid from a 96 ZJ.
251068_921531496888_4355435_n.jpg?t=1407444336248245_921531402078_3764117_n.jpg?t=1407444336
Sold the roof rack for some extra funds and had to relocate the hi-lift. The Tailbone tire carrier works pretty well pulling double duty as a hi'lift carrier.
IMG_0360.jpg?t=1329858257
Got to visit my parents in Michigan for Christmas and spent a few hours each day using my dad's welder to build a new bumper.
Picked up a set of TJ flares for $50. I built the front bumper anticipating the TJ flares, so they line up really nicely with each other. Ran the lights from the factory side markers to the ones in the flares and painted the factory markers to match the body. At some point those will be sanded down and fiber-glassed over.
After building the bumper, I realized I wanted a little more lift so I put in some RC 1.5" coil spacers and some shackles off of a '90 MJ to bring it out to about 4.5" up front and 4" in the rear. Eventually 1.5" shackles will be put in to level it all out.
Wanted some different rims and ended up finding a set of MT Classic I's on CL so they replaced the Canyons. Didn't really care for the TJ flares extending all the way down to the rockers so i trimmed those to the body line.
Snagged an ARB snorkel off of Craigslist to replace the AIRAID intake. Now I don't have to worry about dunking the hood under water.
Added a few skids - front diff skid from Warn painted to match the body, a gas tank skid from a 93 XJ with a 16 gallon tank cut to fit my 99's 20 gal tank, and a t-case skid from a 96 ZJ.
251068_921531496888_4355435_n.jpg?t=1407444336248245_921531402078_3764117_n.jpg?t=1407444336
Last edited by no rdplz; 08-30-2014 at 09:59 PM.
02-21-2012, 03:32 PM
#5
CF Veteran
Thread Starter
Join Date: Jan 2010
Location: Virginia Beach by way of Michigan
Posts: 5,482
Likes: 0
Received 25 Likes
on
25 Posts
The next "big" purchase was a winch - RS9500 with synthetic line from RC.

Picked up a cheapo Uniden CB from Radio Shack and a then a 4' Firestick off CL for next to nothing.

Added a pair of BAJA lights up top - Yay for WalMart and cheap prices! Also got a full length roof rail set up from Red82 to replace the stubby one that came stock.
IMG_0375.jpg?t=1329857696
Traded my 4 MT Classics and worn BFG's for 5 TJ Moabs w/ worn 31" Goodyear MTR's
IMG_0371.jpg?t=1329857750
Found a 8.25 with 4.56's and a locker already installed, as well as a rear diff guard so that and new rear brakes went in.
IMG_0374.jpg?t=1329857716
Started getting some serious death wobble issues, so I checked over everything and ended up having to replace the TRE's, ball joints (all 4), axle u-joints, trac-bar (went to a ProComp adj), lower arms (was still on stock LCA's and went with fixed RC's), and the steering box. Unfortunately the steering box is a stock one because all my money went to the other parts first.
Picked up a cheapo Uniden CB from Radio Shack and a then a 4' Firestick off CL for next to nothing.
Added a pair of BAJA lights up top - Yay for WalMart and cheap prices! Also got a full length roof rail set up from Red82 to replace the stubby one that came stock.
IMG_0375.jpg?t=1329857696
Traded my 4 MT Classics and worn BFG's for 5 TJ Moabs w/ worn 31" Goodyear MTR's
IMG_0371.jpg?t=1329857750
Found a 8.25 with 4.56's and a locker already installed, as well as a rear diff guard so that and new rear brakes went in.
IMG_0374.jpg?t=1329857716
Started getting some serious death wobble issues, so I checked over everything and ended up having to replace the TRE's, ball joints (all 4), axle u-joints, trac-bar (went to a ProComp adj), lower arms (was still on stock LCA's and went with fixed RC's), and the steering box. Unfortunately the steering box is a stock one
because all my money went to the other parts first.
Last edited by no rdplz; 08-30-2014 at 10:01 PM.
02-21-2012, 03:44 PM
#6
CF Veteran
Thread Starter
Join Date: Jan 2010
Location: Virginia Beach by way of Michigan
Posts: 5,482
Likes: 0
Received 25 Likes
on
25 Posts
The headliner was sagging so I decided to heck with a headliner at all. Pulled the whole thing out, trashed it and the front dome light, pulled a rearview mirror from a late 90's Pontiac with map lights, wired it into the existing XJ wiring, and used Undercoating on the roof so it's not bare metal. While I had everything out, I decided to upgrade the soundbar speakers to Sony 4-ways.
IMG_0364.jpg?t=1329860602
IMG_0363.jpg?t=1329860628
IMG_0364.jpg?t=1329860602
IMG_0363.jpg?t=1329860628
Last edited by no rdplz; 09-04-2012 at 03:11 PM.
02-21-2012, 08:08 PM
#8
CF Veteran
Join Date: Jun 2011
Location: S.E. Tx
Posts: 1,845
Likes: 0
Received 2 Likes
on
1 Post
Year: 1992
Model: Cherokee
Engine: 4.0 I6 firepower ignition, cat-back w/ magnaflow muffler, poweraid tb spacer, optima blue top
Well its about time you did this. Lookin good man, keep it up.
Lookin good man, keep it up.
02-24-2012, 12:26 PM
#9
Senior Member
Join Date: Dec 2008
Location: Gloucester Virginia
Posts: 584
Likes: 0
Received 2 Likes
on
2 Posts
Year: 2001
Model: Cherokee
Engine: 4.0 I6
Nice to see ya finally get it all up on a build thread, Love what ya have done with it.
Who did you get to regear the front? I wana try and regear before I hit OBX again (June).
Who did you get to regear the front? I wana try and regear before I hit OBX again (June).
02-24-2012, 04:44 PM
#12
CF Veteran
Thread Starter
Join Date: Jan 2010
Location: Virginia Beach by way of Michigan
Posts: 5,482
Likes: 0
Received 25 Likes
on
25 Posts
And thanks for all the compliments guys!

