When you click on links to various merchants on this site and make a purchase, this can result in this site earning a commission. Affiliate programs and affiliations include, but are not limited to, the eBay Partner Network.
I just went through my pics but I don't have any of the area around the oil filter... I'll get you some pics from the top and bottom... I have my original shield and it was on the vehicle...But it was ripped and petrified.. It did keep the bottom of the engine and all the components relatively clean..
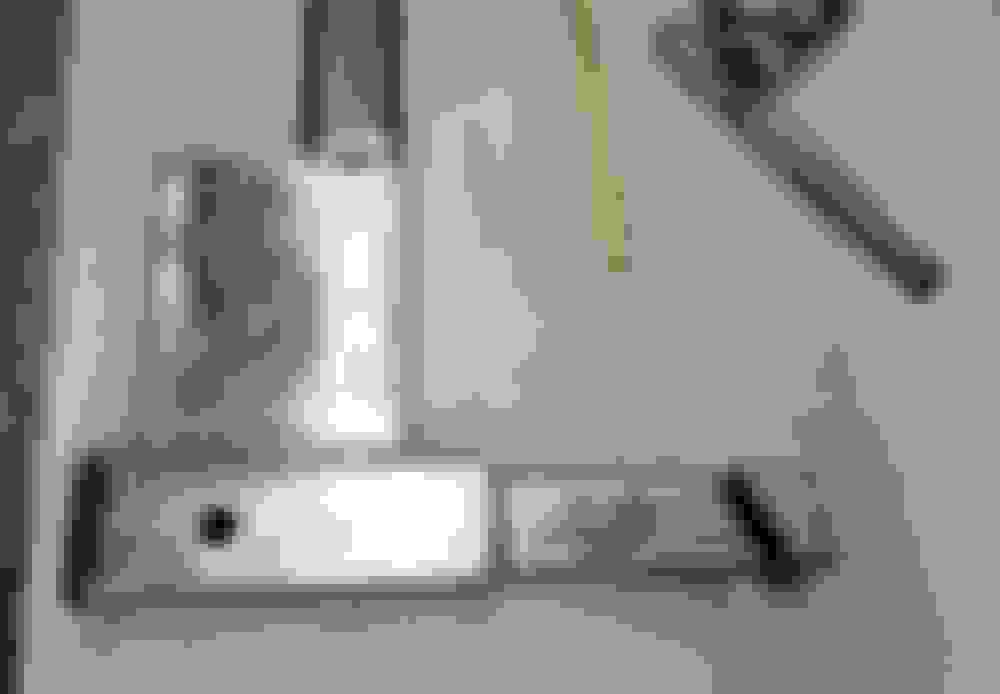
Do those shields interfere with changing the oil filter? My Jeep has the clips in place but no shield.
Never occurred to me to look cause I always take mine out from the top.
With a bunch of rags over the starter when I do.
Thinking getting doused in oil was the reason what I am guessing was the original starter crapped out prematurely IMO at about 150K.
Bought a new one so no core charge and kept it.
Came in handy when mocking up for the battery cables I made.
Do those shields interfere with changing the oil filter? My Jeep has the clips in place but no shield.
Here's the view you're looking for... Plenty of room to get it done...The shield stops in front of the oil pan sump.. Actually curls down a bit and appears to create some low pressure behind the engine to draw the air out...
Installed the fuel hose heat shield... Here's the final pic with the bed liner coating on both sides.. Hopefully rust won't be an issue in the future...
Amazing how fast it gets dusty... But anyhow, I wiped the dust until it goes out for a wash and added the 4.0 emblems...These are metal with a black inlay similar to the 4x4 emblems on the rear quarter...
I pulled the throttle body and gave it the once over...I was doing some other things and happened to crack the throttle open and it was much dirtier than I thought it would be for only 67000 miles... So a quick clean up of the body and the IAC... Then back on the vehicle... I left the TPS on there and carefully cleaned so I didn't need to reset it...That's about it for the "tune up" of the throttle body now...
Time for an update... It's out !!! I've been running it all weekend... I need to run and get some miles on it so it will pass emissions...
.Here's pics of it out in the sun....
Everything works great...No driveshaft vibrations at all...I started at 30 psi and did the chalk procedure to get the tread pattern just right with the highest psi...
Looks like 27 psi is the magic number....Handles great, tracks straight when you let go of the wheel and after a few adjustments the steering wheel is spot on center... I was wondering just how it was going to handle with all the mods and it couldn't be better !! All that fine tuning the suspension paid off... I bedded the brake pads within the first few miles and they work flawlessly....Oh, and I do feel more engine vibration with the brown dog motor mounts compared to the old mounts but it's very acceptable considering the upgrade...So I'll drive it all this week and it should be ready for inspection...Overall it's a big win !!
It's. so. beautiful! Like, seriously - it really is a work of art. I like how it has a mix of "period correct" flare and some modern offroad tech. You've got to share a video of the hood flaps working haha!
Thanks guys it feels good to be behind the wheel after all the work .......I'll get a video of the flaps in action for you Battle......Well, I put over 100 miles on it this past week pretty much running around and taking the long way here and there... It's now got the inspection and emission stickers on it and is back to being legal on the road...The garage gave me an emission exempt status on the testing {under 5000 miles a year} so it's basically a visual here in Pa ...I didn't think that would happen after a few years off the grid until the build was done...
Anyhow, a few things on the punch list got done.. The speedo was off due to changing out to the custom layout... I have a GPS app on my phone so I had the wife ride along and held a steady speed.. Then simply set the needle...Now it's spot on through the range of motion...The 4WD light doesn't come on when moving the transfer case lever...I'm going to test the wiring to ground to make sure all is good to the switch...I probably have too much sealer on the indicator switch when I assembled it.. No biggie.
.Other than that it's worked flawlessly and drives better than I expected.. I figured there would be a bunch of fine tuning the driveshafts etc... But it's all good even at high speeds...
Now that the main part of the build is complete it's time for a key part... The spare tire carrier...I'm going to follow the main idea but change a few things for my piece of mind using the 33 tire and the HELO custom rim... First up is fitting/welding the main post and what I'll call the inner sleeve...After careful measuring I tacked it all together...I cut a section of 2x6 channel and split it in half..This gives the inner sleeve a positive stop in the full upright position...I marked the flat area of the 2x2 upright and center punched for the 5/8 holes through it.....Also in this pic is the beginning of the receiver's anti-wobble clamp..It's precisely cut so the two pieces mate together...
The next two pics show more detail on the inner sleeve portion of the assembly in rough form....
That cowl hood is an incredible piece. You should be really proud of it!
The rest of the build matches the attention to detail you put there. Incredible work, I'm not surprised you have had no real issues on the test drives.
Now that the main part of the build is complete it's time for a key part... The spare tire carrier...I'm going to follow the main idea but change a few things for my piece of mind using the 33 tire and the HELO custom rim... First up is fitting/welding the main post and what I'll call the inner sleeve...After careful measuring I tacked it all together...I cut a section of 2x6 channel and split it in half..This gives the inner sleeve a positive stop in the full upright position...I marked the flat area of the 2x2 upright and center punched for the 5/8 holes through it.....Also in this pic is the beginning of the receiver's anti-wobble clamp..It's precisely cut so the two pieces mate together...
Your spare tire carrier is looking good. How do you plan to finish your anti-wobble clamp? If it helps, I welded a 1/2" couple nut into mine. I centred it with small scraps and then welded it in solid. You might be surprised by how well they work. I can jump up and down on mine and it does not budge.
I just saw your swing out tire carrier and fab skills in another thread.. Great work...It looks like you positioned it perfectly with the height and spacing for your wheel/rim combo...I'll get some pics of what I've got for the anti-wobble clamp but yes, it's a 1/2 inch set up for the task...I'm still in the fab process and haven't welded the components together yet.. I trial fitted the clamp and I don't have much room to the rear of the receiver because of the fuel tank skid...But there's just enough to make it happen..
Thanks. It was a fun project. I'm still working on the folding table and cook top but they're coming along.
Yes, things are bit tight for space on the back end. Some tighten their carriers up from the gas tank end but with an XJ OEM hitch it's a bit tight. I tighten mine from the back end of the vehicle through the 2" tube using a 1/2" drive ratchet with 2 extensions (15" in total). I insert the carrier and then a typical trailer lock pin to make sure everything is lined up. I then pull the pin, tighten the anti-wobble clamp bolt and reinsert the pin and lock it.
Here's a pic of mine. It's the same basic idea as what Rig'd has but theirs is made of a block of steel. As mentioned, I used a 1/2" couple nut for extra thread length. I built it as a test and figured I'd have a block properly machined later. It works fine and I'm happy with with it as is. I was worried that it might lock itself in place due to road salt, rust, etc. I just give it a squirt of Fluid Film now and then and it hasn't been a problem. Initially, I faithfully torqued it to 100 lbs. but I just guess at it now and it's been fine.

 01-22-2024 | 07:32 PM


 ...Well, I put over 100 miles on it this past week pretty much running around and taking the long way here and there... It's now got the inspection and emission stickers on it and is back to being legal on the road...The garage gave me an emission exempt status on the testing {under 5000 miles a year} so it's basically a visual here in Pa ...I didn't think that would happen after a few years off the grid until the build was done...


 How do you plan to finish your anti-wobble clamp? If it helps, I welded a 1/2" couple nut into mine. I centred it with small scraps and then welded it in solid. You might be surprised by how well they work. I can jump up and down on mine and it does not budge.