
Project Do work - 2001 XJ Build (Pic intensive)
 11-23-2010, 12:50 AM
#376
Member
Join Date: Dec 2009
Location: dfw
Posts: 182
Likes: 0
Received 0 Likes
on
0 Posts
Year: 1998
Model: Cherokee
Engine: 4.0
 11-23-2010, 01:44 AM
#377
CF Veteran
Join Date: Sep 2009
Location: Chesapeake, Virginia
Posts: 1,092
Likes: 0
Received 0 Likes
on
0 Posts
Year: 2002
Model: Grand Cherokee
Engine: 4.7
wow i just read the whole thing, looks amazing man, makes me wanna start over on mine and do a few things differently
11-23-2010, 02:42 PM
#378
Seasoned Member
Thread Starter
Join Date: May 2010
Location: Columbus, OH
Posts: 415
Likes: 0
Received 0 Likes
on
0 Posts
Year: 2001
Model: Cherokee
Engine: 4.0 I6
I drove the XJ into work this morning. Was doing about 75mph on the highway. The driveline is smooth as silk, so far so good.
11-25-2010, 09:58 AM
#379
Seasoned Member
Join Date: Aug 2010
Location: Grand Junction, CO
Posts: 330
Likes: 0
Received 0 Likes
on
0 Posts
Year: 1999
Model: Cherokee
Engine: 4.0L I-6
Very nice rig!
Did you ever get those rear fenders trimmed? I mean, your posts lack illustration and all, but I'll manage.
I was happy to see some pics of someone installing control arm drop brackets. When I said I was going to install a set a lot of people said that because I live in Crawlorado, as soon as they made it on my Jeep rocks were going to jump out of the woodwork and tear them off!
11-25-2010, 12:30 PM
#380
Seasoned Member
Thread Starter
Join Date: May 2010
Location: Columbus, OH
Posts: 415
Likes: 0
Received 0 Likes
on
0 Posts
Year: 2001
Model: Cherokee
Engine: 4.0 I6
Very nice rig!
Did you ever get those rear fenders trimmed? I mean, your posts lack illustration and all, but I'll manage.
I was happy to see some pics of someone installing control arm drop brackets. When I said I was going to install a set a lot of people said that because I live in Crawlorado, as soon as they made it on my Jeep rocks were going to jump out of the woodwork and tear them off!
No, the rear fenders aren't trimmed yet. Been real busy with work and stuff.
I love the control arm drop brackets. The additional flex is great and the ride quality is even better! I haven't done too much rock crawling but I hope to next time I'm out, we'll see how they work.
12-06-2010, 06:15 PM
#381
Seasoned Member
Thread Starter
Join Date: May 2010
Location: Columbus, OH
Posts: 415
Likes: 0
Received 0 Likes
on
0 Posts
Year: 2001
Model: Cherokee
Engine: 4.0 I6
Alright guys, working on some more odds and ends...
Ever since the removal of the transfer case drop kit which was removed after the SYE installation the XJ had developed a little front end vibration.
The vibration would only occur (or become noticeable) at highway speeds, 65mph+. It had a cyclic pattern to it and would increase in intensity and frequency with speed. One of the things I did in an attempt to locate the source of the vibration was to remove the front drive shaft. This completely resolved the issue and after a little internet research I was pretty confident that the front pinion angle was going to need some adjustment.
Similar to the rear axle, the front axle's pinion and drive shaft are also sensitive to driveline angles. However, unlike the rear axle, the front axle wasn't going to be as simple as tossing in a couple shims.
This is where those handy dandy adjustable control arms come into play. In order to point the front axle's pinion up towards the transfer case I would either have to shorten the lower control arms or increase the length of the upper control arms. I decided to fool around with the upper control arms since the LCA mounting slots at the frame side have a little room to wiggle and thus could've been an additional source for error.
Here's how I went about it....
First, a few measurements. With the vehicle on the ground I measured the front drive shaft angle @ 14 degrees from horizontal.

With the vehicle still on the ground but with the front drive shaft removed, I measured the front pinion at 90-84.5= 5.5 degrees from horizontal.
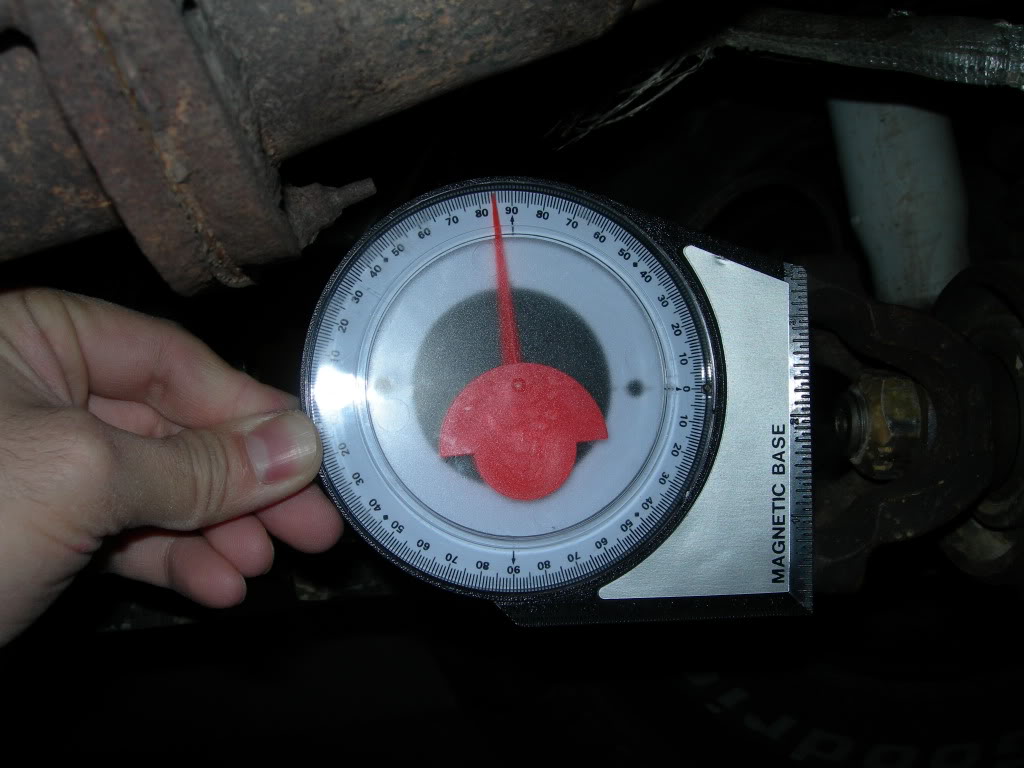
So, the difference between the front pinion and the drive shaft is 14-5.5= 8.5 degrees
After the measurements, I jacked up the XJ, placed it on jackstands and let the front axle droop a bit. I started with the passenger side first by removing the mounting bolt from its home in the Rough Country Control Arm Drop Bracket.
Here is a good pic of the outside of the UCA bolt, viewed from the passenger side:
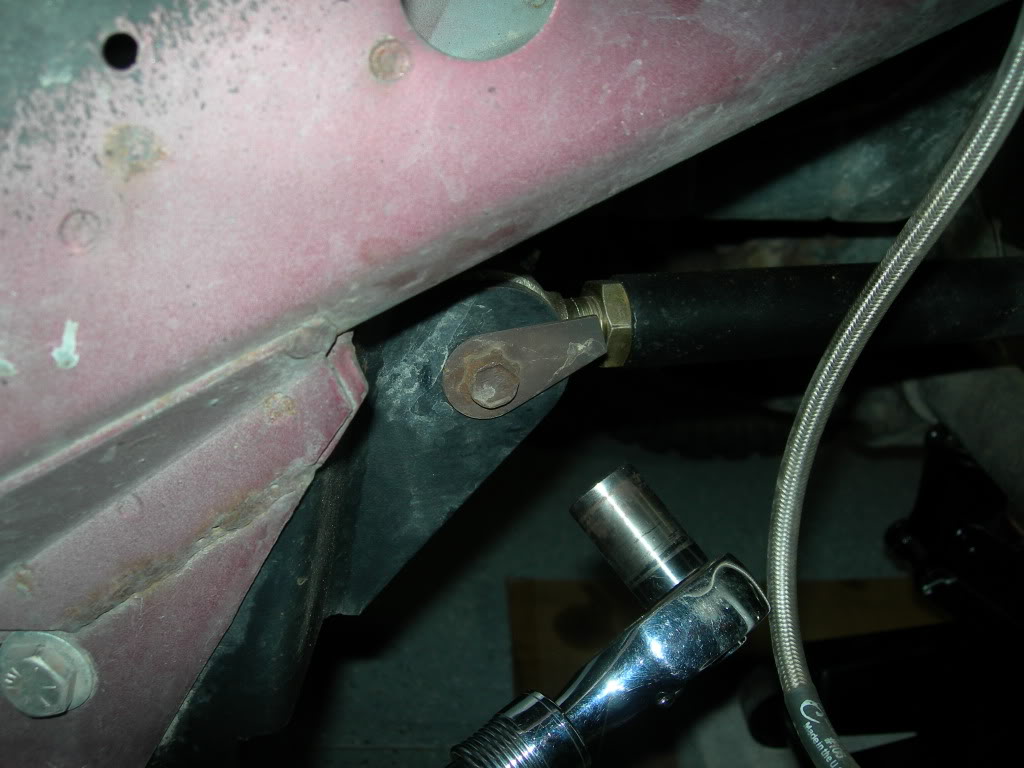
Here you can see both the UCA and LCA, but all were worried about here is the UCA's mounting bolt and nut:
Remove the nut:

With the nut removed, all you gotta do is slide the bolt out:

Once the bolts out, the UCA will come loose from the mounting location:

Ever since the removal of the transfer case drop kit which was removed after the SYE installation the XJ had developed a little front end vibration.
The vibration would only occur (or become noticeable) at highway speeds, 65mph+. It had a cyclic pattern to it and would increase in intensity and frequency with speed. One of the things I did in an attempt to locate the source of the vibration was to remove the front drive shaft. This completely resolved the issue and after a little internet research I was pretty confident that the front pinion angle was going to need some adjustment.
Similar to the rear axle, the front axle's pinion and drive shaft are also sensitive to driveline angles. However, unlike the rear axle, the front axle wasn't going to be as simple as tossing in a couple shims.
This is where those handy dandy adjustable control arms come into play. In order to point the front axle's pinion up towards the transfer case I would either have to shorten the lower control arms or increase the length of the upper control arms. I decided to fool around with the upper control arms since the LCA mounting slots at the frame side have a little room to wiggle and thus could've been an additional source for error.
Here's how I went about it....
First, a few measurements. With the vehicle on the ground I measured the front drive shaft angle @ 14 degrees from horizontal.
With the vehicle still on the ground but with the front drive shaft removed, I measured the front pinion at 90-84.5= 5.5 degrees from horizontal.
So, the difference between the front pinion and the drive shaft is 14-5.5= 8.5 degrees
After the measurements, I jacked up the XJ, placed it on jackstands and let the front axle droop a bit. I started with the passenger side first by removing the mounting bolt from its home in the Rough Country Control Arm Drop Bracket.
Here is a good pic of the outside of the UCA bolt, viewed from the passenger side:
Here you can see both the UCA and LCA, but all were worried about here is the UCA's mounting bolt and nut:
Remove the nut:
With the nut removed, all you gotta do is slide the bolt out:
Once the bolts out, the UCA will come loose from the mounting location:
12-06-2010, 06:19 PM
#382
Member

Join Date: Nov 2010
Posts: 116
Likes: 0
Received 0 Likes
on
0 Posts
Model: Cherokee
Alright guys, working on some more odds and ends...
Ever since the removal of the transfer case drop kit which was removed after the SYE installation the XJ had developed a little front end vibration.
The vibration would only occur (or become noticeable) at highway speeds, 65mph+. It had a cyclic pattern to it and would increase in intensity and frequency with speed. One of the things I did in an attempt to locate the source of the vibration was to remove the front drive shaft. This completely resolved the issue and after a little internet research I was pretty confident that the front pinion angle was going to need some adjustment.
Similar to the rear axle, the front axle's pinion and drive shaft are also sensitive to driveline angles. However, unlike the rear axle, the front axle wasn't going to be as simple as tossing in a couple shims.
This is where those handy dandy adjustable control arms come into play. In order to point the front axle's pinion up towards the transfer case I would either have to shorten the lower control arms or increase the length of the upper control arms. I decided to fool around with the upper control arms since the LCA mounting slots at the frame side have a little room to wiggle and thus could've been an additional source for error.
Here's how I went about it....
First, a few measurements. With the vehicle on the ground I measured the front drive shaft angle @ 14 degrees from horizontal.

With the vehicle still on the ground but with the front drive shaft removed, I measured the front pinion at 90-84.5= 5.5 degrees from horizontal.

So, the difference between the front pinion and the drive shaft is 14-5.5= 8.5 degrees
After the measurements, I jacked up the XJ, placed it on jackstands and let the front axle droop a bit. I started with the passenger side first by removing the mounting bolt from its home in the Rough Country Control Arm Drop Bracket.
Here is a good pic of the outside of the UCA bolt, viewed from the passenger side:

Here you can see both the UCA and LCA, but all were worried about here is the UCA's mounting bolt and nut:
Remove the nut:

With the nut removed, all you gotta do is slide the bolt out:

Once the bolts out, the UCA will come loose from the mounting location:

Ever since the removal of the transfer case drop kit which was removed after the SYE installation the XJ had developed a little front end vibration.
The vibration would only occur (or become noticeable) at highway speeds, 65mph+. It had a cyclic pattern to it and would increase in intensity and frequency with speed. One of the things I did in an attempt to locate the source of the vibration was to remove the front drive shaft. This completely resolved the issue and after a little internet research I was pretty confident that the front pinion angle was going to need some adjustment.
Similar to the rear axle, the front axle's pinion and drive shaft are also sensitive to driveline angles. However, unlike the rear axle, the front axle wasn't going to be as simple as tossing in a couple shims.
This is where those handy dandy adjustable control arms come into play. In order to point the front axle's pinion up towards the transfer case I would either have to shorten the lower control arms or increase the length of the upper control arms. I decided to fool around with the upper control arms since the LCA mounting slots at the frame side have a little room to wiggle and thus could've been an additional source for error.
Here's how I went about it....
First, a few measurements. With the vehicle on the ground I measured the front drive shaft angle @ 14 degrees from horizontal.
With the vehicle still on the ground but with the front drive shaft removed, I measured the front pinion at 90-84.5= 5.5 degrees from horizontal.
So, the difference between the front pinion and the drive shaft is 14-5.5= 8.5 degrees
After the measurements, I jacked up the XJ, placed it on jackstands and let the front axle droop a bit. I started with the passenger side first by removing the mounting bolt from its home in the Rough Country Control Arm Drop Bracket.
Here is a good pic of the outside of the UCA bolt, viewed from the passenger side:
Here you can see both the UCA and LCA, but all were worried about here is the UCA's mounting bolt and nut:
Remove the nut:
With the nut removed, all you gotta do is slide the bolt out:
Once the bolts out, the UCA will come loose from the mounting location:
12-06-2010, 06:31 PM
#383
Seasoned Member
Thread Starter
Join Date: May 2010
Location: Columbus, OH
Posts: 415
Likes: 0
Received 0 Likes
on
0 Posts
Year: 2001
Model: Cherokee
Engine: 4.0 I6
With the UCA free, it was time for an adjustment. But first, a litte measurement so that I would have something to compare to:
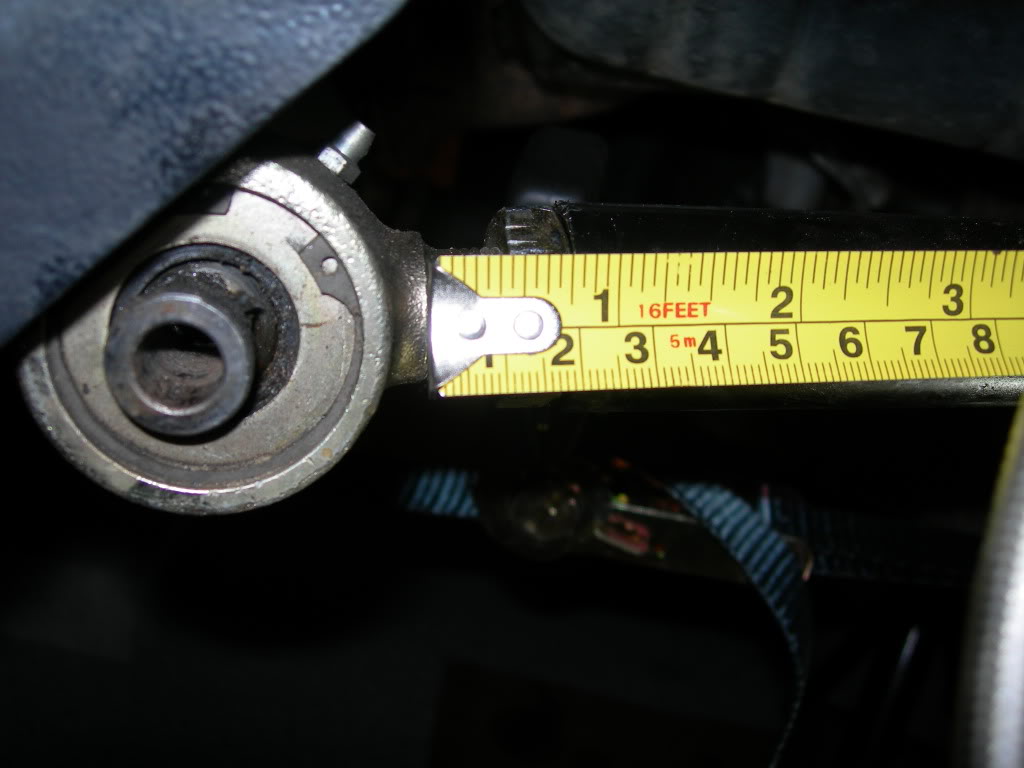
After the measuring it, I loosend the adjustment collar and lengthened the UCA by rotating it 4 times. I figured 4 times was a good place to start. Here's what it looked like after 4 rotations of lengthening:

4 rotations ended up getting me about a 1/4'' of increase in length. Now, you may be wondering how I came up with such an arbitrary number.... well, from what I've learned it's bascially a trial-and-error type of procedure because you essentially want to increase the pinion angle just enough to remove vibration while maintaining as much positive caster as possible. The idea is that you want to make your driveline angles happy with the proper pinion setting without sacrificing handling/steering characteristics by screwing around with the caster. So I picked 4 rotations to see where that got me and did that to both sides to keep things even.
Now, with the UCA adjusted it was time to remount the arm. After it was in place I took a picture of both the passenger and driver side UCA so you could see the difference.
Passenger (adjusted):
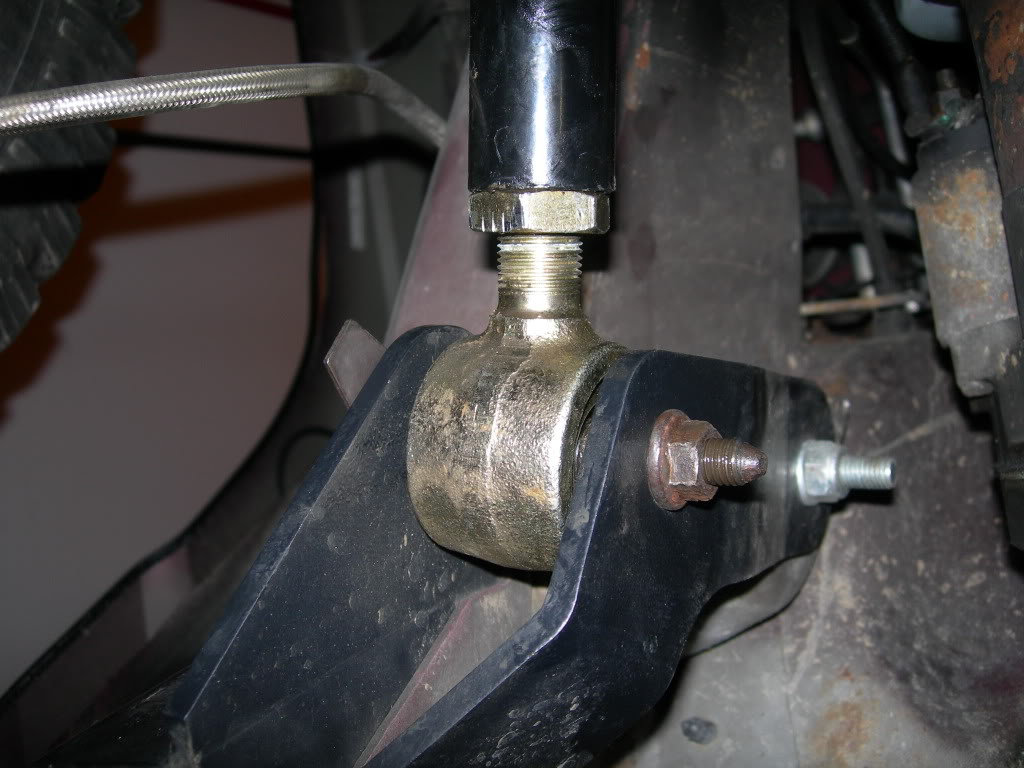
Driver (unadjusted):

After the measuring it, I loosend the adjustment collar and lengthened the UCA by rotating it 4 times. I figured 4 times was a good place to start. Here's what it looked like after 4 rotations of lengthening:
4 rotations ended up getting me about a 1/4'' of increase in length. Now, you may be wondering how I came up with such an arbitrary number.... well, from what I've learned it's bascially a trial-and-error type of procedure because you essentially want to increase the pinion angle just enough to remove vibration while maintaining as much positive caster as possible. The idea is that you want to make your driveline angles happy with the proper pinion setting without sacrificing handling/steering characteristics by screwing around with the caster. So I picked 4 rotations to see where that got me and did that to both sides to keep things even.
Now, with the UCA adjusted it was time to remount the arm. After it was in place I took a picture of both the passenger and driver side UCA so you could see the difference.
Passenger (adjusted):
Driver (unadjusted):
12-06-2010, 06:33 PM
#384
Seasoned Member
Thread Starter
Join Date: May 2010
Location: Columbus, OH
Posts: 415
Likes: 0
Received 0 Likes
on
0 Posts
Year: 2001
Model: Cherokee
Engine: 4.0 I6
Also, as a courtesy, could you please not quote all the pictures in your replies when possible? Not at all intending to be rude but my photobucket account uses up soooooooo much bandwidth that it usually shuts down about once per month haha. Otherwise, it's no big deal it's just that photobucket disables ALL of my images for that account when I exceed my monthly bandwidth allowance.... it sucks. Thanks bud.
Last edited by sanchezcruz_20; 12-06-2010 at 06:36 PM. Reason: Forgot
12-06-2010, 06:45 PM
#385
Seasoned Member
Thread Starter
Join Date: May 2010
Location: Columbus, OH
Posts: 415
Likes: 0
Received 0 Likes
on
0 Posts
Year: 2001
Model: Cherokee
Engine: 4.0 I6
After finishing up the passenge side, I moved onto the driver side UCA. It removed and adjusted with no problem, however it didn't want to line back up easily so I had to "sweet talk" it a little with my friend under the back seat:

Finally, with everything in place, I placed the XJ back on it's feet and took a couple more measurements.
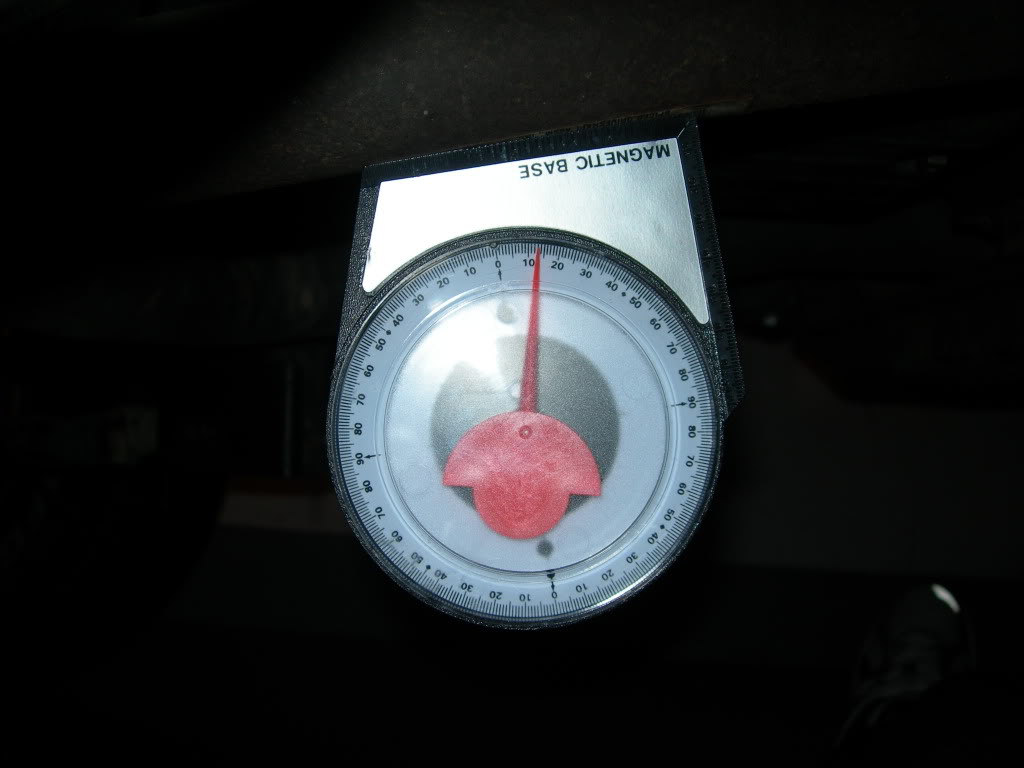
Adjusted pinion angle:

That reads 90-82.5= 7.5 degrees
Adjusted drive shaft angle:
That reads 13 degrees.
So, a little math would indicate that, 13-7.5= 5.5 degrees of separation between the newly adjusted pinion and drive shaft. If you recall, the original difference between these angles was 8.5 degrees, so I've reduced that angle by 3 degrees with essentially 4 rotations of the UCA's.
Now the question is, will that be enough to eliminate the driveline vibrations?
Test drive impressions to follow....
Finally, with everything in place, I placed the XJ back on it's feet and took a couple more measurements.
Adjusted pinion angle:
That reads 90-82.5= 7.5 degrees
Adjusted drive shaft angle:
That reads 13 degrees.
So, a little math would indicate that, 13-7.5= 5.5 degrees of separation between the newly adjusted pinion and drive shaft. If you recall, the original difference between these angles was 8.5 degrees, so I've reduced that angle by 3 degrees with essentially 4 rotations of the UCA's.
Now the question is, will that be enough to eliminate the driveline vibrations?
Test drive impressions to follow....
12-09-2010, 12:13 PM
#386
Seasoned Member
Thread Starter
Join Date: May 2010
Location: Columbus, OH
Posts: 415
Likes: 0
Received 0 Likes
on
0 Posts
Year: 2001
Model: Cherokee
Engine: 4.0 I6
Well, the verdict is..... there's still a little residual front end vibration. but, it's significantly reduced. In fact, it's to the point that a non-Jeep enthusiast probably wouldn't even notice it. Plus, it's really only an issue at 70mph+ so it's really not bad at all.
Essentially, 3 degrees almost got me there but I want it to be spot on so I'll try another adjustment, this time perhaps an additional 3 rotations of lengthening on the UCA's. 2 rotations just seems like it wouldn't be worth the trouble and since 4 almost got me there, 3 just seems like a good number. Again, it's kind of just a trial and error type of process anyway.
As far as the effects on steering and handling are concerned, there was no perceived change in that department so I'm assuming that my caster is still within a reasonable range. The XJ tracked straight down the highway at all speed ranges and I didn't notice anything crazy like bump steering or a wandering steering wheel. All appears to be good.
I'm hoping to do the second adjustment this weekend if time permits.
12-09-2010, 03:08 PM
#387
Senior Member
Join Date: Jan 2009
Location: Columbia, SC
Posts: 770
Likes: 0
Received 0 Likes
on
0 Posts
Year: 1999
Model: Cherokee
Engine: I6
i didnt want the thread to end, gah, did u ever cut and fold the rear? i did mine with an angle grinder and rubber mallet, took like ten mins a side if that
12-09-2010, 03:57 PM
#388
CF Veteran
Join Date: May 2010
Location: New Hampshire
Posts: 1,013
Likes: 0
Received 1 Like
on
1 Post
Year: 1997
Model: Grand Cherokee
Engine: 4.0
sweet build man. I like all the specifics, measurements and how clean you made the build. Nice details and pics!! 2 thumbs up from this guy
12-09-2010, 06:24 PM
#389
Member
Join Date: Nov 2010
Posts: 116
Likes: 0
Received 0 Likes
on
0 Posts
Model: Cherokee
Originally? As in how did I remove it from the factory mounting location or from the control arm drop bracket location?
Also, as a courtesy, could you please not quote all the pictures in your replies when possible? Not at all intending to be rude but my photobucket account uses up soooooooo much bandwidth that it usually shuts down about once per month haha. Otherwise, it's no big deal it's just that photobucket disables ALL of my images for that account when I exceed my monthly bandwidth allowance.... it sucks. Thanks bud.
Also, as a courtesy, could you please not quote all the pictures in your replies when possible? Not at all intending to be rude but my photobucket account uses up soooooooo much bandwidth that it usually shuts down about once per month haha. Otherwise, it's no big deal it's just that photobucket disables ALL of my images for that account when I exceed my monthly bandwidth allowance.... it sucks. Thanks bud.
12-09-2010, 06:45 PM
#390
Seasoned Member
Thread Starter
Join Date: May 2010
Location: Columbus, OH
Posts: 415
Likes: 0
Received 0 Likes
on
0 Posts
Year: 2001
Model: Cherokee
Engine: 4.0 I6

Thread ending? I don't think I'll ever run out of things to work on so I don't see that happening any time soon lol...
I had to get under the Jeep with some nice gloves and go to town on the wrench but the bolts eventually gave up.