
Project Do work - 2001 XJ Build (Pic intensive)
 11-22-2011, 02:08 PM
#706
Junior Member
Join Date: Feb 2011
Location: Denver, Co
Posts: 56
Likes: 0
Received 0 Likes
on
0 Posts
Year: 2001
Model: Cherokee
Engine: 4.0
Man this has been an epic build thread. So much information. Thank you again for documenting your build the way you did. It has and will come in very handy for a lot of people. Cant wait for until the next one.
 11-22-2011, 05:34 PM
#707
Member
Join Date: Mar 2009
Location: Punta Cana , Dominican Republic.
Posts: 249
Likes: 0
Received 1 Like
on
1 Post
Year: 1988
Model: Cherokee
Engine: 4d56td
jajaja , dont worry you sooner or later will get there , they even tell you that you love more the crappy jeep than her, and the most annoying thing for her is that you'll agree jajajaj
 11-22-2011, 06:05 PM
#708
Member
Join Date: Mar 2009
Location: Punta Cana , Dominican Republic.
Posts: 249
Likes: 0
Received 1 Like
on
1 Post
Year: 1988
Model: Cherokee
Engine: 4d56td
Alright, what would an update be without a little trouble to share?
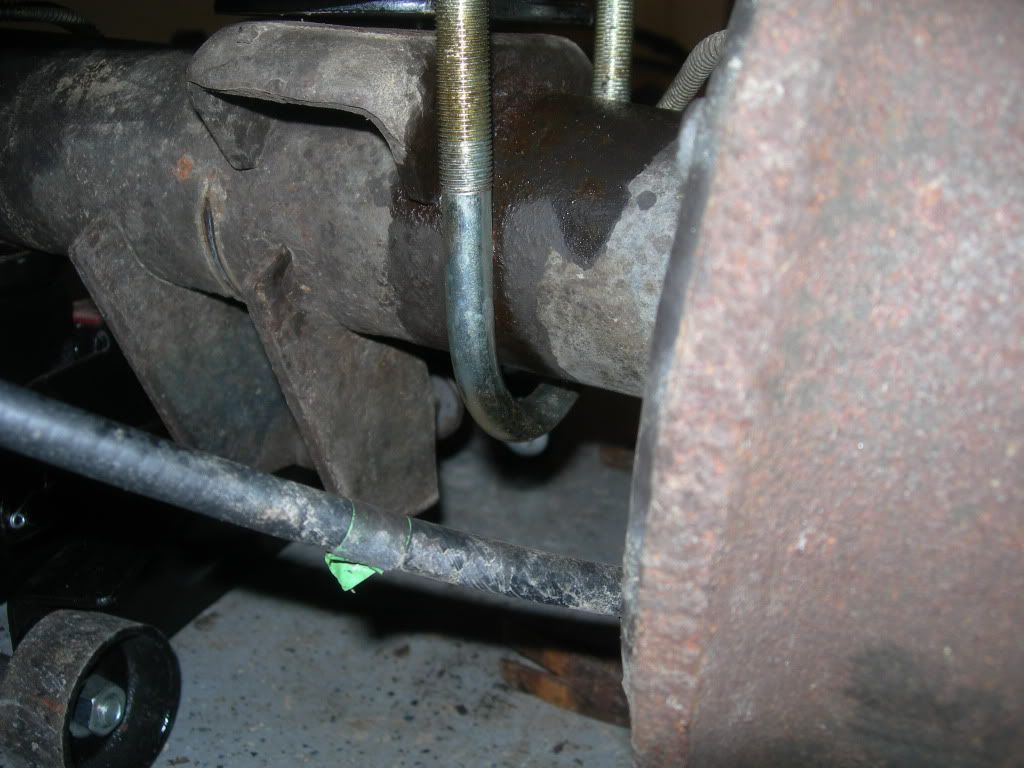
Once I had the leafsprings bolted into place at the shackle and unibody it was time to install the u-bolts and fasten the springs down to the axle.
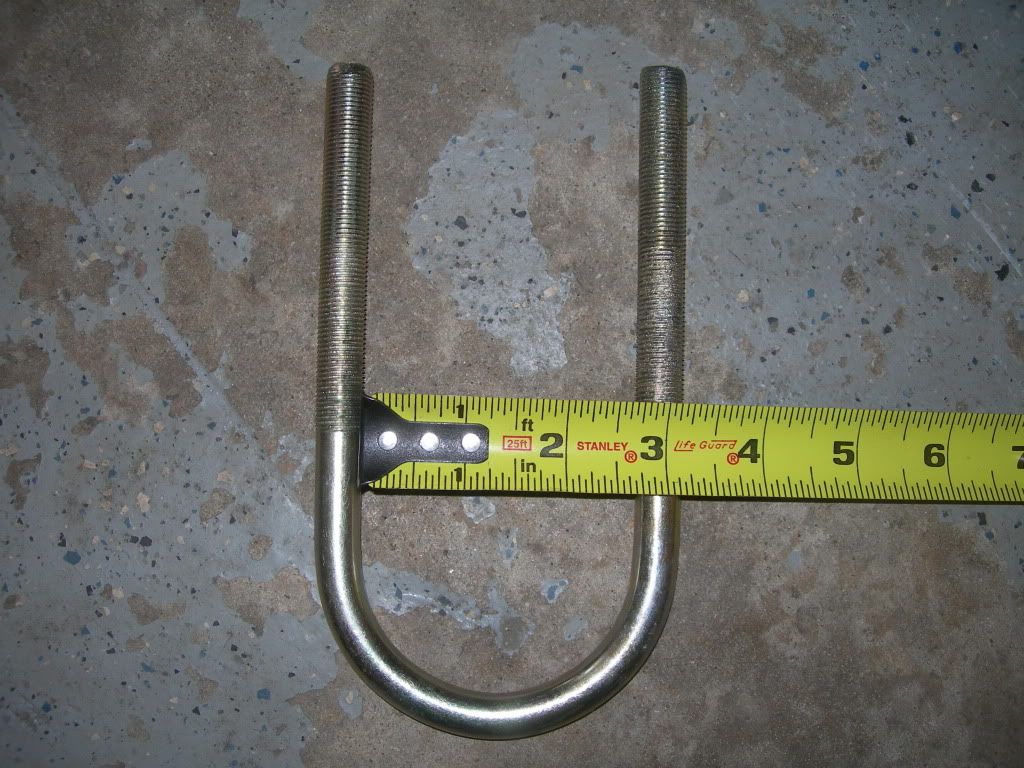
Well, I pulled out my new replacement u-bolts and started to slide them up and over the axle. They were REALLY tight, but I figured it was because they were new so I gave them a little persuasion with the hammer.
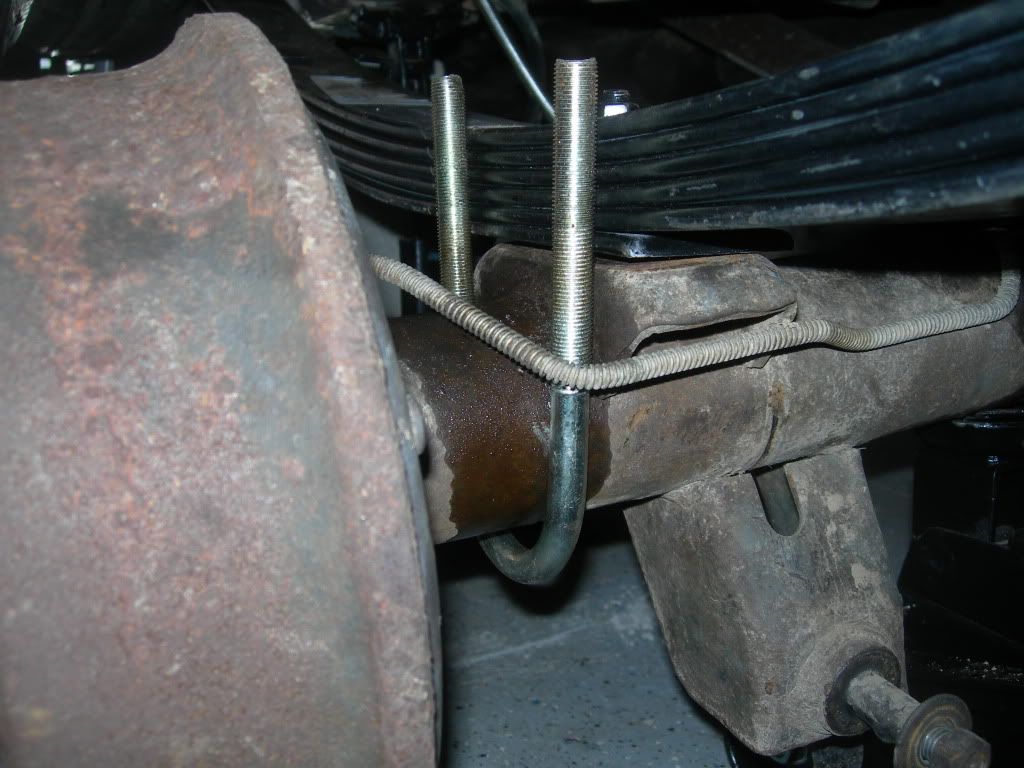
After a couple minutes of fooling around with them, I decided that they weren't seating properly around the axle. They seemed too small. Here's a picture, take a look at the gap between the u-bolt and axle:
and another angle:
So since I wasn't happy with the way they were mating up I took them back off. I double checked the box they came in from RC and the label read "universal u-bolt kit", so that was fine.
Then I compared the old u-bolts with the new ones:
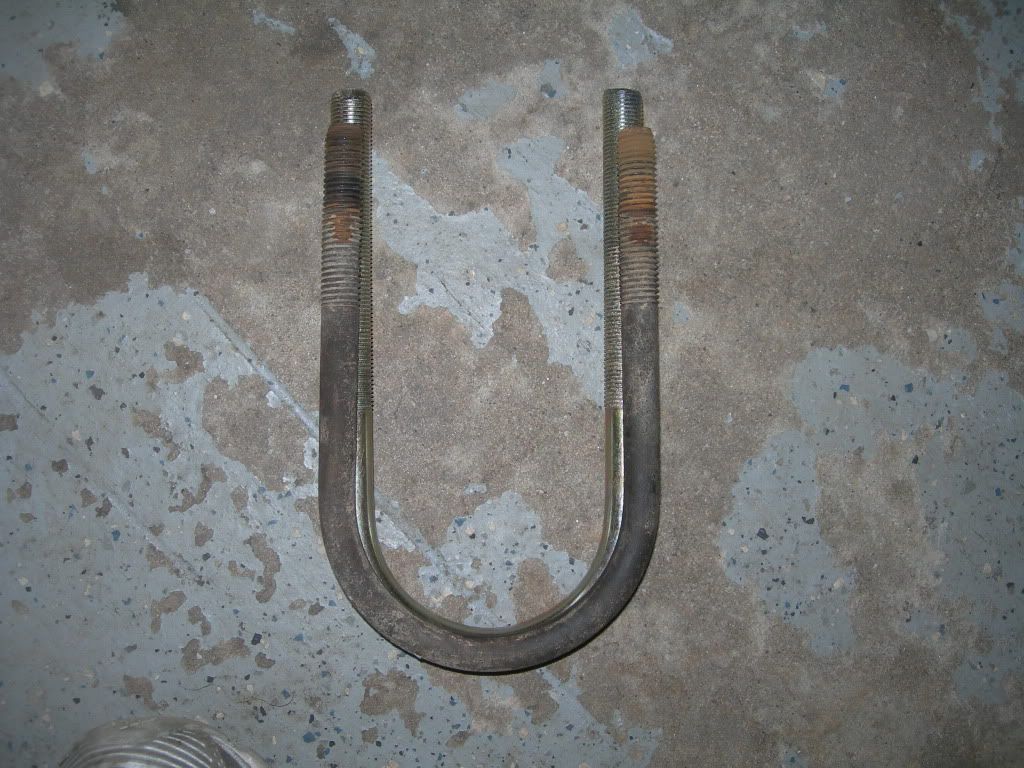
You can see the factory bolt is quite a bit larger. So I busted out the tape measure:
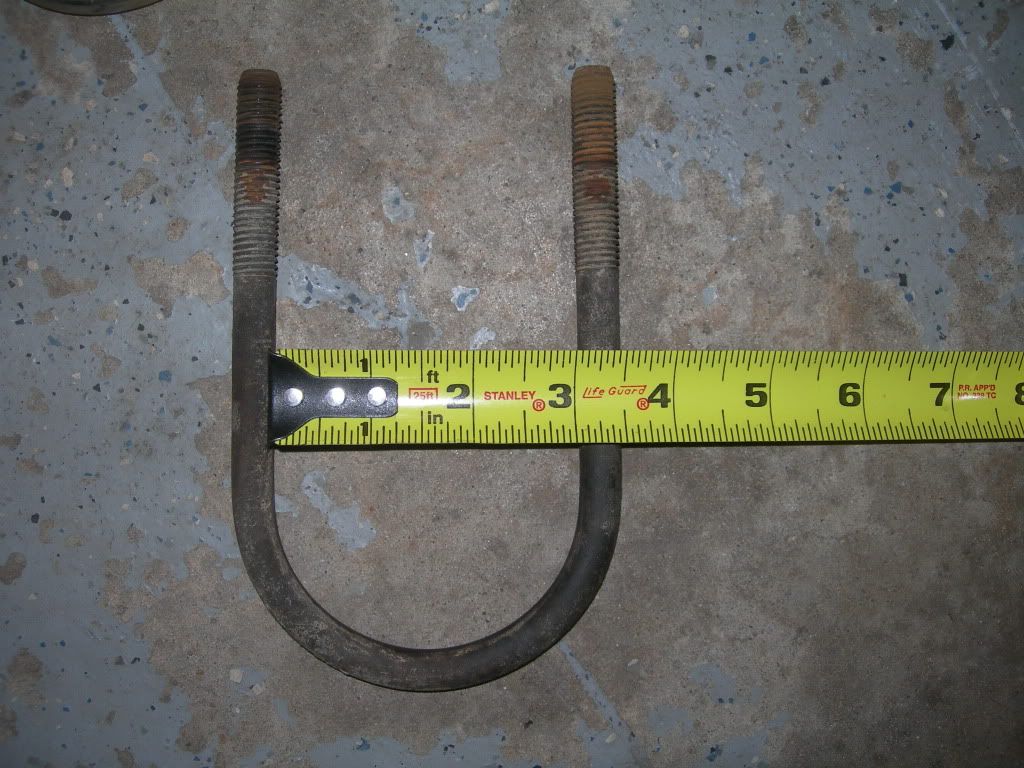
They're not even close.
I'm wondering if I was supposed to receive 2 sets of u-bolts in the kit? Since there are various axle diameters in the XJ... I'm going to contact RC today and talk to them about it.
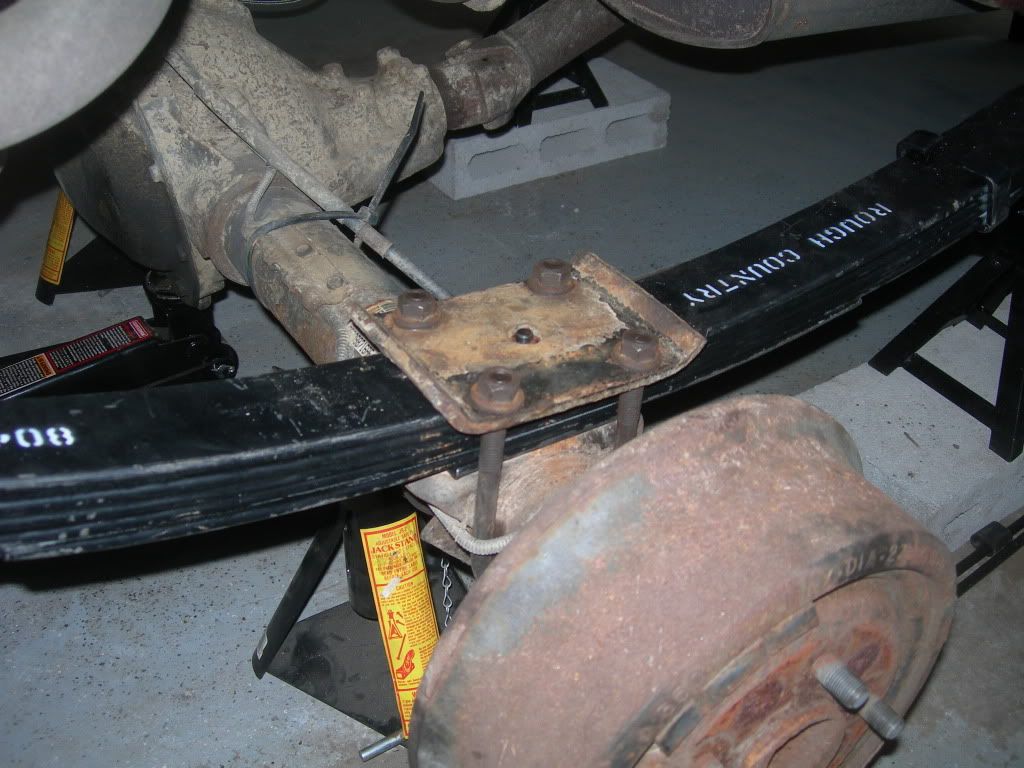
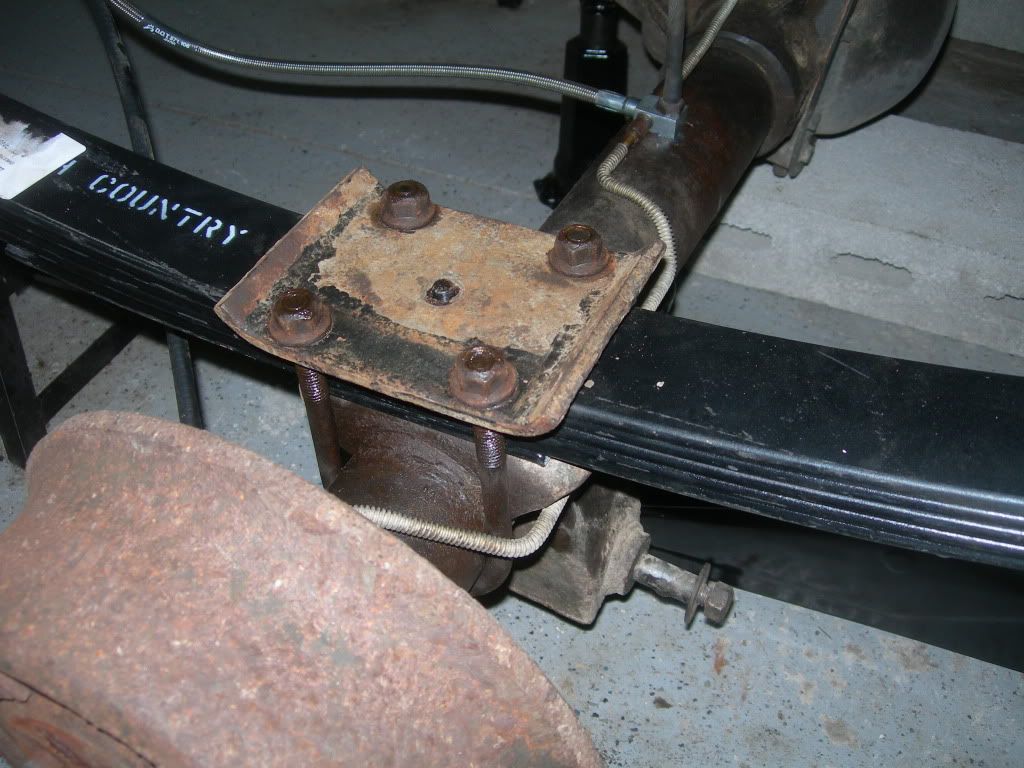
In the meantime, I have reused the factory u-bolts so that I can proceed with the install. I understand this is not recommended, but I won't be driving anywhere other than possibly the alignment shop which is literally a 1/2 mile down the road.
I don't think they'll be a problem getting me to the alignment shop:
Once I had the leafsprings bolted into place at the shackle and unibody it was time to install the u-bolts and fasten the springs down to the axle.
Well, I pulled out my new replacement u-bolts and started to slide them up and over the axle. They were REALLY tight, but I figured it was because they were new so I gave them a little persuasion with the hammer.
After a couple minutes of fooling around with them, I decided that they weren't seating properly around the axle. They seemed too small. Here's a picture, take a look at the gap between the u-bolt and axle:
and another angle:
So since I wasn't happy with the way they were mating up I took them back off. I double checked the box they came in from RC and the label read "universal u-bolt kit", so that was fine.
Then I compared the old u-bolts with the new ones:
You can see the factory bolt is quite a bit larger. So I busted out the tape measure:
They're not even close.
I'm wondering if I was supposed to receive 2 sets of u-bolts in the kit? Since there are various axle diameters in the XJ... I'm going to contact RC today and talk to them about it.
In the meantime, I have reused the factory u-bolts so that I can proceed with the install. I understand this is not recommended, but I won't be driving anywhere other than possibly the alignment shop which is literally a 1/2 mile down the road.
I don't think they'll be a problem getting me to the alignment shop:
i have been using stock u bolts since lift install this was on december '10 and still going so there is no problem on that
Last edited by preppye; 04-03-2012 at 06:57 PM. Reason: i have stock u bolts too , they are the same as yours and to problem at all!!!
01-20-2012, 12:00 AM
#709
Junior Member
Join Date: Nov 2011
Location: SoCal
Posts: 48
Likes: 0
Received 0 Likes
on
0 Posts
Year: 1999
Model: Cherokee
Engine: 4.0L
i know this thread is probably dead by now, but i just wanted to say that i just finished reading through from pg1 and loved it...very entertaining and lots of great (usable) information. I also would like to say how very, VERY angry i am to see that u let it go!! 
 but as long as you come back to us sometime in the future, i guess its all good!
  another thing, is idk about resale value over where u r at, but $5500 for that thing is a friggin steal!!!! (im in SoCal) and i hope the new owner puts as much blood sweat and tears into it as u did (and all of us that were watching the build, lol) ..I am pleased to say that you have motivated (and inspired for that matter) me and im sure most of the others that were following this build.
  Amazing job, congrats and good luck with the new house, and hope to see a "Do Work 2" thread up and running in the not too distant future!


but as long as you come back to us sometime in the future, i guess its all good! Amazing job, congrats and good luck with the new house, and hope to see a "Do Work 2" thread up and running in the not too distant future!
 01-20-2012, 08:53 AM
#711
Seasoned Member
Thread Starter
Join Date: May 2010
Location: Columbus, OH
Posts: 415
Likes: 0
Received 0 Likes
on
0 Posts
Year: 2001
Model: Cherokee
Engine: 4.0 I6
i know this thread is probably dead by now, but i just wanted to say that i just finished reading through from pg1 and loved it...very entertaining and lots of great (usable) information. I also would like to say how very, VERY angry i am to see that u let it go!! but as long as you come back to us sometime in the future, i guess its all good! another thing, is idk about resale value over where u r at, but $5500 for that thing is a friggin steal!!!! (im in SoCal) and i hope the new owner puts as much blood sweat and tears into it as u did (and all of us that were watching the build, lol) ..I am pleased to say that you have motivated (and inspired for that matter) me and im sure most of the others that were following this build. Amazing job, congrats and good luck with the new house, and hope to see a "Do Work 2" thread up and running in the not too distant future!
but as long as you come back to us sometime in the future, i guess its all good! Amazing job, congrats and good luck with the new house, and hope to see a "Do Work 2" thread up and running in the not too distant future! I really miss the XJ and working on it, but the new house is keeping me busy too. In fact, I can hear a sheet of drywall being cut in the basement as I sit here and type this. I better get back down there, lol.Don't worry, I'll have another one some day and I'll be sure to DO WORK.
Thanks. I sent you a response about your question in the pm's.
01-23-2012, 02:19 PM
#713
Seasoned Member
Thread Starter
Join Date: May 2010
Location: Columbus, OH
Posts: 415
Likes: 0
Received 0 Likes
on
0 Posts
Year: 2001
Model: Cherokee
Engine: 4.0 I6
The ones I bought were from Summit Racing... I don't see the exact ones listed on their website anymore though. But, there are some other options:
http://www.summitracing.com/search/P...ter+cap&page=1
http://www.summitracing.com/search/P...ter+cap&page=1
03-03-2012, 08:42 PM
#714
Newbie

Join Date: Oct 2011
Location: Northern Nevada
Posts: 4
Likes: 0
Received 0 Likes
on
0 Posts
Year: 2000
Model: Cherokee
Engine: I6
SanchezCruz20 --
Just a quick note to thank you a whole lot for all the work you did and documented. Today I was able to get my rear shocks off and put in the new "stud" as you did in the beginning. I, too, had considered going thru the floor, but then remember I had subscribed to this thread and had vaguely remembered you had a (much) better way. I'll finish installing the shocks tomorrow with a lot less headache. Oh, yeah, my welds for the bolts were all broken Used an air chisel to get one bolt cut off, moved the shock, then a die grinder and a cutoff wheel finished the job. Great to be able to get a better ride.
Thanks millions. I'll keep this thread marked to help with other problems. I'm not doing a buildup, just want it pretty safe on the road.
Chuck (in Nevada; Jeep from NY).
03-05-2012, 02:32 PM
#715
Member
Join Date: Jan 2012
Location: Toulouse, France
Posts: 121
Likes: 0
Received 0 Likes
on
0 Posts
Year: 1990 Diesel
Model: Cherokee
Engine: 2.1L Renault "J8S"
In all honesty, I was kinda scared about modding my XJ before I read this: but now I'm more confident than ever!!
The abundance of photos and really clear explanations allowed to me to really imagine what I'd be dealing with when I'll start modding the Jeep, so naturally all this information is invaluable!! Thanks!! And what's even better is that I'm planning to do most of the mods you did! I'm sure you detailed the steps better than the product's instructions!
To be honest, I started reading from page 1 and I loved reading all the way through! A great story: getting me upset, worried, happy, sad! I think I relived the whole build! lol
So, many thanks for your clear explanations and quality build thread! I'll be sure to subscribe to next one!! ... I hope there's going to be a next one!! ;-)
04-03-2012, 08:29 AM
#717
Seasoned Member
Thread Starter
Join Date: May 2010
Location: Columbus, OH
Posts: 415
Likes: 0
Received 0 Likes
on
0 Posts
Year: 2001
Model: Cherokee
Engine: 4.0 I6
SanchezCruz20 --
Just a quick note to thank you a whole lot for all the work you did and documented. Today I was able to get my rear shocks off and put in the new "stud" as you did in the beginning. I, too, had considered going thru the floor, but then remember I had subscribed to this thread and had vaguely remembered you had a (much) better way. I'll finish installing the shocks tomorrow with a lot less headache. Oh, yeah, my welds for the bolts were all broken Used an air chisel to get one bolt cut off, moved the shock, then a die grinder and a cutoff wheel finished the job. Great to be able to get a better ride.
Thanks millions. I'll keep this thread marked to help with other problems. I'm not doing a buildup, just want it pretty safe on the road.
Chuck (in Nevada; Jeep from NY).
Just a quick note to thank you a whole lot for all the work you did and documented. Today I was able to get my rear shocks off and put in the new "stud" as you did in the beginning. I, too, had considered going thru the floor, but then remember I had subscribed to this thread and had vaguely remembered you had a (much) better way. I'll finish installing the shocks tomorrow with a lot less headache. Oh, yeah, my welds for the bolts were all broken Used an air chisel to get one bolt cut off, moved the shock, then a die grinder and a cutoff wheel finished the job. Great to be able to get a better ride.
Thanks millions. I'll keep this thread marked to help with other problems. I'm not doing a buildup, just want it pretty safe on the road.
Chuck (in Nevada; Jeep from NY).
In all honesty, I was kinda scared about modding my XJ before I read this: but now I'm more confident than ever!!
The abundance of photos and really clear explanations allowed to me to really imagine what I'd be dealing with when I'll start modding the Jeep, so naturally all this information is invaluable!! Thanks!! And what's even better is that I'm planning to do most of the mods you did! I'm sure you detailed the steps better than the product's instructions!
To be honest, I started reading from page 1 and I loved reading all the way through! A great story: getting me upset, worried, happy, sad! I think I relived the whole build! lol
So, many thanks for your clear explanations and quality build thread! I'll be sure to subscribe to next one!! ... I hope there's going to be a next one!! ;-)
The abundance of photos and really clear explanations allowed to me to really imagine what I'd be dealing with when I'll start modding the Jeep, so naturally all this information is invaluable!! Thanks!! And what's even better is that I'm planning to do most of the mods you did! I'm sure you detailed the steps better than the product's instructions!
To be honest, I started reading from page 1 and I loved reading all the way through! A great story: getting me upset, worried, happy, sad! I think I relived the whole build! lol
So, many thanks for your clear explanations and quality build thread! I'll be sure to subscribe to next one!! ... I hope there's going to be a next one!! ;-)
