
Project Do work - 2001 XJ Build (Pic intensive)


 06-30-2010, 10:47 AM
#78
Junior Member

Join Date: Apr 2010
Location: Jefferson
Posts: 65
Likes: 0
Received 0 Likes
on
0 Posts
Year: 1998
Model: Cherokee
Engine: 4.0
Crap I read the whole thread expecting to see the end.
Great job so far!!
Like the other guy I dont have the patience to take pictures while I work on something either, but these build threads are awesome to read!!
Oh yeah Hurry up!!!
Great job so far!!
Like the other guy I dont have the patience to take pictures while I work on something either, but these build threads are awesome to read!!
Oh yeah Hurry up!!!
06-30-2010, 11:49 PM
#82
Seasoned Member
Thread Starter
Join Date: May 2010
Location: Columbus, OH
Posts: 415
Likes: 0
Received 0 Likes
on
0 Posts
Year: 2001
Model: Cherokee
Engine: 4.0 I6

Yeah, I'm real happy I got the tap and die. In the past, I might have given up and had to find some help or take it to a service shop. It's really nice to be doing the work myself.
07-01-2010, 12:08 AM
#83
Seasoned Member
Thread Starter
Join Date: May 2010
Location: Columbus, OH
Posts: 415
Likes: 0
Received 0 Likes
on
0 Posts
Year: 2001
Model: Cherokee
Engine: 4.0 I6
Well, work has really been putting a damper on quality time with the Jeep this week.
Anyway, just wanted to post a few pics. I hope you guys won't be too disappointed but I couldn't get the metal sleeve off one of the leafspring bolts (severely seized to the bolt)... and since I had to cut another one off with the sawzall I decided to buy a couple from the dealer. They ran about $7 a piece... kind of steep for a couple bolts.
Seized on metal sleeve:

And since I was at the dealer, I decided to get a quote on how much some stock replacement shackles would be. If you remember, in an earlier post I said that I couldn't get one of the shackles off the leafspring and since my kit reuses the factory shackle I needed at least one. But I thought it'd be better to replace them both. The dealer quoted me at $100 per shackle. I said no way of course. Went online, found some at Quadratec for $18 and ordered them up ( http://www.quadratec.com/products/56005_04.htm ). They arrived today via brown truck:

As you can see, even the shackle that I managed to remove from the spring is having a slight issue. The metal sleeve has backed out during the bolt removal and refuses to reseat. This sounds like a simple fix right? Just hit it with a BFH. Well, apparently it's not that simple for me... it won't go back in. So I figured for $18, why not just get new ones. Problem solved.
In this pic, you can see the metal sleeve and 2 new bolts.

So tomorrow, when I get home from work, hopefully I'll be installing the shackles and leafsprings. Maybe even the shocks and tires! Don't hold your breathe though
Anyway, just wanted to post a few pics. I hope you guys won't be too disappointed but I couldn't get the metal sleeve off one of the leafspring bolts (severely seized to the bolt)... and since I had to cut another one off with the sawzall I decided to buy a couple from the dealer. They ran about $7 a piece... kind of steep for a couple bolts.
Seized on metal sleeve:
And since I was at the dealer, I decided to get a quote on how much some stock replacement shackles would be. If you remember, in an earlier post I said that I couldn't get one of the shackles off the leafspring and since my kit reuses the factory shackle I needed at least one. But I thought it'd be better to replace them both. The dealer quoted me at $100 per shackle. I said no way of course. Went online, found some at Quadratec for $18 and ordered them up ( http://www.quadratec.com/products/56005_04.htm ). They arrived today via brown truck:
As you can see, even the shackle that I managed to remove from the spring is having a slight issue. The metal sleeve has backed out during the bolt removal and refuses to reseat. This sounds like a simple fix right? Just hit it with a BFH. Well, apparently it's not that simple for me... it won't go back in. So I figured for $18, why not just get new ones. Problem solved.
In this pic, you can see the metal sleeve and 2 new bolts.
So tomorrow, when I get home from work, hopefully I'll be installing the shackles and leafsprings. Maybe even the shocks and tires! Don't hold your breathe though
07-01-2010, 06:53 AM
#84
CF Veteran
Join Date: Jun 2010
Location: Ohio
Posts: 2,117
Likes: 0
Received 3 Likes
on
3 Posts
Year: 1998
Model: Cherokee
Engine: 4.0 stock
You got it better then I did... I wrestled a bolt for 2 hours, gave up and had the springs installed. It took THEM 4 hours!!! They ended up cutting off 2 bolts and the rear spring eyelet. They where nice and discounted the rate from $73/hr total it ended up costing $190
I simply didn't have the time.
I simply didn't have the time.
07-01-2010, 08:15 AM
#85
Junior Member
Join Date: May 2010
Location: Gloucester, Virginia
Posts: 37
Likes: 0
Received 0 Likes
on
0 Posts
Year: 2001
Model: Cherokee
Engine: 4.0L
Love the build thread, following it closely... Will help when it come time to do mine!
With that 4.5" RC you should be able to stuff 32" tires under there no problem.
With that 4.5" RC you should be able to stuff 32" tires under there no problem.
07-01-2010, 10:31 AM
#86
Seasoned Member
Join Date: Aug 2009
Posts: 486
Likes: 0
Received 1 Like
on
1 Post
Year: 1993
Model: Cherokee
Engine: 4.0L
you can put 31 on it and not cut anything on the fender or go to 35s and cut the whole thing apart but my opinion 33s with a little trimming always look really clean will wheel well
07-02-2010, 12:08 AM
#87
Seasoned Member
Thread Starter
Join Date: May 2010
Location: Columbus, OH
Posts: 415
Likes: 0
Received 0 Likes
on
0 Posts
Year: 2001
Model: Cherokee
Engine: 4.0 I6
You got it better then I did... I wrestled a bolt for 2 hours, gave up and had the springs installed. It took THEM 4 hours!!! They ended up cutting off 2 bolts and the rear spring eyelet. They where nice and discounted the rate from $73/hr total it ended up costing $190
I simply didn't have the time.
I simply didn't have the time.
I'll be honest, the thought of dropping the Jeep off at the shop has crossed my mind a few times... especially when I get stuck during an installation procedure. But I'm way too deep into it to give up now. Plus, I'd have to get this thing towed to the shop at this point, increasing the cost.
But it's really been a blast working on it. I look forward to coming home after work every day just so I can go work in the garage.
The smallest I'm going is 32's. I'm sure I'll eventually want to trim the fenders too, and that's why I'll be considering 33's. But, I'll be running stock gears for a while, so that's also a consideration. Additionally, I don't want to lose daily drivability or total loss of road manners.
07-02-2010, 01:08 AM
#88
Seasoned Member
Thread Starter
Join Date: May 2010
Location: Columbus, OH
Posts: 415
Likes: 0
Received 0 Likes
on
0 Posts
Year: 2001
Model: Cherokee
Engine: 4.0 I6
Had a few hours after work to get some time in with the Jeep, then a soccer game, then back to the garage for more quality time.
Lift is really coming together. Was able to get the leafsprings and shocks on tonight. And guess what? I took pictures along the way.
New vs. Old

First thing I did was to install the shackles.

Installing the spring, shackle-side first...
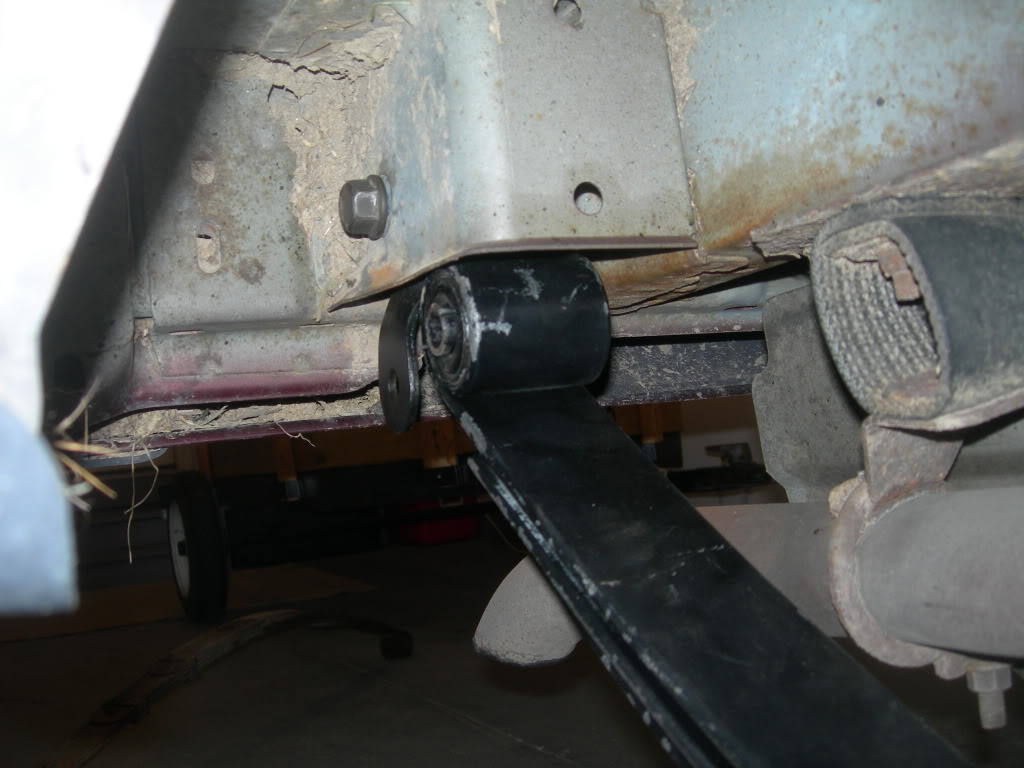
So I dropped the axle down and wrestled around with the leafsprings until I had them lined up with the mounting locations. I found that it was easier to attach the rear/shackle-end first, then focus on the unibody mounting location near the front..
Here's the rear leafspring mounted to the shackle

One of the bad things about new leafsprings is that they tend to be very curved, making them a little shorter. I needed to compress the spring a little to get it to lenghthen and line up . The only way I could think of was to use a floor jack.
Here's the spring needing a little lengthening/compression in order to line up with the hole for the bolt:
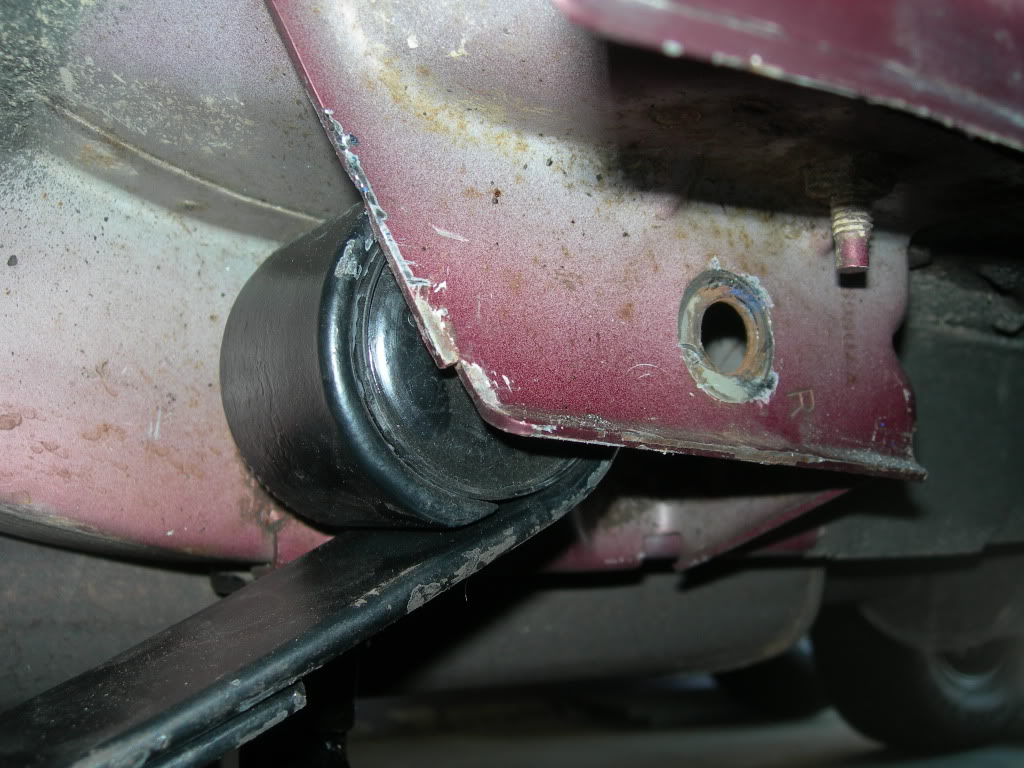

The floor jack doin work and allowing me to compress the spring a little
And finally lined up enough for the bolt....

Lift is really coming together. Was able to get the leafsprings and shocks on tonight. And guess what? I took pictures along the way.
New vs. Old
First thing I did was to install the shackles.
Installing the spring, shackle-side first...
So I dropped the axle down and wrestled around with the leafsprings until I had them lined up with the mounting locations. I found that it was easier to attach the rear/shackle-end first, then focus on the unibody mounting location near the front..
Here's the rear leafspring mounted to the shackle
One of the bad things about new leafsprings is that they tend to be very curved, making them a little shorter. I needed to compress the spring a little to get it to lenghthen and line up . The only way I could think of was to use a floor jack.
Here's the spring needing a little lengthening/compression in order to line up with the hole for the bolt:
The floor jack doin work and allowing me to compress the spring a little
And finally lined up enough for the bolt....
Last edited by sanchezcruz_20; 07-02-2010 at 10:30 AM.
07-02-2010, 11:01 AM
#90
Seasoned Member
Thread Starter
Join Date: May 2010
Location: Columbus, OH
Posts: 415
Likes: 0
Received 0 Likes
on
0 Posts
Year: 2001
Model: Cherokee
Engine: 4.0 I6
Alright, what would an update be without a little trouble to share?
Once I had the leafsprings bolted into place at the shackle and unibody it was time to install the u-bolts and fasten the springs down to the axle.
Well, I pulled out my new replacement u-bolts and started to slide them up and over the axle. They were REALLY tight, but I figured it was because they were new so I gave them a little persuasion with the hammer.
After a couple minutes of fooling around with them, I decided that they weren't seating properly around the axle. They seemed too small. Here's a picture, take a look at the gap between the u-bolt and axle:

and another angle:

So since I wasn't happy with the way they were mating up I took them back off. I double checked the box they came in from RC and the label read "universal u-bolt kit", so that was fine.
Then I compared the old u-bolts with the new ones:
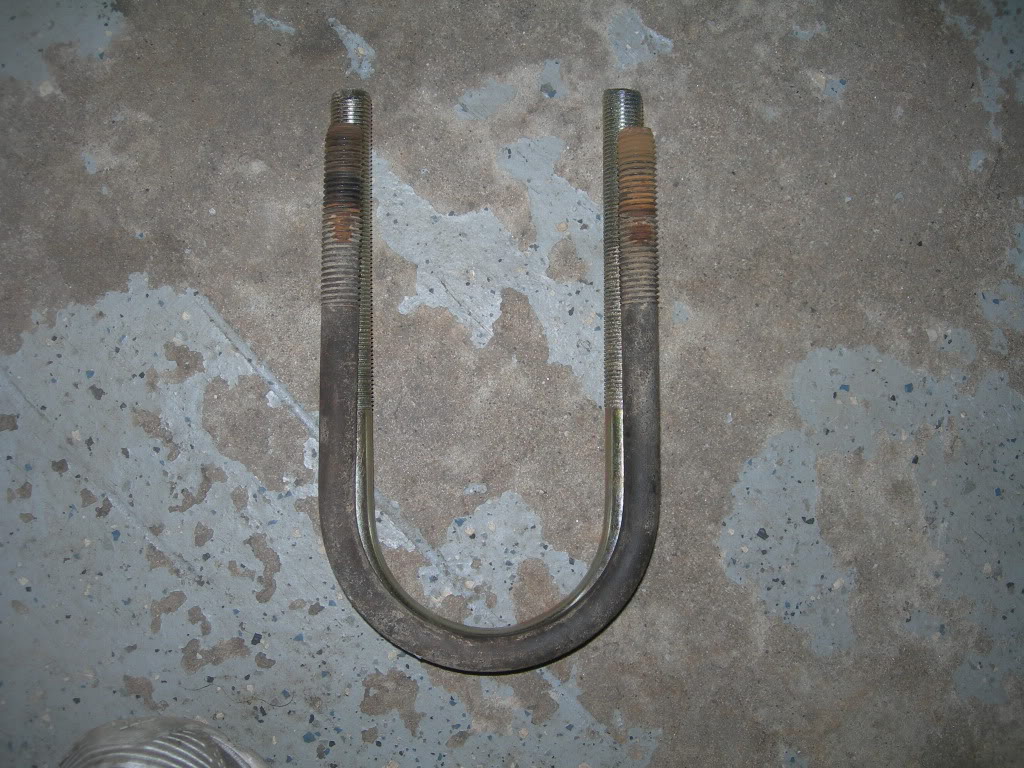
You can see the factory bolt is quite a bit larger. So I busted out the tape measure:

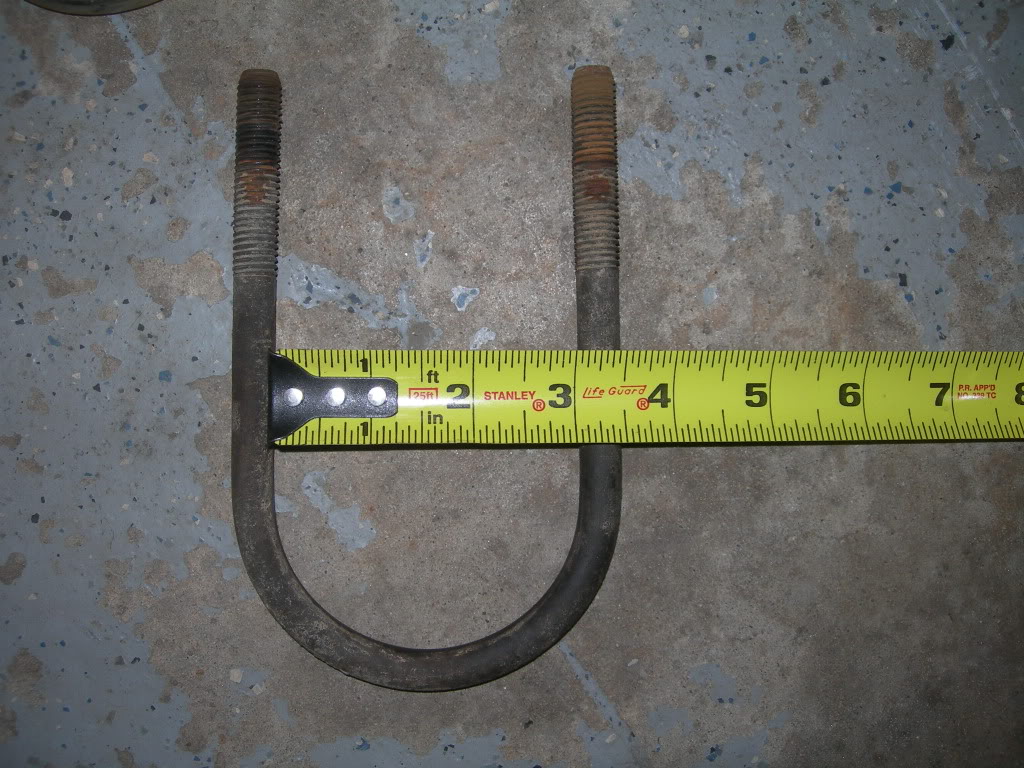
They're not even close.
I'm wondering if I was supposed to receive 2 sets of u-bolts in the kit? Since there are various axle diameters in the XJ... I'm going to contact RC today and talk to them about it.
In the meantime, I have reused the factory u-bolts so that I can proceed with the install. I understand this is not recommended, but I won't be driving anywhere other than possibly the alignment shop which is literally a 1/2 mile down the road.
I don't think they'll be a problem getting me to the alignment shop:


Once I had the leafsprings bolted into place at the shackle and unibody it was time to install the u-bolts and fasten the springs down to the axle.
Well, I pulled out my new replacement u-bolts and started to slide them up and over the axle. They were REALLY tight, but I figured it was because they were new so I gave them a little persuasion with the hammer.
After a couple minutes of fooling around with them, I decided that they weren't seating properly around the axle. They seemed too small. Here's a picture, take a look at the gap between the u-bolt and axle:
and another angle:
So since I wasn't happy with the way they were mating up I took them back off. I double checked the box they came in from RC and the label read "universal u-bolt kit", so that was fine.
Then I compared the old u-bolts with the new ones:
You can see the factory bolt is quite a bit larger. So I busted out the tape measure:
They're not even close.
I'm wondering if I was supposed to receive 2 sets of u-bolts in the kit? Since there are various axle diameters in the XJ... I'm going to contact RC today and talk to them about it.
In the meantime, I have reused the factory u-bolts so that I can proceed with the install. I understand this is not recommended, but I won't be driving anywhere other than possibly the alignment shop which is literally a 1/2 mile down the road.
I don't think they'll be a problem getting me to the alignment shop: