Fabrication & builders section. All fabrication posts go here.
XJ/MJ/ZJ/WJ Only projects go here. Questions belong in modified tech.

Complete Center Console Overhaul

Thread Tools
 
Search this Thread
 
Old 08-06-2023, 12:33 PM
  #1  
Seasoned Member
Thread Starter
 
Travis Mudrich's Avatar
 
Join Date: Apr 2021
Posts: 436
Received 86 Likes on 74 Posts
Year: 1996
Model: Cherokee (XJ)
Engine: 4.0 High Output
Default Complete Center Console Overhaul

Alright, so this started out as a simple problem, then grew into an entire thing. I've posted about it before in other threads because it was relevant to what I was doing, but figured I would compile it all together into one thread. Follow me and watch as I completely rethink the pre96 center console!

If you want to read in full detail about individual mods to the center console instead of a glazed over compile of information, you can find them here:

https://www.cherokeeforum.com/f67/mj-parking-brake-pre-96-xj-264354/

https://www.cherokeeforum.com/f67/pre-96-center-console-armrest-modification-263129/

Last edited by Travis Mudrich; 08-06-2023 at 12:43 PM. Reason: Typo
Old 08-06-2023, 12:40 PM
  #2  
Seasoned Member
Thread Starter
 
Travis Mudrich's Avatar
 
Join Date: Apr 2021
Posts: 436
Received 86 Likes on 74 Posts
Year: 1996
Model: Cherokee (XJ)
Engine: 4.0 High Output
Default Armrest Repair (Part 1)

So I'm sure you're aware, these pre96 armrest break right at the post where it attaches to the hinge. I've went through 3 multiple armrests before I figured it out.

The 3 major problems with the design that leads to failure are:
1. The posts that attach to the hinge are nearly not as supported as they need to be.
2. The screws going into the posts are not long enough.
3. Theres excess room around the mounting point allowing for the armrest to shift around.


After replacing the first one, this second one broke too.


You can see here I attempted to support the posts with JBWeld, but it atill broke. The armrest was ripped up anyways.
Old 08-06-2023, 12:48 PM
  #3  
Seasoned Member
Thread Starter
 
Travis Mudrich's Avatar
 
Join Date: Apr 2021
Posts: 436
Received 86 Likes on 74 Posts
Year: 1996
Model: Cherokee (XJ)
Engine: 4.0 High Output
Default Armrest Repair (Part 2)

From there, I got a new armrest.


I took apart the new armrest


Cleaned up all excess expanding foam


100% infill with JB Weld. I contemplated putting some on the otherside but figured this should be enough.


And got proper length screws.


Heres the size difference.
Old 08-06-2023, 12:52 PM
  #4  
Seasoned Member
Thread Starter
 
Travis Mudrich's Avatar
 
Join Date: Apr 2021
Posts: 436
Received 86 Likes on 74 Posts
Year: 1996
Model: Cherokee (XJ)
Engine: 4.0 High Output
Default Armrest Repair (Part 3)

Finally, just had one more thing to do.


I was already this far down the road, figured bight as well do it all.


Filled in the latch also.


Thre it back together with grease


Bolted it back together


Better than factory
The following users liked this post:
ijeeep (04-24-2024)
Old 08-06-2023, 01:14 PM
  #5  
Seasoned Member
Thread Starter
 
Travis Mudrich's Avatar
 
Join Date: Apr 2021
Posts: 436
Received 86 Likes on 74 Posts
Year: 1996
Model: Cherokee (XJ)
Engine: 4.0 High Output
Default MJ Emergency Brake Swap (Part 1)

I fell into a Comanche E-brake swap. I did this to install cupholders, more center console room, and because I want to be different 😄 Here's what I've got going on.


First, I removed the hand brake


I extended the brake switch line


Crimped on a new end, and rerouted it under the carpet towards the driver side footwell
Old 08-06-2023, 01:18 PM
  #6  
Seasoned Member
Thread Starter
 
Travis Mudrich's Avatar
 
Join Date: Apr 2021
Posts: 436
Received 86 Likes on 74 Posts
Year: 1996
Model: Cherokee (XJ)
Engine: 4.0 High Output
Default E-brake Swap (Part 2)

From here, I had the gap from where the handle was.


Got this patch panel from ebay


Glued it in
Old 08-06-2023, 01:21 PM
  #7  
Seasoned Member
Thread Starter
 
Travis Mudrich's Avatar
 
Join Date: Apr 2021
Posts: 436
Received 86 Likes on 74 Posts
Year: 1996
Model: Cherokee (XJ)
Engine: 4.0 High Output
Default E-Brake Swap (Part 3)

Went over the patch with glazing putty to fill in the gaps. I eventually will go over the whole thing with black textured paint to blend it all together. (I still have to do the cupholders)


First pass


Second pass

Last edited by Travis Mudrich; 08-06-2023 at 01:22 PM. Reason: Typo
Old 08-06-2023, 01:37 PM
  #8  
Seasoned Member
Thread Starter
 
Travis Mudrich's Avatar
 
Join Date: Apr 2021
Posts: 436
Received 86 Likes on 74 Posts
Year: 1996
Model: Cherokee (XJ)
Engine: 4.0 High Output
Default Center Console Storage (Part 1)

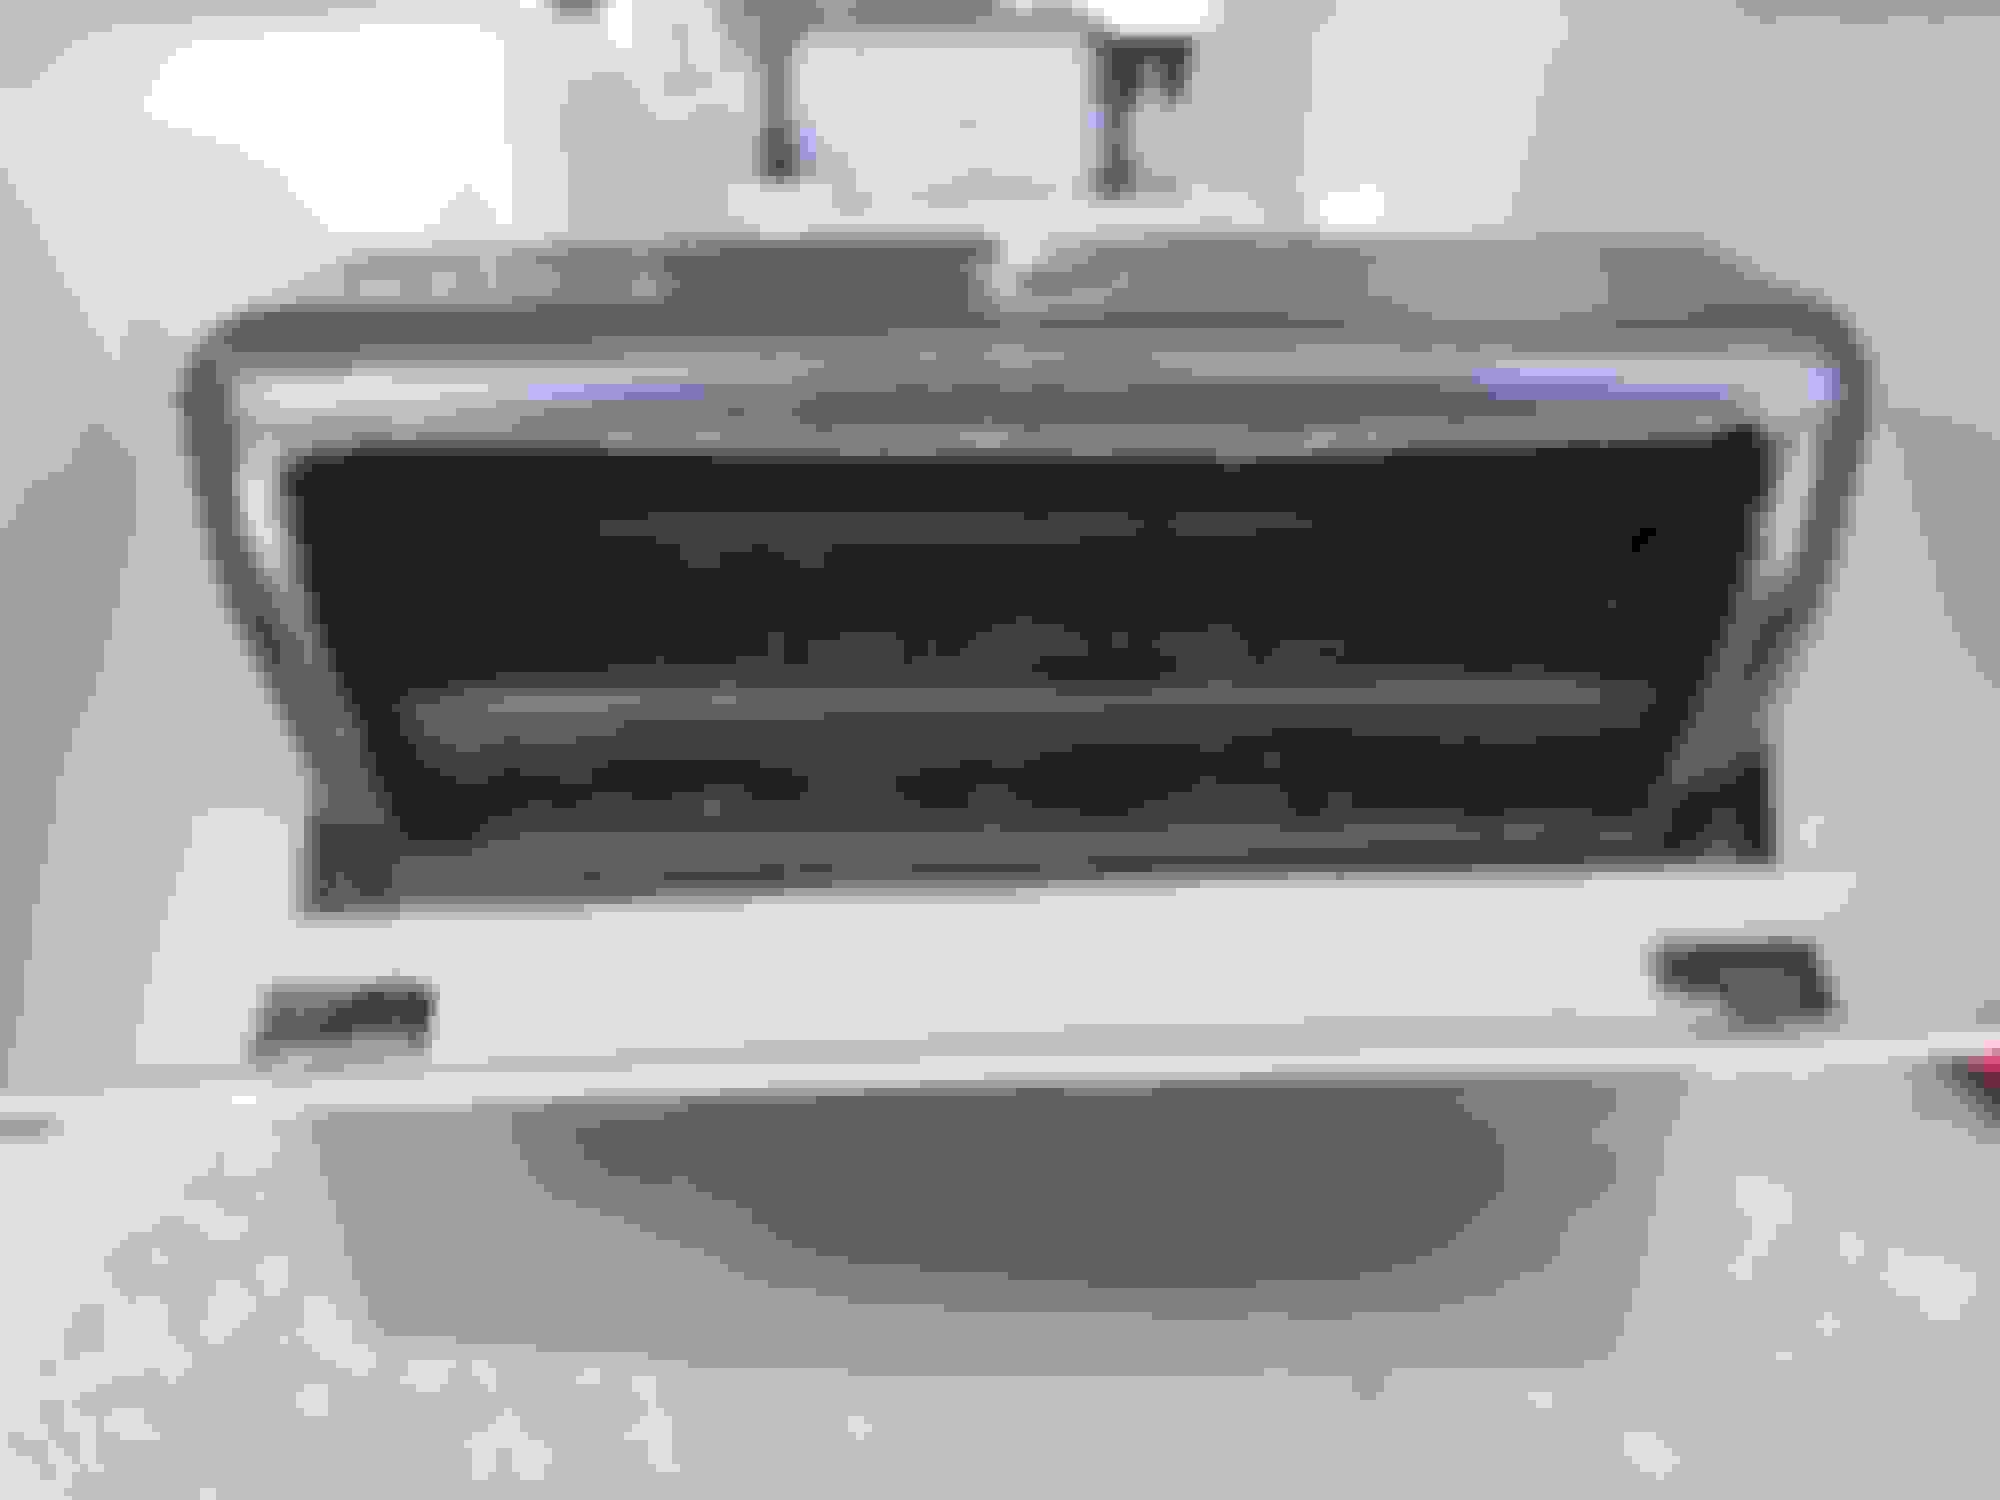
Because I deleted the E-brake, I now have more room in that area. At first I was after a Tuffy console insert. Those are hard rare now, but I own a spot welder. I highly considered making my own template and putting one together with sheet metal. Pretty simple actually. But instead of rising the top up, I figure I'd bring the bottom down.


This a standard 5.56 ammo can


I removed the hinge


Removed the handle lip


It seats in perfectly


You can see here it drops lower than original.

Don't mind the quality of the ammo can, this one is a beat up prototype. The interior space is almost double! And the bottom of the ammo can will bolt right up to the trans tunnel where the bracket used to sit.

Unfortunately, because it sits low, i will have to delete my rear seat air conditioning. Minor loss for what I am gaining.
Old 08-06-2023, 01:42 PM
  #9  
Seasoned Member
Thread Starter
 
Travis Mudrich's Avatar
 
Join Date: Apr 2021
Posts: 436
Received 86 Likes on 74 Posts
Year: 1996
Model: Cherokee (XJ)
Engine: 4.0 High Output
Default Lower Air Conditioning (Part 1)

Because I deleted the air-conditioning tube in place of more storage, I was left with a few options. I could just leave it as is. Or I could reroute the air.


I removed the vent from under the climate controls on a spare dash that I had.


And broke off the change cubby that sits under the ashtray.


I shaved off the lip that interfaces with the rest of the black center console insert.
Old 08-06-2023, 01:44 PM
  #10  
Seasoned Member
Thread Starter
 
Travis Mudrich's Avatar
 
Join Date: Apr 2021
Posts: 436
Received 86 Likes on 74 Posts
Year: 1996
Model: Cherokee (XJ)
Engine: 4.0 High Output
Default Air Conditioning (Part 2)


I trimmed all of the excess plastic around the vent so it would sit flush


And angled the corners so it would sit inside of the walls
Old 08-06-2023, 01:50 PM
  #11  
Seasoned Member
Thread Starter
 
Travis Mudrich's Avatar
 
Join Date: Apr 2021
Posts: 436
Received 86 Likes on 74 Posts
Year: 1996
Model: Cherokee (XJ)
Engine: 4.0 High Output
Default Air Conditioning (Part 3)

From here, I needed to pre everything to accept the vent.


I cut a hole in the change cubby


You can start to see here how I will intrigrate it with the air supply.
Old 08-06-2023, 01:53 PM
  #12  
Seasoned Member
Thread Starter
 
Travis Mudrich's Avatar
 
Join Date: Apr 2021
Posts: 436
Received 86 Likes on 74 Posts
Year: 1996
Model: Cherokee (XJ)
Engine: 4.0 High Output
Default Air Conditioning (Part 4)

Nearly done!


Im going to lay the vent on top of the cubby and then lay the console insert over the whole thing.


This is what it will look like.

I still have to JB Weld it all together but I'm waiting to texture paint it first
Old 08-06-2023, 01:57 PM
  #13  
Seasoned Member
Thread Starter
 
Travis Mudrich's Avatar
 
Join Date: Apr 2021
Posts: 436
Received 86 Likes on 74 Posts
Year: 1996
Model: Cherokee (XJ)
Engine: 4.0 High Output
Default What now?

So this is what I still have to do:

1. Insert cupholders where the E-brake used to be
2. Finish the glaze putty
3. Texture paint the whole black insert
4. Attach the vent
5. Connect the vent to the air supply
6. Finalize the design of the interior storage

That's all of the big ticket items. Of course there's a bunch of smaller tasks to do to complete the larger tasks, but you get the idea.
Old 08-06-2023, 02:04 PM
  #14  
Seasoned Member
Thread Starter
 
Travis Mudrich's Avatar
 
Join Date: Apr 2021
Posts: 436
Received 86 Likes on 74 Posts
Year: 1996
Model: Cherokee (XJ)
Engine: 4.0 High Output
Default Modifications

The 5 modification this encompasses are:

1. Armrest reinforcement
2. E-brake delete
3. Larger storage capacity
4. Cupholders
5. Air vent reroute


Progress so far 😁😁😁


I hope everyone has enjoyed so far! If you have any questions or comments, feel free to leave them below. I love to hear back from the community.

What other center console mods have you done? I would love to see pictures!
The following users liked this post:
ijeeep (04-24-2024)
Old 08-08-2023, 09:16 PM
  #15  
Seasoned Member
Thread Starter
 
Travis Mudrich's Avatar
 
Join Date: Apr 2021
Posts: 436
Received 86 Likes on 74 Posts
Year: 1996
Model: Cherokee (XJ)
Engine: 4.0 High Output
Default E-Brake Swap (Part 4)

Made some progress today!


Sanded the whole thing down to 180 grit. I was going to do textured paint but figured I wouldnt be happy with it. I think the texture would be too large and it would remind me more of bedliner rather than what was originally on there. So I opted out for a smooth look since the texture is pretty subtle already.


Go the bondo sanded down to clean lines


Hit it with some black spray paint to see the imperfections. After sanding it down to see where the two panels meet, I realised I made a mistake. The bondo sands quicker than the plastic (Duh!) So now parts of the bondo are lower. It's fine, just means I have to do more work.

After I get this patch panel how I like it, I'll probably go over the whole thing again up to 220 grit. I want this thing as smooth as glass. I am going to try to find a flat black to help match how it was originally.

Still trying to figure out the cupholders. I have the OEM one that clicks into the side. I doubt I'll ever use it again because I hate how much if the passenger side leg room it takes, even though I think it's a considerably better option than the ebrake style one. There are so many issues with that I'm not even going to go into detail. Either way, I think the OEM is worth more to someone else than for me to patch in. Not sure what I'm going to do yet.

Since I'm patching this together and refinishing it, i think i may pay a visit to the junkyard to see what other cupholder I can find and what other center console goodies are out there in other trucks. I'm do mind modifying my XJ, but I want it to appear stock.

For example, I don't really like the little change holder between the E-Brake and the transmission shifter. It's was a great attempt by Chrystler to utilize some wasted space, but I bet I can find something better to put there. We'll see!


Quick Reply: Complete Center Console Overhaul


All times are GMT -5. The time now is 02:36 AM.