Dual Stock AC Fans in XJ
#1
I hope this is in the right section since my account will not let me post in the write up section on the forum. Although, since the pics were taken after I did the mod I'm not sure if it qualifies for that either.
I won't consider this a write up but just a little bit of information on how I did my dual stock AC fan mod. I've have many people PM me and ask me about how I did it and I don't want to keep clogging up other peoples threads with my pictures. So I decided to post this thread and I can just send the link.
I'm sure there will be some to say that this won't work. Well, it works on mine so I'm passing along the information. I believe if you make sure the radiator and condenser fins are kept clean and not bent you won't restrict airflow and you'll get the proper cooling you need.
Ok let's get started....
I previously had a dual fan set up. My Stock AC fan with a Derale 16 inch 2600cfm fan. DO NOT use this method unless you plan on running a TC drop forever. Just showing some pictures, the reason why is further in to the write up.
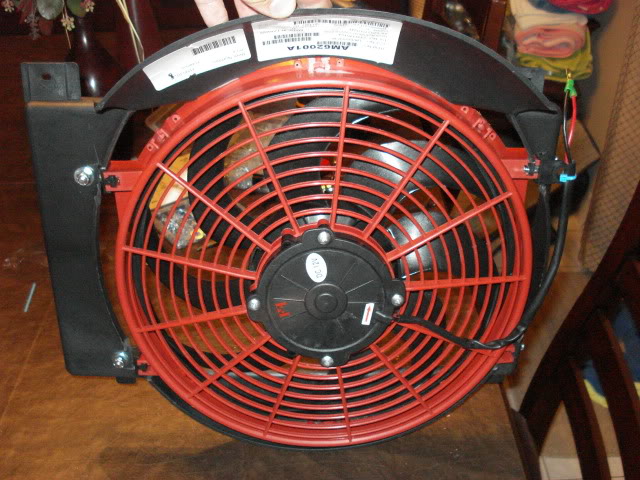
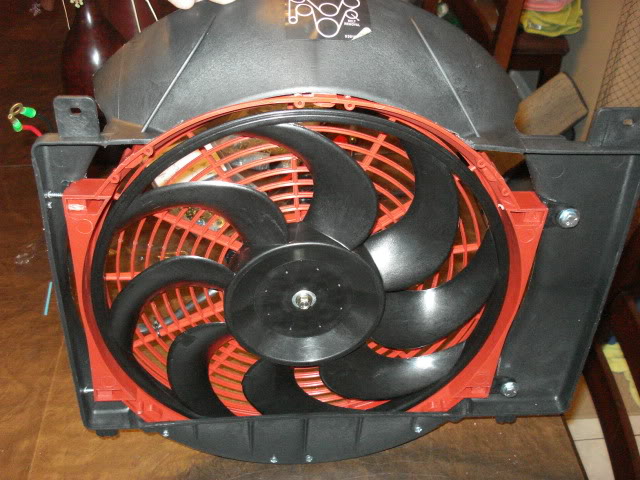
Pulled the studs and installed bolts
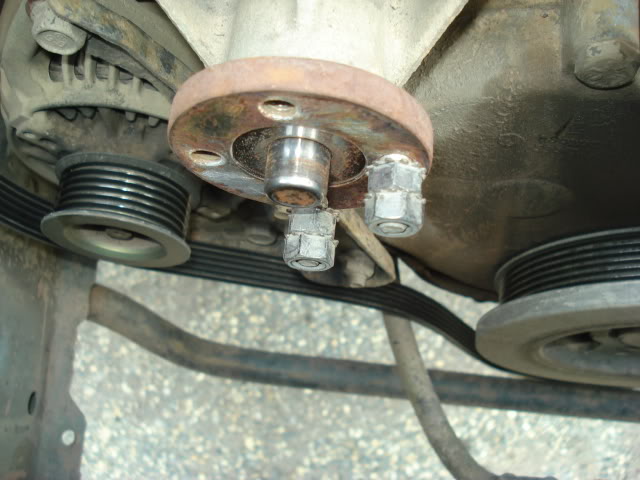
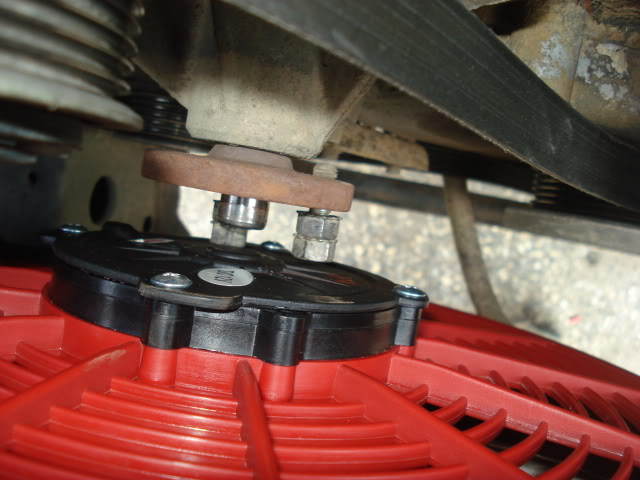
Made fillers for better air flow
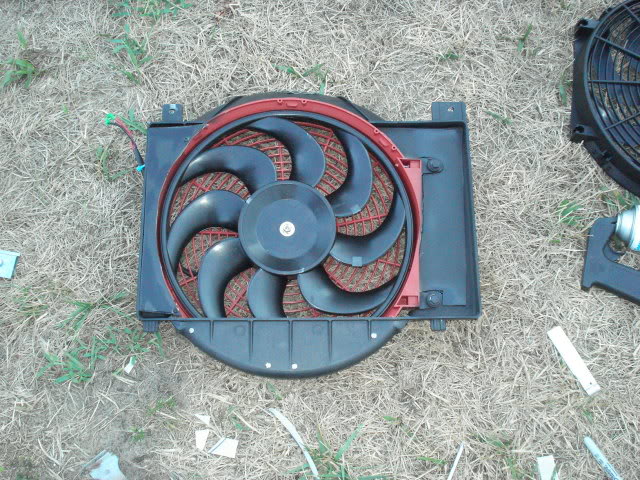
Installed
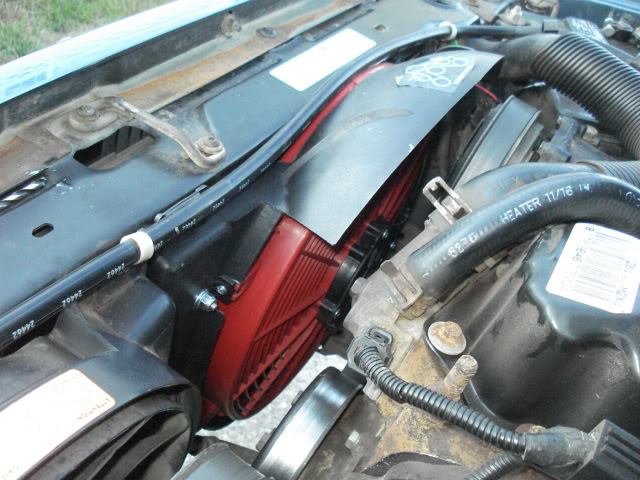
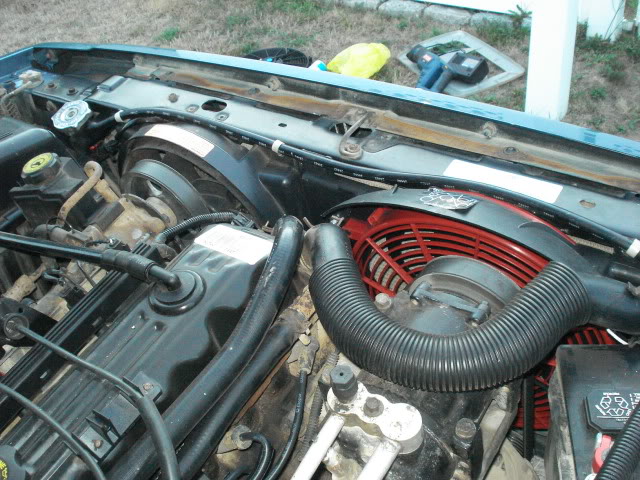
You didn't even know it was in there
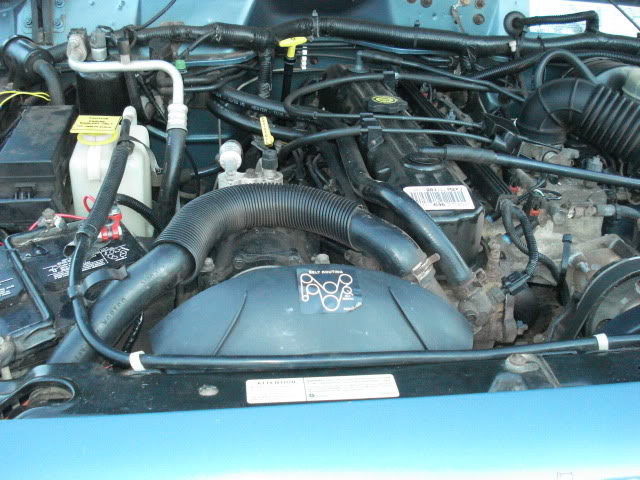
This set up worked great when I had the TC drop and no SYE installed yet. Problem was, when I finally did the SYE and removed the TC drop it changed the angle of the engine and trans and the bolts for the fan clutch hit the fan casing. So I had to find an alternative. I always wondered about just running 2 stock AC fans. I searched and searched. Some said the CFM's were too low and a few desert runners said they used them no problem. So I decided to give it a shot.
Like I said earlier, my pics were taken after I did this not during so I won't have all installation pics available but I think you'll get it.
Recently I installed a new radiator in my friends XJ. I held on to the old one for measurements because I knew I had to do something with mine. I figured that one was already out and it would be easier to come up with something. I test fitted a new stock AC fan that I purchased against the old radiator and took measurements. I kept the original AC fan in it's stock place and I can mount the new one right next to it with a little brainstorming.
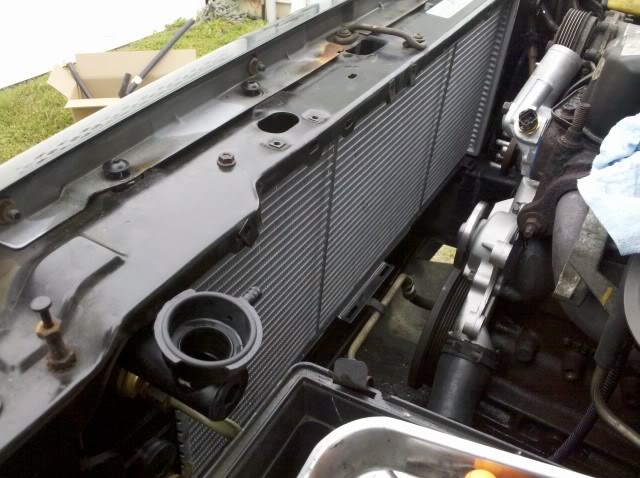
Here is a pic of the new radiator sitting in the Jeep.
I won't consider this a write up but just a little bit of information on how I did my dual stock AC fan mod. I've have many people PM me and ask me about how I did it and I don't want to keep clogging up other peoples threads with my pictures. So I decided to post this thread and I can just send the link.
I'm sure there will be some to say that this won't work. Well, it works on mine so I'm passing along the information. I believe if you make sure the radiator and condenser fins are kept clean and not bent you won't restrict airflow and you'll get the proper cooling you need.
Ok let's get started....
I previously had a dual fan set up. My Stock AC fan with a Derale 16 inch 2600cfm fan. DO NOT use this method unless you plan on running a TC drop forever. Just showing some pictures, the reason why is further in to the write up.


Pulled the studs and installed bolts


Made fillers for better air flow

Installed


You didn't even know it was in there

This set up worked great when I had the TC drop and no SYE installed yet. Problem was, when I finally did the SYE and removed the TC drop it changed the angle of the engine and trans and the bolts for the fan clutch hit the fan casing. So I had to find an alternative. I always wondered about just running 2 stock AC fans. I searched and searched. Some said the CFM's were too low and a few desert runners said they used them no problem. So I decided to give it a shot.
Like I said earlier, my pics were taken after I did this not during so I won't have all installation pics available but I think you'll get it.
Recently I installed a new radiator in my friends XJ. I held on to the old one for measurements because I knew I had to do something with mine. I figured that one was already out and it would be easier to come up with something. I test fitted a new stock AC fan that I purchased against the old radiator and took measurements. I kept the original AC fan in it's stock place and I can mount the new one right next to it with a little brainstorming.
Here is a pic of the new radiator sitting in the Jeep.

Last edited by Lyon; 07-09-2012 at 05:48 AM.
#2
This is a basic idea of what I did.
Cut the center fan shroud support bracket from another old/used radiator or trace one out and make one yourself
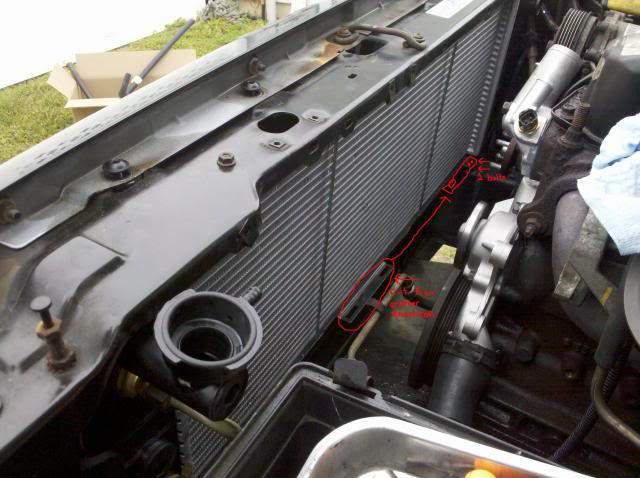
This is the bracket to cut from the old radiator
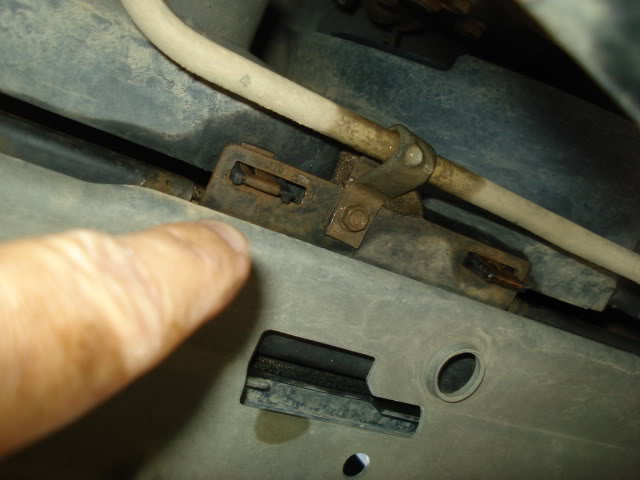
Install it overlapping the existing shroud support bracket on the passengers side with 2 1/4 X 20 nuts and bolts. The spacing works out perfectly.
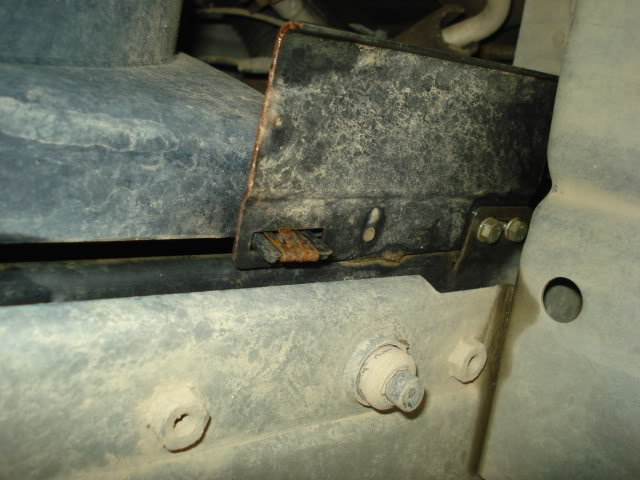
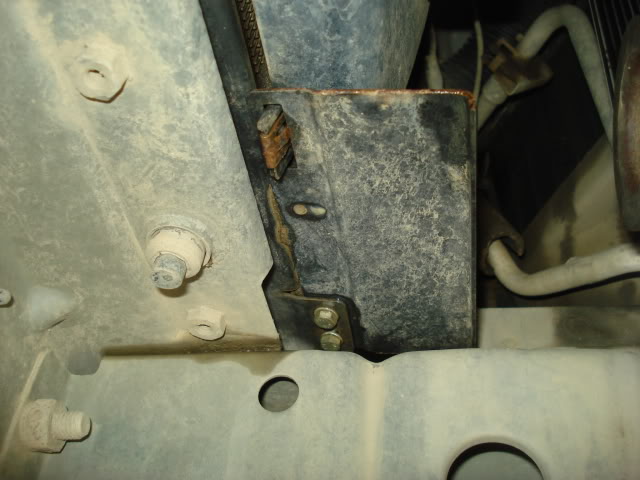
OK, here's a shot of them installed in the XJ
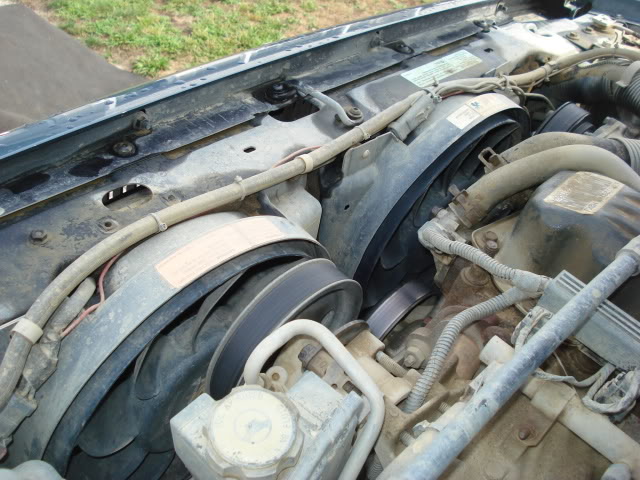
Sorry, where are my manners? I should have cleaned up before inviting you in!
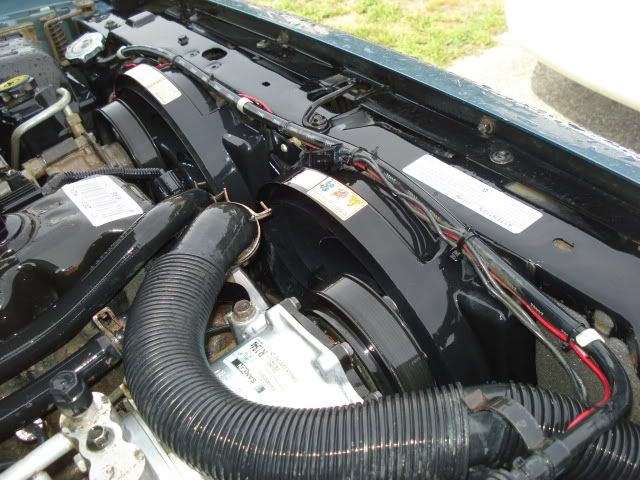
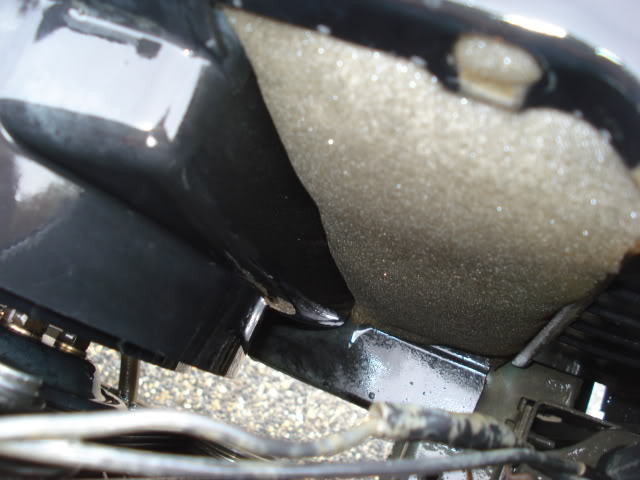
Now, some at this point will say, ok but the shroud is much smaller on the AC fan than it is on the original shroud for the clutch fan. TRUE. You will also have about a 3/4 inch gap between the two fan shrouds down the middle of the radiator. I had some thick 2 inch foam and made fillers. The foam will still allow a very little bit of air through to help cool without the fans trying to pull air from the engine compartment and recirculating it.
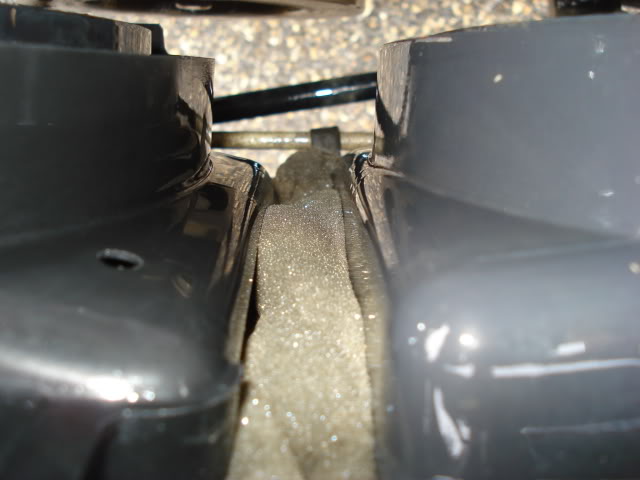
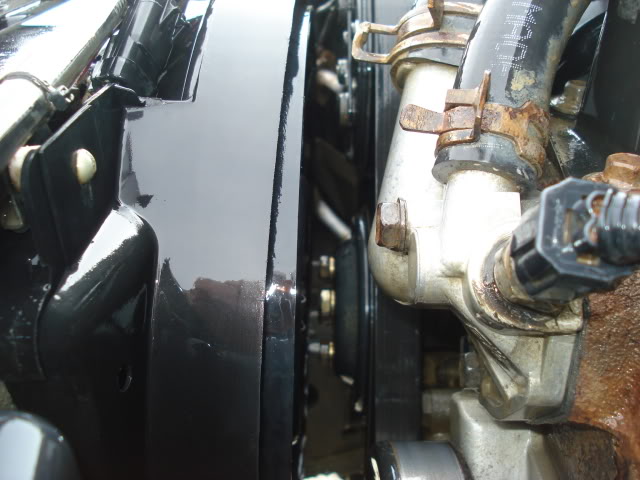
Your clearance fan to motor is fine
Cut the center fan shroud support bracket from another old/used radiator or trace one out and make one yourself

This is the bracket to cut from the old radiator

Install it overlapping the existing shroud support bracket on the passengers side with 2 1/4 X 20 nuts and bolts. The spacing works out perfectly.


OK, here's a shot of them installed in the XJ

Sorry, where are my manners? I should have cleaned up before inviting you in!

Now, some at this point will say, ok but the shroud is much smaller on the AC fan than it is on the original shroud for the clutch fan. TRUE. You will also have about a 3/4 inch gap between the two fan shrouds down the middle of the radiator. I had some thick 2 inch foam and made fillers. The foam will still allow a very little bit of air through to help cool without the fans trying to pull air from the engine compartment and recirculating it.


Your clearance fan to motor is fine

Last edited by Lyon; 07-04-2011 at 05:26 PM.
#3
Just a few other little things to do to make the set up work.
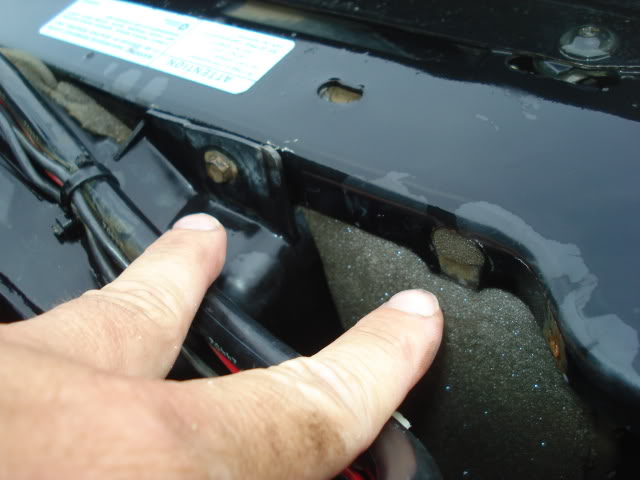
You'll need a longer screw and a spacer (about 1/2 inch to 5/8 inches long) for the shroud to fit straight to the rad support.
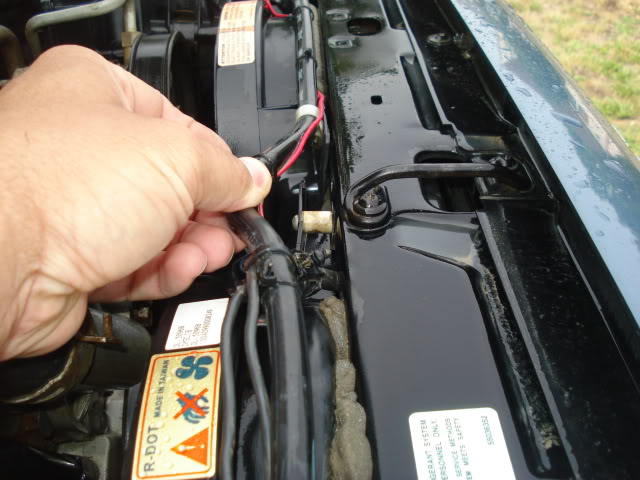
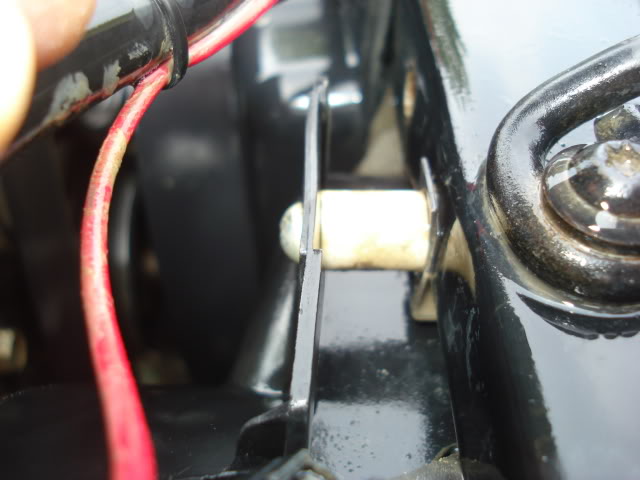
You'll also need to drill a new mounting hole nearest the battery end and move the original shroud clip
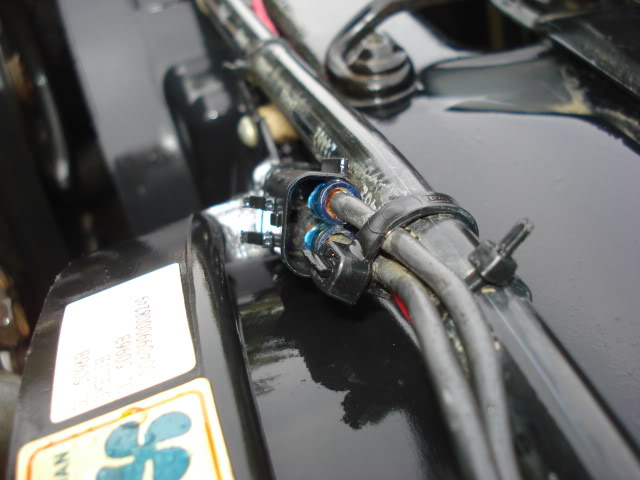
Until you can get another stock AC harness end you'll have to use generic ends to the plug on the new fan assembly.
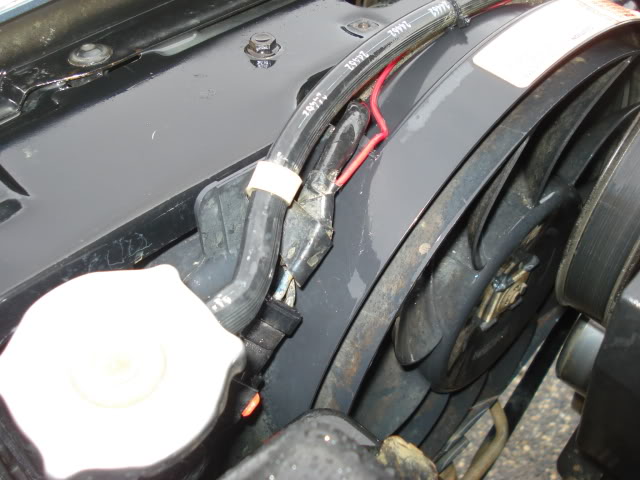
Now wire up your fan set how you like. I kept my original stock AC fan in stock working order. Meaning off the computer and temp sensor. It also comes on when the AC is engaged. I ran the 2nd fan off an additional relay and switch but also will run just like the stock fan. I used the 12 volt feed to the AC fan to power on the additional relay.
I also ran a "cutoff" switch to the same circuit in series so I can shut off the fans going through deep water.
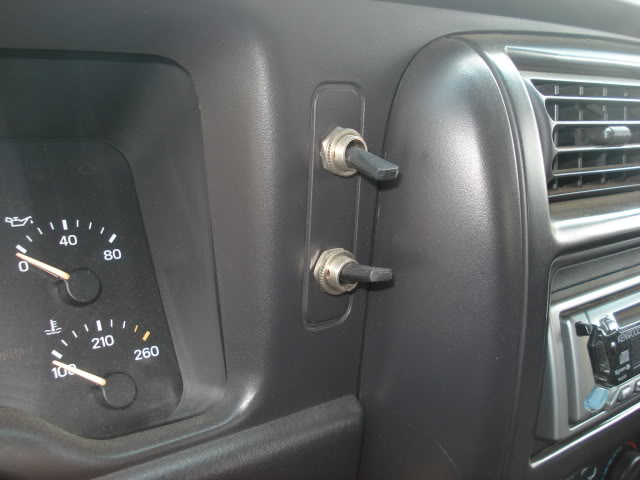
My top switch turns on the NEW AC fan. (The clutch fan replacement) when ever I want it to run.
The lower switch is my cutoff switch. In the up position, it allows the fans to run normally without any changes needed. With the switch down (off) it shuts both fans off. I don't want them binding when going through deep water. The switches also have a blue light on the tips to let me know when they are inoperation.
I hope this helps someone out there if they are thinking about doing it. I've had no problems with this set up whatsoever. I run a 180 t-stat and keep the radiator fins and condensor fins exceptionally clean. I normally clean them after every trail ride. No air flow through the coils= no cooling. Thanks for watching.
You'll need a longer screw and a spacer (about 1/2 inch to 5/8 inches long) for the shroud to fit straight to the rad support.


You'll also need to drill a new mounting hole nearest the battery end and move the original shroud clip

Until you can get another stock AC harness end you'll have to use generic ends to the plug on the new fan assembly.

Now wire up your fan set how you like. I kept my original stock AC fan in stock working order. Meaning off the computer and temp sensor. It also comes on when the AC is engaged. I ran the 2nd fan off an additional relay and switch but also will run just like the stock fan. I used the 12 volt feed to the AC fan to power on the additional relay.

I also ran a "cutoff" switch to the same circuit in series so I can shut off the fans going through deep water.

My top switch turns on the NEW AC fan. (The clutch fan replacement) when ever I want it to run.
The lower switch is my cutoff switch. In the up position, it allows the fans to run normally without any changes needed. With the switch down (off) it shuts both fans off. I don't want them binding when going through deep water. The switches also have a blue light on the tips to let me know when they are inoperation.
I hope this helps someone out there if they are thinking about doing it. I've had no problems with this set up whatsoever. I run a 180 t-stat and keep the radiator fins and condensor fins exceptionally clean. I normally clean them after every trail ride. No air flow through the coils= no cooling. Thanks for watching.
Last edited by Lyon; 07-04-2011 at 11:30 PM.
#6
Member
Joined: Jan 2011
Posts: 138
Likes: 0
From: St. Louis, MO
Year: 1992
Model: Cherokee
Engine: 4.0
Lyon, so you have the fan come on immediately and run continuously unless you manually shut it down?
Did either of you guys notice a big improvement in power or driveability of the vehicle? I always wondered what kind of drag the stock clutch setup placed on the engine. I'm always looking to free ups some extra power.
Did either of you guys notice a big improvement in power or driveability of the vehicle? I always wondered what kind of drag the stock clutch setup placed on the engine. I'm always looking to free ups some extra power.
#7
Lyon, so you have the fan come on immediately and run continuously unless you manually shut it down?
Did either of you guys notice a big improvement in power or driveability of the vehicle? I always wondered what kind of drag the stock clutch setup placed on the engine. I'm always looking to free ups some extra power.
Did either of you guys notice a big improvement in power or driveability of the vehicle? I always wondered what kind of drag the stock clutch setup placed on the engine. I'm always looking to free ups some extra power.
The fans will kick on at 218 I believe. It's the normal temp the AC fan would kick on to assist the clutch fan if it wasn't cooling enough. On hot days with the stock set up, the clutch fan doesn't pull enough CFM's to cool the system alone. Both fans run off the computer now but I have the ability to shut them off when I want. What I like to do is run 1 all the time while offroading so it never has the chance to get too hot. If the temp goes to 218 at that point, the other fan will kick in like normal to assist, shut off when needed and still be running the 1 fan in the "hand" position.
Thank you for bringing up the power issue. I completely forgot to report on that. The answer is yes, I noticed a considerable amount of acceleration off the line. The Jeep just feels lighter now. Much more pep. The fan clutch did put major drag on the motor. It was like night and day on my Jeep. I can't say if the fuel mileage changed because right when I did the mod the 1st time, I also went from 30 inch to 32 inch tires at the same time. The XJ will never be fuel efficient so I don't even attempt to try it. What I also like about the dual fan set up, is how quiet the Jeep is now. It doesn't sound like a school bus coming down the road anymore.
 Do the switch and report back to me. You'll swear you're in a different vehicle. On the highway, they almost never run. I've gone 25 miles without them going on.
Last edited by Lyon; 07-04-2011 at 11:55 PM.
Trending Topics
#8
Member
Joined: Jan 2011
Posts: 138
Likes: 0
From: St. Louis, MO
Year: 1992
Model: Cherokee
Engine: 4.0
The fans will kick on at 218 I believe. It's the normal temp the AC fan would kick on to assist the clutch fan if it wasn't cooling enough. On hot days with the stock set up, the clutch fan doesn't pull enough CFM's to cool the system alone. Both fans run off the computer now but I have the ability to shut them off when I want. What I like to do is run 1 all the time while offroading so it never has the chance to get too hot. If the temp goes to 218 at that point, the other fan will kick in like normal to assist, shut off when needed and still be running the 1 fan in the "hand" position.
Thank you for bring up the power issue. I completely forgot to report on that. The answer is yes, I noticed a considerable amount of acceleration off the line. The Jeep just feels lighter now. Much more pep. The fan clutch did put major drag on the motor. It was like night and day on my Jeep. I can't say if the fuel mileage changed because right when I did the mod the 1st time, I also went from 30 inch to 32 inch tires at the same time. The XJ will never be fuel efficient so I don't even attempt to try it. What I also like about the dual fan set up, is how quiet the Jeep is now. It doesn't sound like a school bus coming down the road anymore. Do the switch and report back to me. You'll swear you're in a different vehicle.
Thank you for bring up the power issue. I completely forgot to report on that. The answer is yes, I noticed a considerable amount of acceleration off the line. The Jeep just feels lighter now. Much more pep. The fan clutch did put major drag on the motor. It was like night and day on my Jeep. I can't say if the fuel mileage changed because right when I did the mod the 1st time, I also went from 30 inch to 32 inch tires at the same time. The XJ will never be fuel efficient so I don't even attempt to try it. What I also like about the dual fan set up, is how quiet the Jeep is now. It doesn't sound like a school bus coming down the road anymore.
 Do the switch and report back to me. You'll swear you're in a different vehicle.
#9
Yeah, I looked in to that too and I think that set up is over rated. I searched all over for ideas on a different fan set up and always came across that set up. Lots of guys loved it at first but complained about relay and wiring problems with them. Apparently they have a huge Amp draw and it causes all kinds of problems. Some even had to upgrade main battery wiring to run it with other accesories. So I scratched that idea. Plus, a few inches of the fan is not used because it hangs lower that the radiator itself. I was also worried about hitting it on something. This set up is great, works awesome, is rated for power properly since it already uses one and it looks stock.
#11
1- Stock AC fan (additional to the 1 already in there)
1- 30/40 amp relay and wiring set up.
1- roll 10 guage wire red 25 ft
1- roll 10 guage wire black 25 ft
1- set 10 guage butt connectors
2- Your style toggle switches. I used 30 amp with led indicators.
1- Fish eye style connector for battery hook up. Just get an entire electrical connector kit for your own style. Harbor Freight...
1- cordless drill gun
1- drill bit. IIRC it was a 1/8 bit but not sure. Didn't do pics during install.
1- cordless saw with bi-metal blade
1- piece 2 inch thick foam approx 12X16 inches
1- roll harness covers
1- 1 inch sheet metal screw
1- fabbed at home spacer
1- pack of small black zip ties
1- drill bit to install the toggles to the dash. You'll need to match up your toggles since they sometimes run different sizes.
1- inline fuse kit (off the battery)
2- 1/4 20 nuts, lock washers and bolts
I think that's it.
1- 30/40 amp relay and wiring set up.
1- roll 10 guage wire red 25 ft
1- roll 10 guage wire black 25 ft
1- set 10 guage butt connectors
2- Your style toggle switches. I used 30 amp with led indicators.
1- Fish eye style connector for battery hook up. Just get an entire electrical connector kit for your own style. Harbor Freight...

1- cordless drill gun
1- drill bit. IIRC it was a 1/8 bit but not sure. Didn't do pics during install.
1- cordless saw with bi-metal blade
1- piece 2 inch thick foam approx 12X16 inches
1- roll harness covers
1- 1 inch sheet metal screw
1- fabbed at home spacer
1- pack of small black zip ties
1- drill bit to install the toggles to the dash. You'll need to match up your toggles since they sometimes run different sizes.
1- inline fuse kit (off the battery)
2- 1/4 20 nuts, lock washers and bolts
I think that's it.

Last edited by Lyon; 07-05-2011 at 08:31 AM. Reason: Forgot them damn bolts. haha!
#13
haha thanks! I didn't want to call it a write up since I didn't have ALL the information and ALL the good pics I needed for a proper write up. I had about an hour to get this installed so I didn't have time during the install to take pics. I just hope the info helps someone out.

#14
CF Veteran
Joined: Aug 2010
Posts: 1,220
Likes: 0
From: Greensboro
Year: 1992
Model: Cherokee
Engine: 4.0L
1- Stock AC fan (additional to the 1 already in there)
1- 30/40 amp relay and wiring set up.
1- roll 10 guage wire red 25 ft
1- roll 10 guage wire black 25 ft
1- set 10 guage butt connectors
2- Your style toggle switches. I used 30 amp with led indicators.
1- Fish eye style connector for battery hook up. Just get an entire electrical connector kit for your own style. Harbor Freight...
1- cordless drill gun
1- drill bit. IIRC it was a 1/8 bit but not sure. Didn't do pics during install.
1- cordless saw with bi-metal blade
1- piece 2 inch thick foam approx 12X16 inches
1- roll harness covers
1- 1 inch sheet metal screw
1- fabbed at home spacer
1- pack of small black zip ties
1- drill bit to install the toggles to the dash. You'll need to match up your toggles since they sometimes run different sizes.
1- inline fuse kit (off the battery)
2- 1/4 20 nuts, lock washers and bolts
I think that's it.
1- 30/40 amp relay and wiring set up.
1- roll 10 guage wire red 25 ft
1- roll 10 guage wire black 25 ft
1- set 10 guage butt connectors
2- Your style toggle switches. I used 30 amp with led indicators.
1- Fish eye style connector for battery hook up. Just get an entire electrical connector kit for your own style. Harbor Freight...

1- cordless drill gun
1- drill bit. IIRC it was a 1/8 bit but not sure. Didn't do pics during install.
1- cordless saw with bi-metal blade
1- piece 2 inch thick foam approx 12X16 inches
1- roll harness covers
1- 1 inch sheet metal screw
1- fabbed at home spacer
1- pack of small black zip ties
1- drill bit to install the toggles to the dash. You'll need to match up your toggles since they sometimes run different sizes.
1- inline fuse kit (off the battery)
2- 1/4 20 nuts, lock washers and bolts
I think that's it.

Thanks man. I think I'm going to do this this weekend


