Show your Homebrew Roof Rack Pics!!!
 06-18-2010, 12:38 PM
#1
Senior Member
Thread Starter
Join Date: Jan 2008
Location: Kenosha, Wi
Posts: 551
Likes: 0
Received 1 Like
on
1 Post
Year: 2000
Model: Cherokee
Engine: 4.0L I-6
Couldn't find a thread for this, but who cares if there's already one right??? Everyone loves pictures, so post them up! I've seen various threads about homebrew racks, but figured it'd be nice to see them all in one place!!!
Im going to be picking up a cheap welder pretty soon & this is going to be my first project, so im looking for ideas on the build & mounting.
Try to post detailed pics if you have them, along with the size of your rack!
YeeHaw!!!!!!!!!!!!!
Im going to be picking up a cheap welder pretty soon & this is going to be my first project, so im looking for ideas on the build & mounting.
Try to post detailed pics if you have them, along with the size of your rack!
YeeHaw!!!!!!!!!!!!!
Last edited by BigVaz; 06-18-2010 at 12:42 PM.

 06-18-2010, 06:36 PM
#4
CF Veteran
Join Date: Sep 2009
Location: West Valley
Posts: 3,612
Likes: 0
Received 0 Likes
on
0 Posts
Year: 1998
Model: Cherokee (XJ)
Engine: 4.0
I copied Warthogs as well. 42"X52", made out of 3/4" and 1/2" EMT. Mines bolted as I live in an apartment and built it on my patio.
Last edited by Desert Rat; 06-18-2010 at 08:49 PM. Reason: Failed to read OP's request for specifics.


 06-19-2010, 08:38 AM
#7
Honorary Moderator
Join Date: Mar 2010
Location: Gilbert AZ/Las Cruces NM
Posts: 8,135
Likes: 0
Received 14 Likes
on
12 Posts
Year: 1996
Model: Cherokee
Engine: 4.0 upgraded
here ia mine 4'3"x6'2"x8" out of 1/4" steel rod in 2x2 squares(HD store display racks)
(i know bad poser shot. Its all i had tho!)


(i know bad poser shot. Its all i had tho!)
Trending Topics
06-19-2010, 01:19 PM
#8
CF Veteran
Join Date: Jul 2009
Location: Keesler AFB, MS
Posts: 1,640
Likes: 0
Received 0 Likes
on
0 Posts
Year: 1998 XJ
Model: Cherokee
Engine: 4.0L
I have some pics in my album but i just charged up the camera and going to take my daughter off road. So i will take some more pics for you there. I finally made it around to making some custom mounts for my shovel and hi lift jack. Everything is mounted, Now just waiting on a spare to throw up there. Shouldn't be longer than 4 hours or so to post the pics
06-19-2010, 06:05 PM
#9
CF Veteran
Join Date: Jul 2009
Location: Keesler AFB, MS
Posts: 1,640
Likes: 0
Received 0 Likes
on
0 Posts
Year: 1998 XJ
Model: Cherokee
Engine: 4.0L
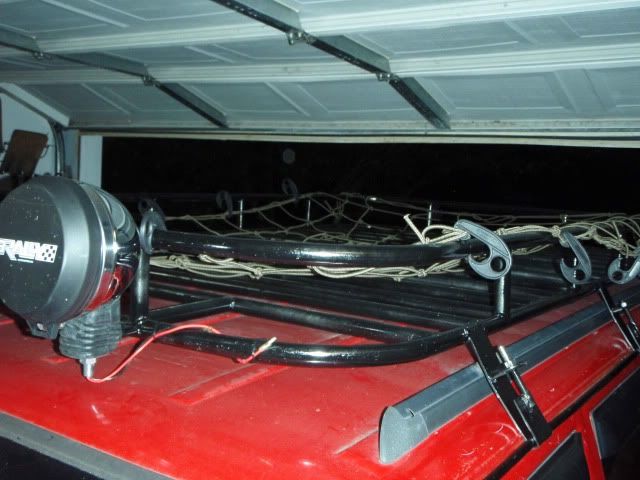
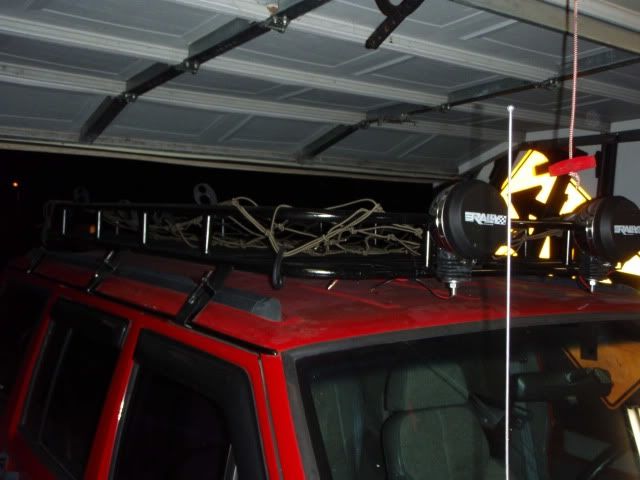
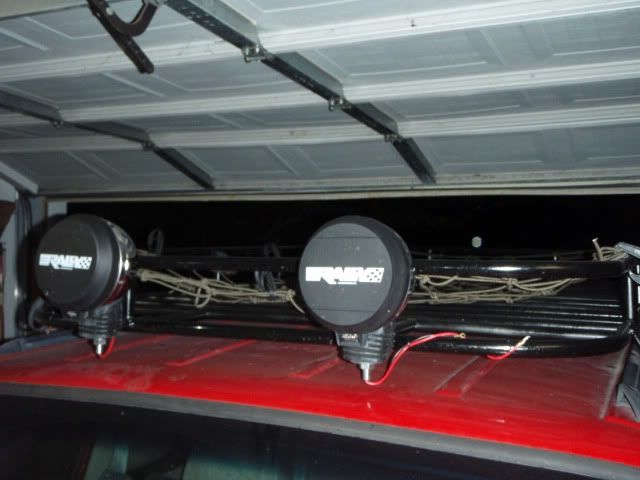
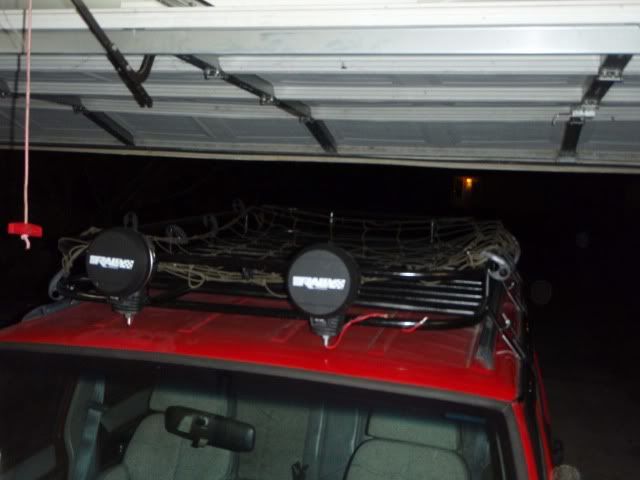
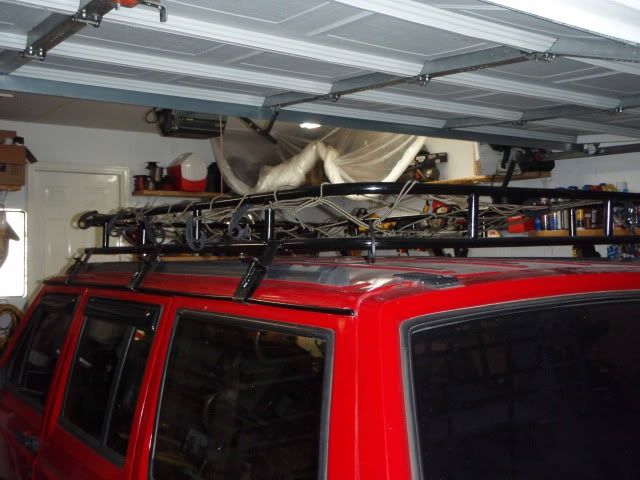
Mine is made from 1" EMT Conduit. Demensions are 42"x58"x5" IIRC. I had a full thread on it but have not been able to find it in a while. I have seached a couple times for it. Let me know if you want the write up, I can post it in this thread. Here are a couple pics i took today.
Last edited by warthog; 06-19-2010 at 06:10 PM.
06-19-2010, 06:48 PM
#12
CF Veteran
Join Date: Jul 2009
Location: Keesler AFB, MS
Posts: 1,640
Likes: 0
Received 0 Likes
on
0 Posts
Year: 1998 XJ
Model: Cherokee
Engine: 4.0L
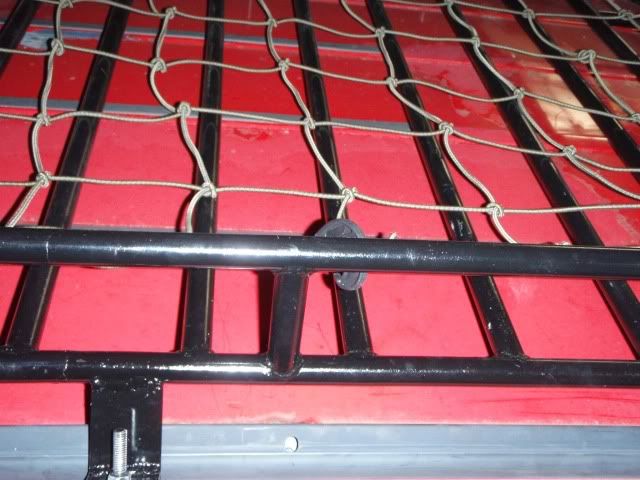
Some build Pics are in my album
you will need
four 10' pieces of 1" emt conduit (Rails)
three 10' pieces of 1/2" emt conduit (floor)
about 8' of 1/4" x 1" aluminum strip (supports)
2 boxes of self tapping screws
3' of 3/4" galvanized steel pipe (for bushings)
1" Tube bender (rent)
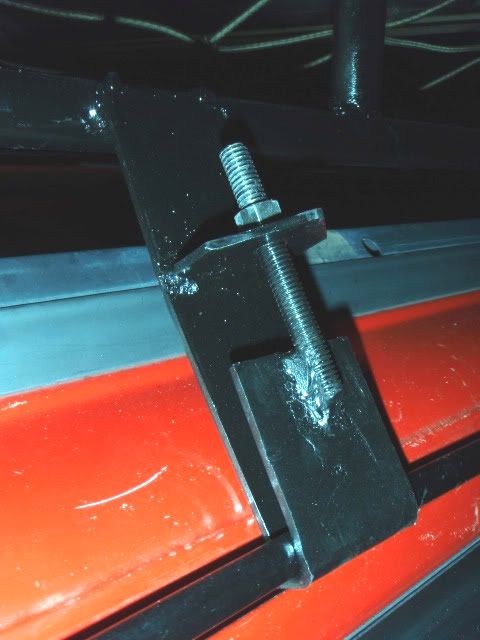
four 1" u bolts (to mount)
2 pieces of thin 12" x 24" diamond plate (optional)
buy a big big square (10 bucks at lowes)
i used the square to make a jig out of 2x4 wood. that was my template to make sure all of my bends were the same.
if you use your factory roof rack to mount it on your width will be 42". my length is 58" but this depends on what you want.
take 1 piece of conduit, make your measurements (mine was 58" front to back) this will probably sound confusing but i will try to explain anyway. your piece of conduit is 120" long. minus 120" by 58" and that leaves you with 62. half of 62" is 31". now you should measure in 31" from one end of the conduit and mark it, now do the same from the other end. you should have 58" in between both your marks. there is a star on the bender. sue that as your marker everytime and bend 2 90 degree bends into it so it looks like this [. Take the other 3 pieces and bend them the exact same way. you can cut off the excess later to make it 42" wide. make sure all your pieces are exactly the same. now overlap them like this [] and using a square. Measure 10 times cut once. cut off the same amount on each end to make it 42" wide when the ends are butted together.
you will have to grind some of the outer diameter of the 3/4" galvanized steel pipe for it to fit inside the 1" emt. then after it will fit inside the emt, cut four 6" pieces. this will be used to connect both sides of the emt conduit. put 3" in one side and secure and then the other 3" inside the other side.
now use your bushings to connect each side top and bottom and make sure they are the exact same. great thing about self tapping screws is that you can removed them and fix your mistakes unlike welding.
With the aluminum strip. cut it into 5" pieces. Or however tall you want it. it should make around 18 or 19. make sure they are all the same length. you will need to predrill these holes. i used a gig on this also to make sure all my holes in each end would look the same. i will try to upload more pics of these items and jigs tonight. evenly space however many supports you want on each side. i started in the middle of each side then 1/2'd each remaining distance and put another support. when the top and bottom are connected now is a good time to grind down any flaws or sharp points you want to. i ground down flush the ends of my supports. you will need to do this atleast on the bottom to install your floor later.
now once all that is done you can install the floor. measure from one side to the other. you can see on the pics in my profile that i connnected my flooring right under my supports. once you have cut all your 1/2" conduit pieces to the same length. you will need to flatten each end so they will connect flush on the bottom of the rack. predrill these holes and then install. grind down the rough edges. if you want to put thin pieces of diamond plate sheet metal on the corners, now is the time. this is up to you and you can make it look the way you want it. i hope i have explained everything and it is understandable. good luck and send me some pics when your dine. there was a lot of measuring and squaring up. this was the first thing i have ever made and fab'd up. i only made one mistake, i said that just to say this. if you take your time and make sure your measurments are good. it is easy.
hopefully i didn' leave anything out
let me know how it works out for you.
later
rusty
you will need
four 10' pieces of 1" emt conduit (Rails)
three 10' pieces of 1/2" emt conduit (floor)
about 8' of 1/4" x 1" aluminum strip (supports)
2 boxes of self tapping screws
3' of 3/4" galvanized steel pipe (for bushings)
1" Tube bender (rent)
four 1" u bolts (to mount)
2 pieces of thin 12" x 24" diamond plate (optional)
buy a big big square (10 bucks at lowes)
i used the square to make a jig out of 2x4 wood. that was my template to make sure all of my bends were the same.
if you use your factory roof rack to mount it on your width will be 42". my length is 58" but this depends on what you want.
take 1 piece of conduit, make your measurements (mine was 58" front to back) this will probably sound confusing but i will try to explain anyway. your piece of conduit is 120" long. minus 120" by 58" and that leaves you with 62. half of 62" is 31". now you should measure in 31" from one end of the conduit and mark it, now do the same from the other end. you should have 58" in between both your marks. there is a star on the bender. sue that as your marker everytime and bend 2 90 degree bends into it so it looks like this [. Take the other 3 pieces and bend them the exact same way. you can cut off the excess later to make it 42" wide. make sure all your pieces are exactly the same. now overlap them like this [] and using a square. Measure 10 times cut once. cut off the same amount on each end to make it 42" wide when the ends are butted together.
you will have to grind some of the outer diameter of the 3/4" galvanized steel pipe for it to fit inside the 1" emt. then after it will fit inside the emt, cut four 6" pieces. this will be used to connect both sides of the emt conduit. put 3" in one side and secure and then the other 3" inside the other side.
now use your bushings to connect each side top and bottom and make sure they are the exact same. great thing about self tapping screws is that you can removed them and fix your mistakes unlike welding.
With the aluminum strip. cut it into 5" pieces. Or however tall you want it. it should make around 18 or 19. make sure they are all the same length. you will need to predrill these holes. i used a gig on this also to make sure all my holes in each end would look the same. i will try to upload more pics of these items and jigs tonight. evenly space however many supports you want on each side. i started in the middle of each side then 1/2'd each remaining distance and put another support. when the top and bottom are connected now is a good time to grind down any flaws or sharp points you want to. i ground down flush the ends of my supports. you will need to do this atleast on the bottom to install your floor later.
now once all that is done you can install the floor. measure from one side to the other. you can see on the pics in my profile that i connnected my flooring right under my supports. once you have cut all your 1/2" conduit pieces to the same length. you will need to flatten each end so they will connect flush on the bottom of the rack. predrill these holes and then install. grind down the rough edges. if you want to put thin pieces of diamond plate sheet metal on the corners, now is the time. this is up to you and you can make it look the way you want it. i hope i have explained everything and it is understandable. good luck and send me some pics when your dine. there was a lot of measuring and squaring up. this was the first thing i have ever made and fab'd up. i only made one mistake, i said that just to say this. if you take your time and make sure your measurments are good. it is easy.
hopefully i didn' leave anything out
let me know how it works out for you.
later
rusty
06-22-2010, 09:21 PM
#13
Senior Member
Join Date: Jan 2009
Posts: 562
Likes: 0
Received 1 Like
on
1 Post
Year: 1990
Model: Cherokee
Engine: Renix 4.0L
Yes, I made them. The parts of them that are in the pics are from an old leafspring that I cut up. I think 1/4"x 2.5" will do just fine. Not in the pics are the way they actually clamp down on the gutters. I will have pics of that part up in my Swing up tire carrier thread sometime this week.