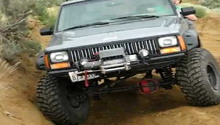
Jeep Cherokee 1984-1996: How to Install Track Bar
Finish your Cherokee lift properly with a heavy duty, adjustable track bar to center the axle at any ride height. You can do this in your driveway using basic tools.
This article applies to the Jeep Cherokee XJ (1984-1996).
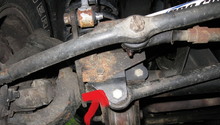
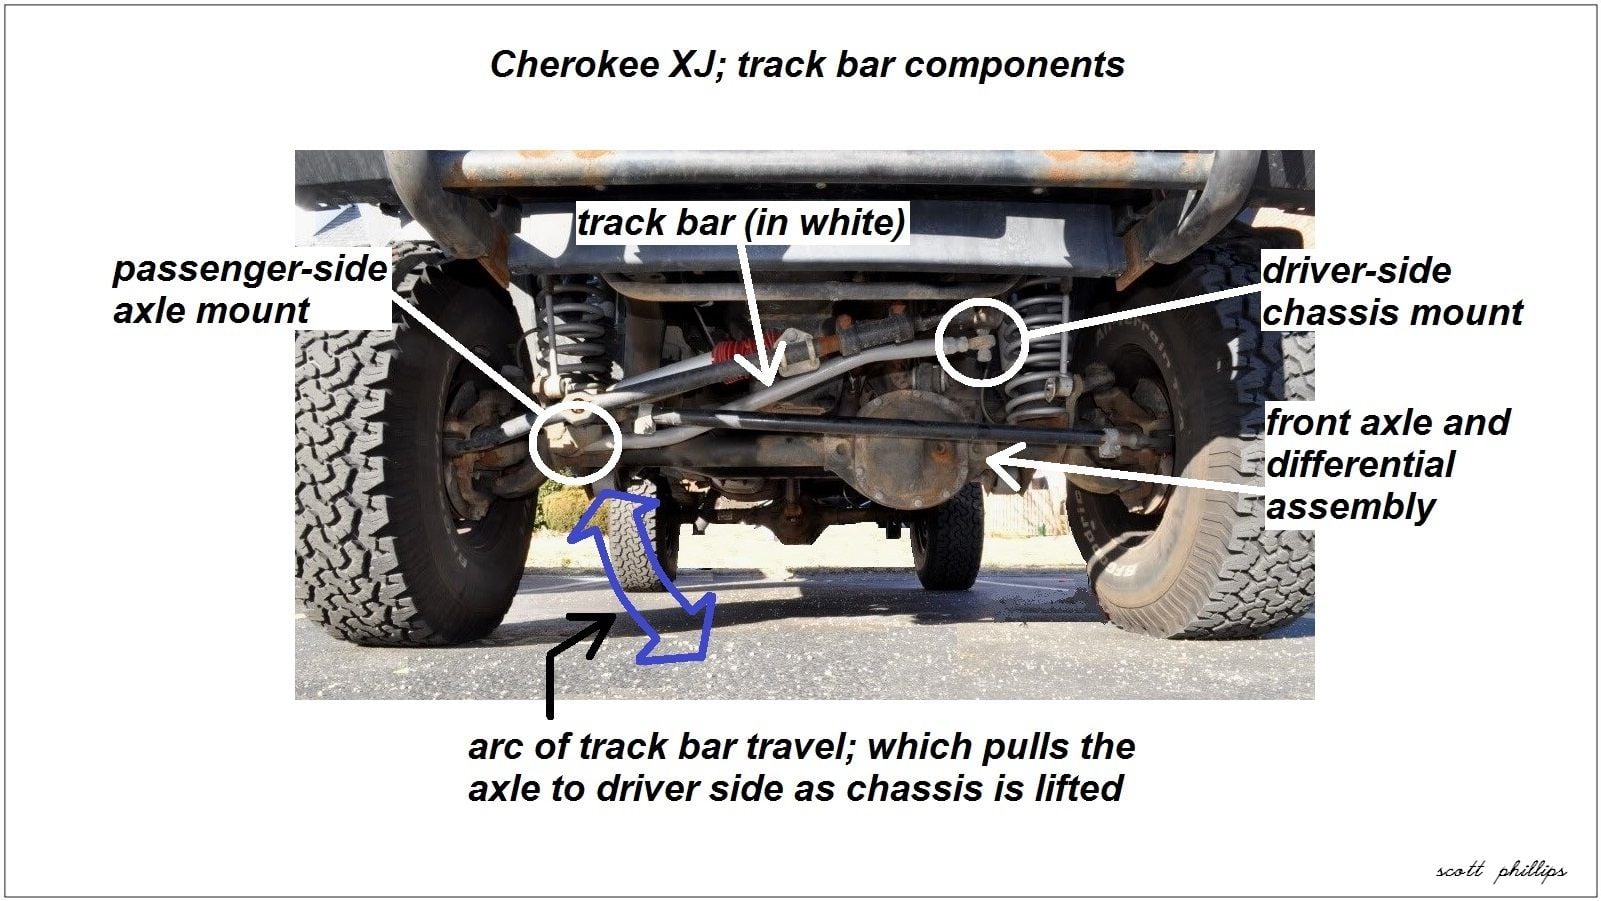
The track bar is also called the Panhard rod, as it was invented by the Panhard Automobile Company in France. In the Cherokee XJ, the OEM front track bar mounts diagonally from the driver-side chassis to the passenger-side of the axle, and is a fixed length for stock ride height. The rigid track bar prevents the coil-sprung axle from shifting left or right under the vehicle. However, when the suspension travels vertically, the track bar can only travel in an arc. In rough terrain, when the axle moves down away from the chassis, the arc of track bar travel pulls the axle to the left—toward the driver-side chassis mount. This is temporary and normal with the long suspension travel that occurs during off-road driving or rock climbing.
However, when you lift your Cherokee XJ's ride height, the stock track bar will pull the front axle permanently to the left, affecting alignment and possibly causing driveline binding. Installing the adjustable length track bar will re-center the axle, as well as allow for a range of ride height choices.
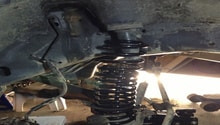
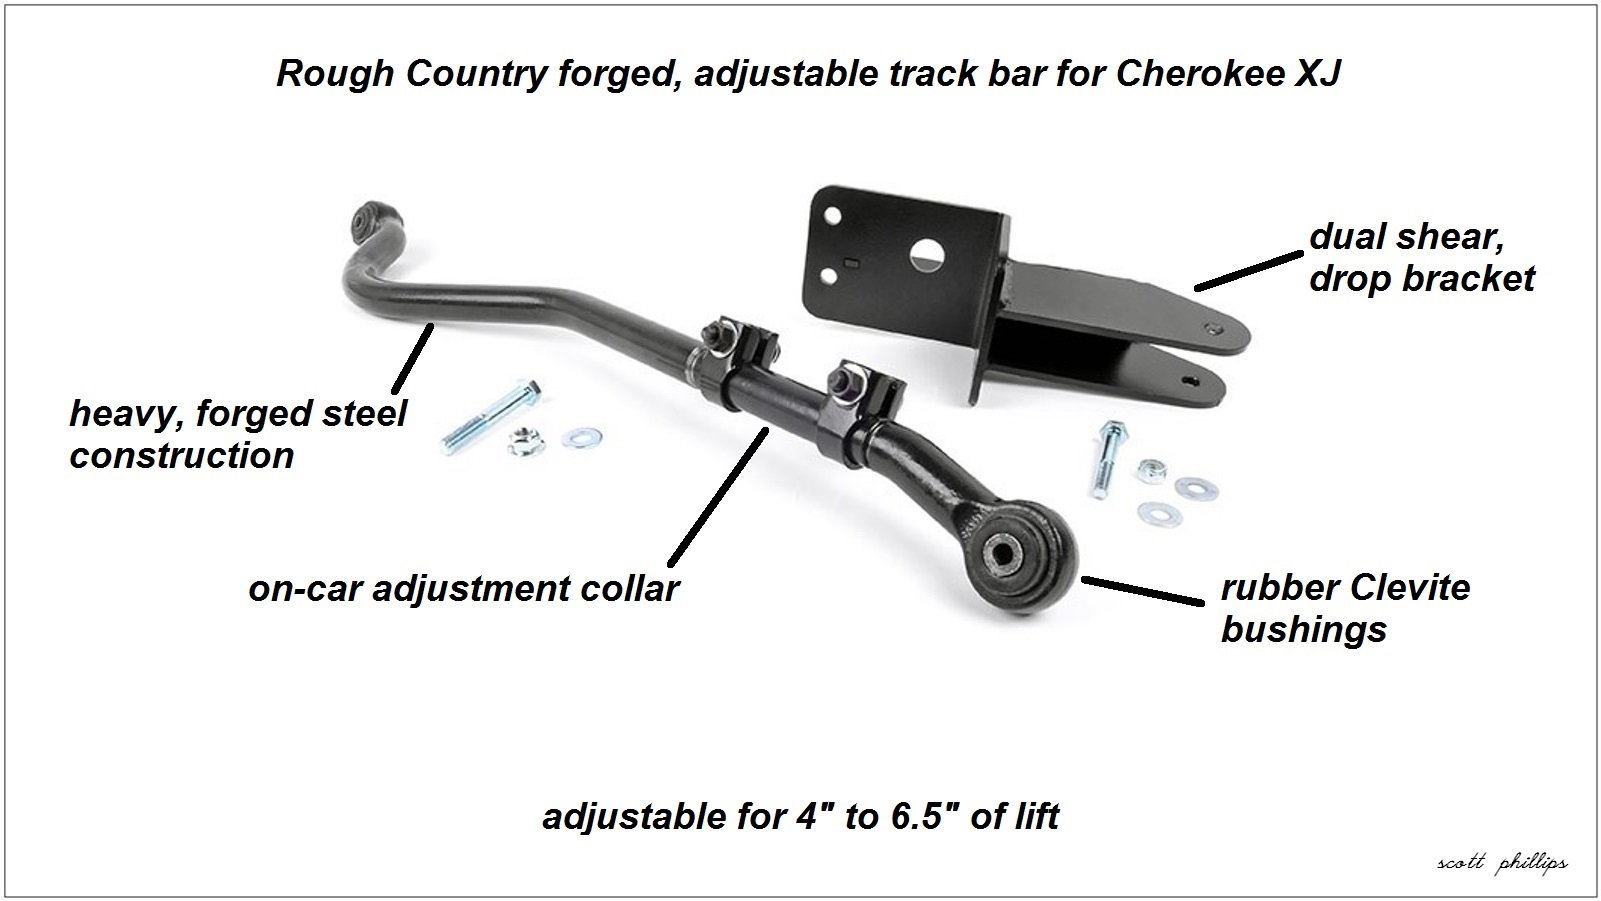
The track bar seen in this article and the BleepinJeep Featured Video is the Rough Country (RC) model 1042, which is made for the Cherokee XJ. It is adjustable for Cherokees with 4" to 6.5" of lift, it is made with solid, forged steel construction, and can be adjusted without taking it off the vehicle. The chassis mount bracket lowers the bar position for better suspension geometry and is made with two mating flanges, rather than the OEM bracket's single flange. This means the mounting bolt goes through two pieces of metal for security. The RC 1042 was made for serious off-road and rock climbing.
Note that the Cherokee XJ also has a rear axle track bar, which is mounted to the passenger-side chassis and the driver-side of the rear axle. When the vehicle is lifted, the rear track bar pulls the rear axle to the right and toward the passenger-side chassis mount.

Materials Needed
- Track bar and hardware
- 15mm, 17mm, 18mm, and 19mm socket wrench
- 11/16" and 5/8" box wrench
- Ball joint separator
- Needle nose pliers
- Spirit level
- Ruler
- Mechanic's gloves
- Blue Threadlocker
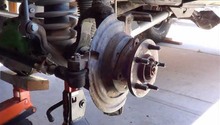
Step 1 – Remove stock track bar from the chassis mount
- Use needle nose pliers to pull the cotter pin from the chassis mount nut.
- Use the 19mm socket wrench to loosen the nut, but leave it loosely threaded on the shaft. This is to catch the track bar when the ball joint separates.
- Use the ball joint separator tool to pop the ball joint loose.
- Remove the nut and lower the track bar.
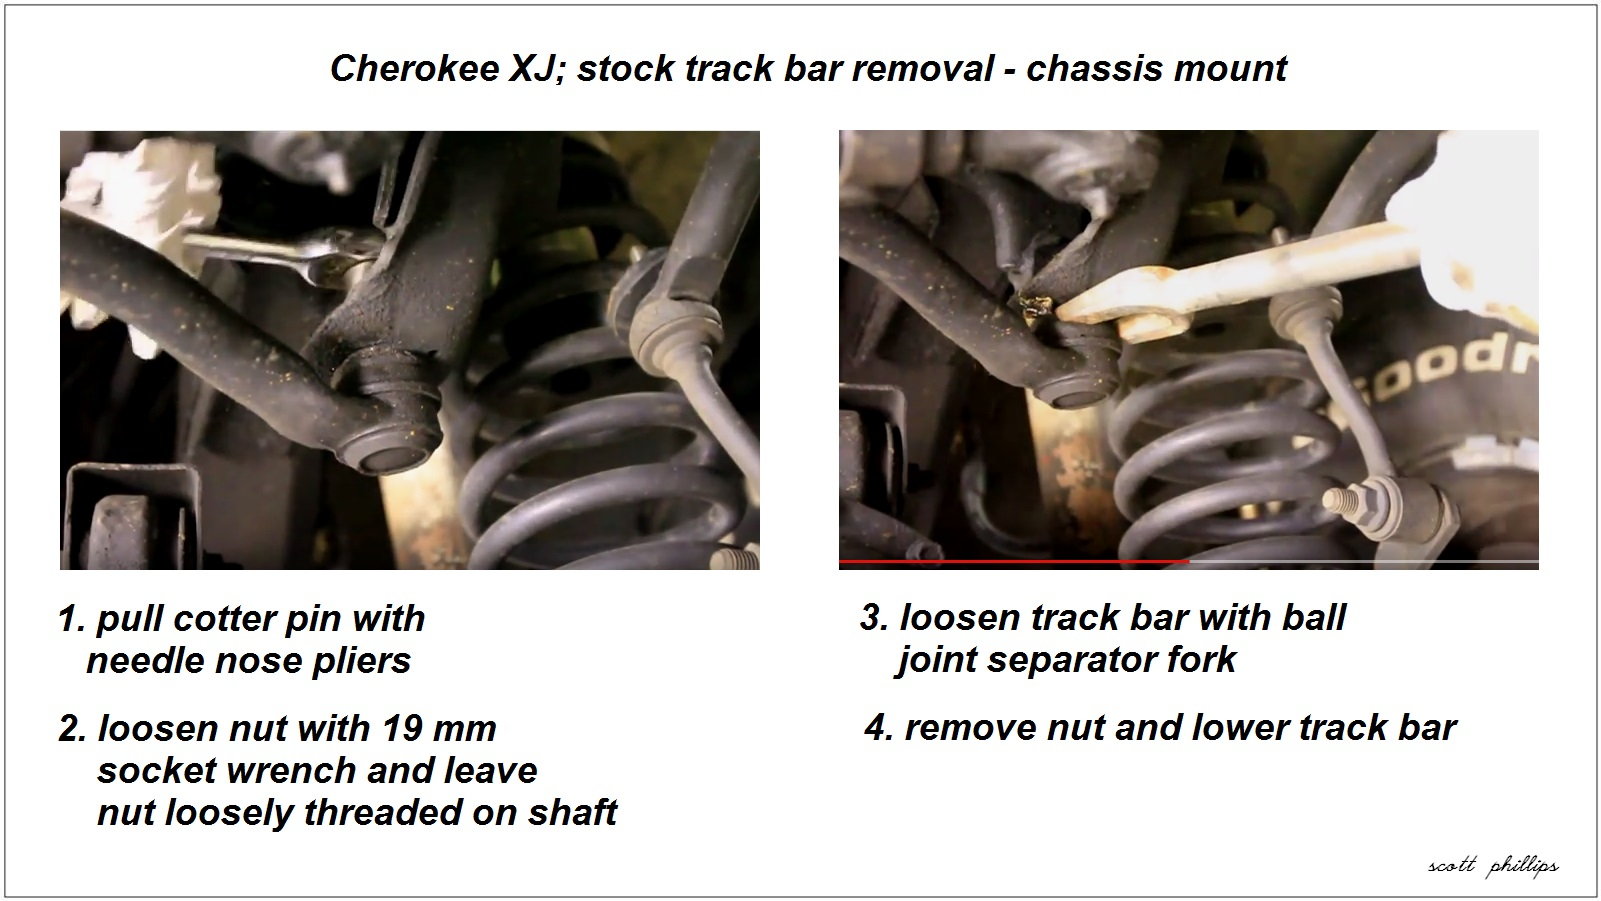
Caution
The ball joint can break free with great force. Always use a restraining nut on the shaft, and never be in the way of the track bar.
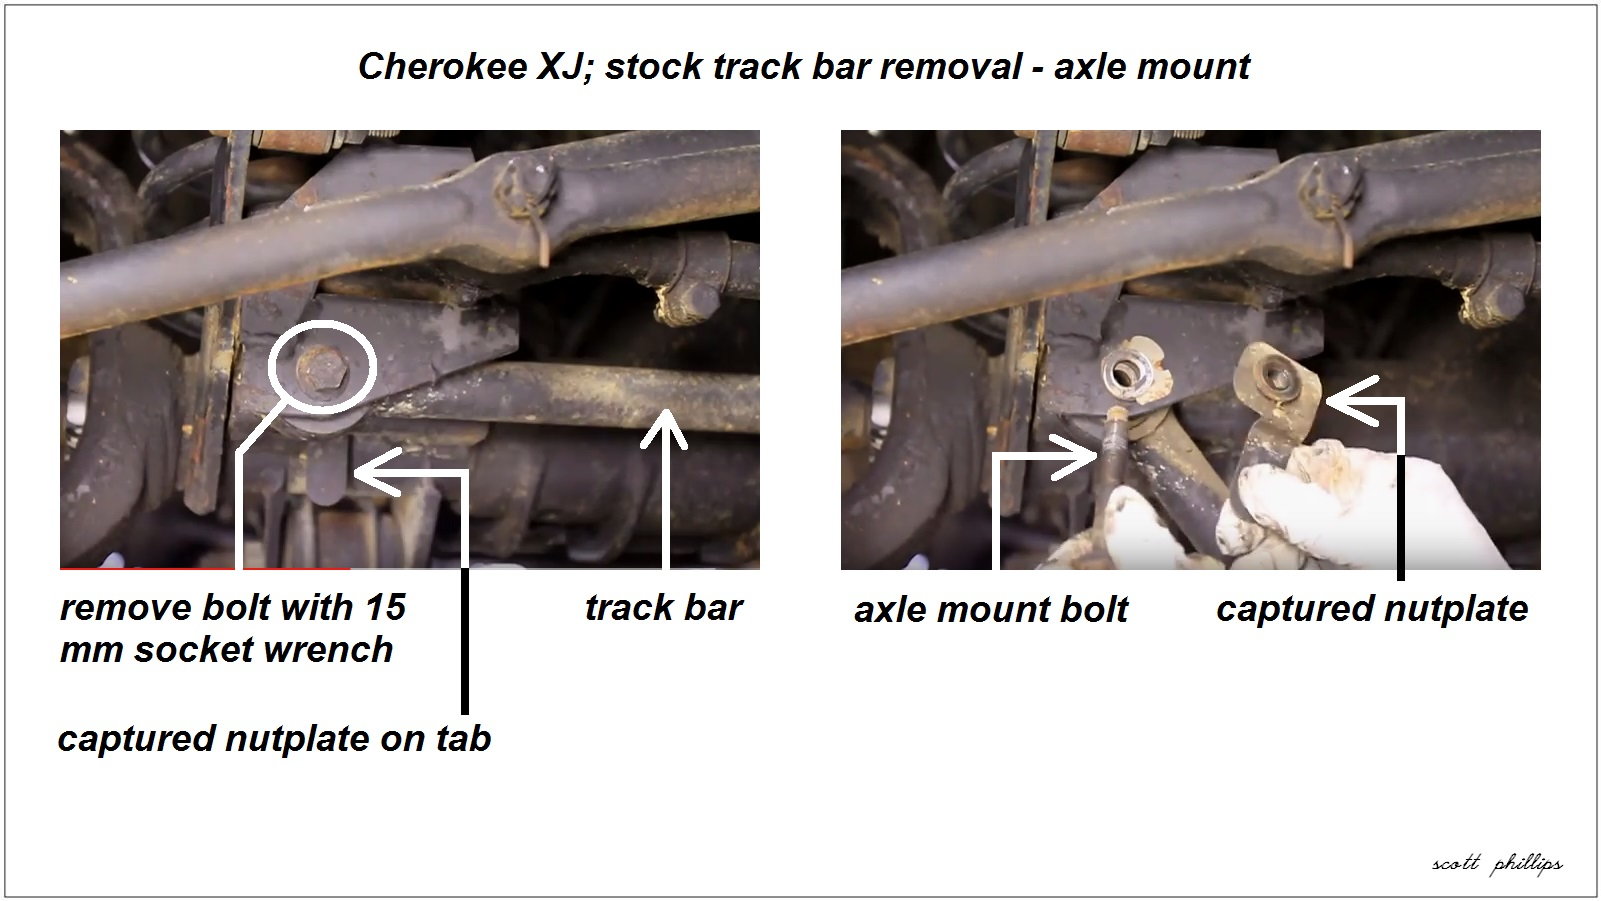
Step 2 – Remove the stock track bar from the axle mount
- Use the 15mm socket wrench to remove the axle mount bolt.
- Remove the captured nut plate.
- Lower the track bar and remove it.
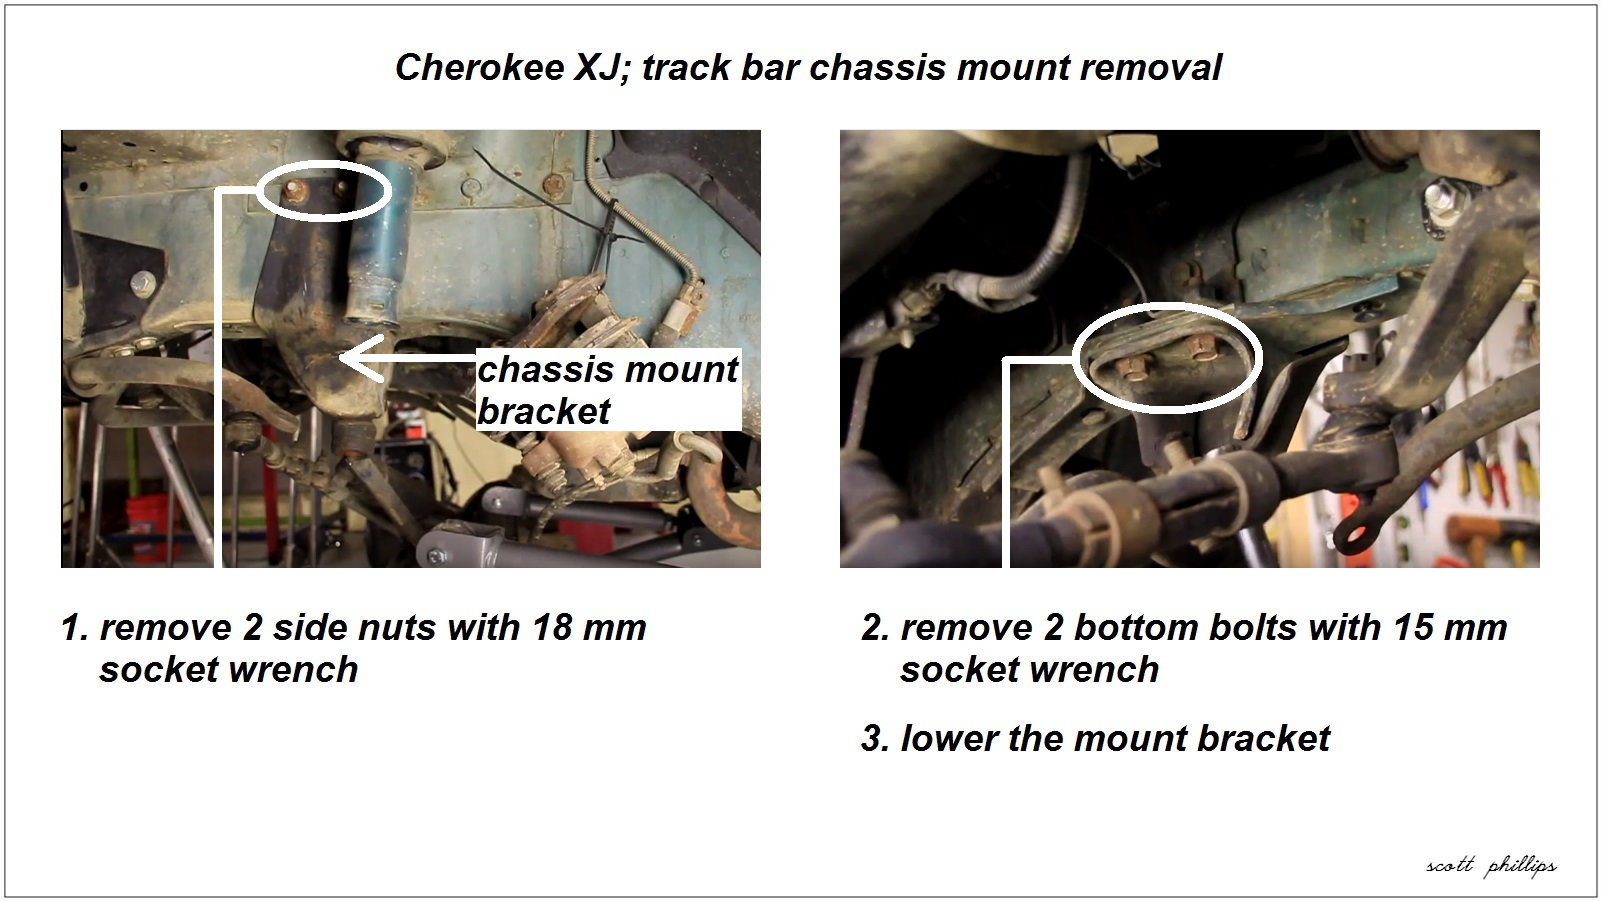
Step 3 – Remove the stock chassis mount bracket
Only do this step if your new track bar comes with a replacement chassis mount.
- Use the 18mm socket wrench to remove the two side nuts.
- Use the 15mm socket wrench to remove the two bottoms bolts.
- Remove the mount bracket.
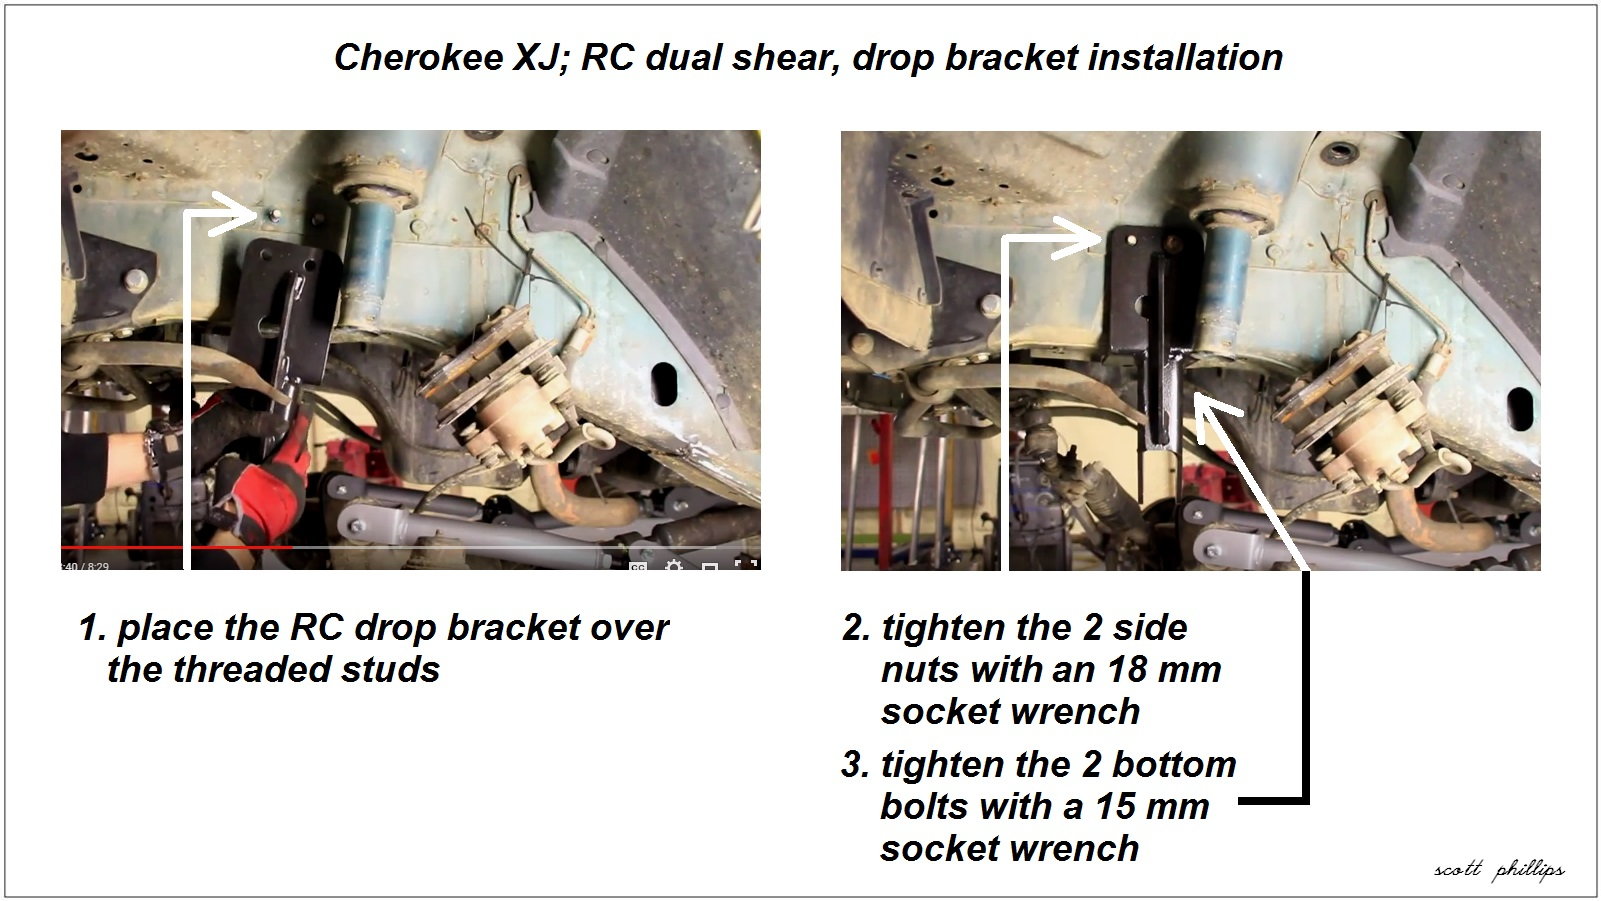
Step 4 – Install the RC dual shear, drop bracket
- Place the bracket over the threaded studs.
- Use the 18mm socket wrench to tighten the two side nuts.
- Use the 15mm socket wrench to tighten the two bottom bolts.
Pro Tip
Use Blue Threadlocker to ensure all track bar fasteners stay tight.
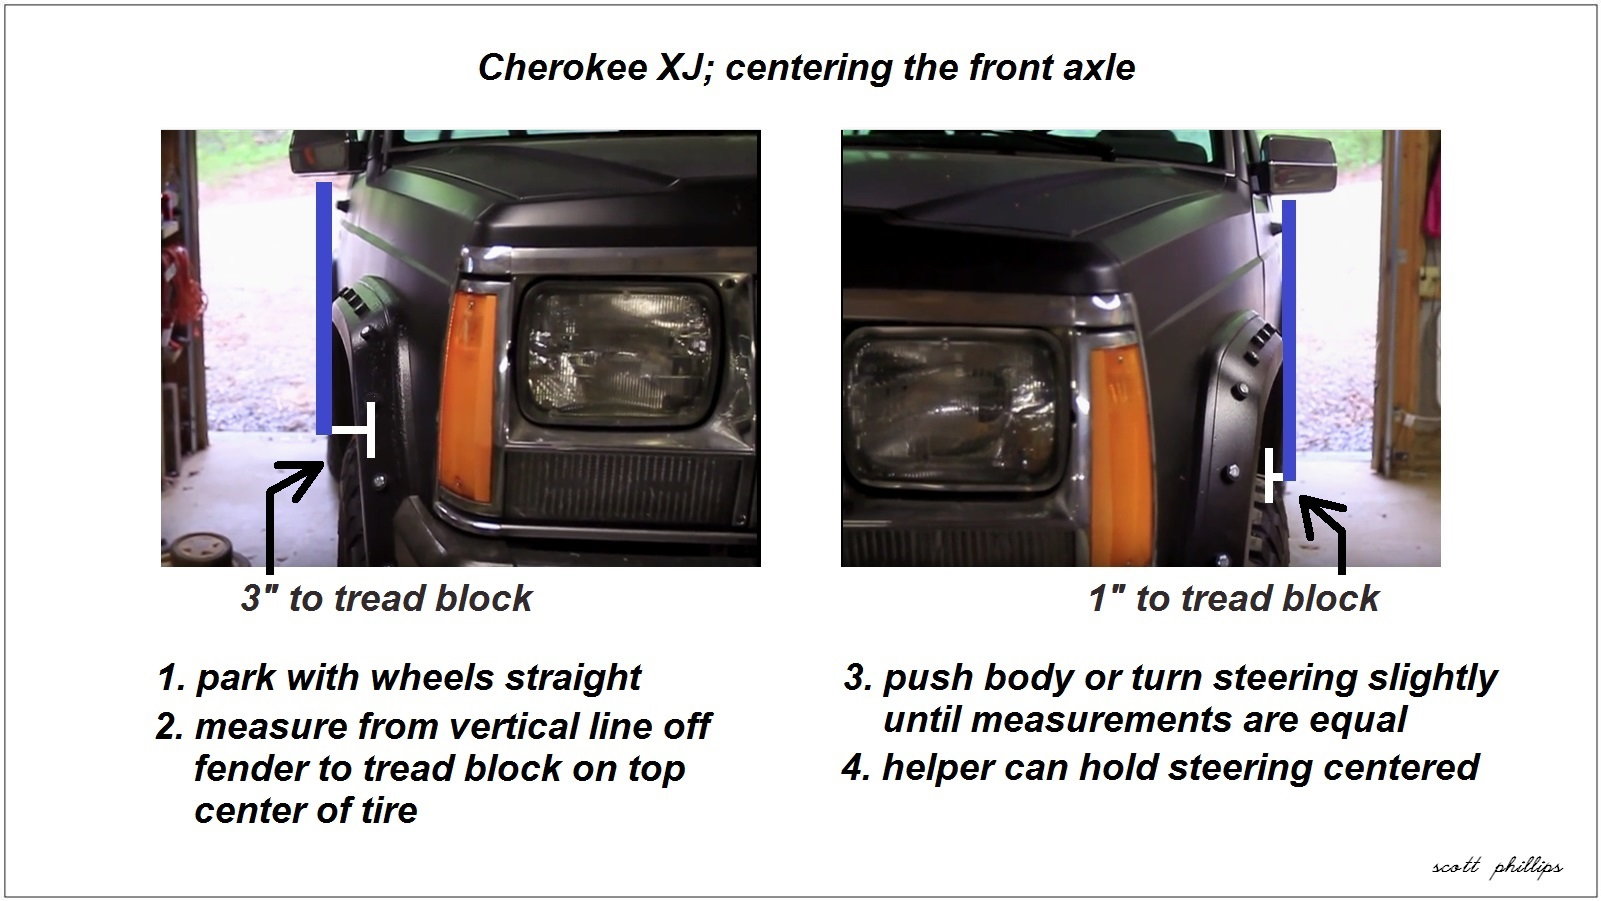
Step 5 – Center the front axle
- Hold a spirit level vertically against the fender flairs at the exact top of both front tires.
- Measure horizontally from the spirit level to identical tread blocks on both front tires.
- Turn the steering wheel slightly, or push against the body, until the two measurements are equal.
- A helper may have to hold the steering wheel in that location for you, while you install the track bar.
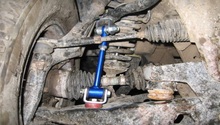
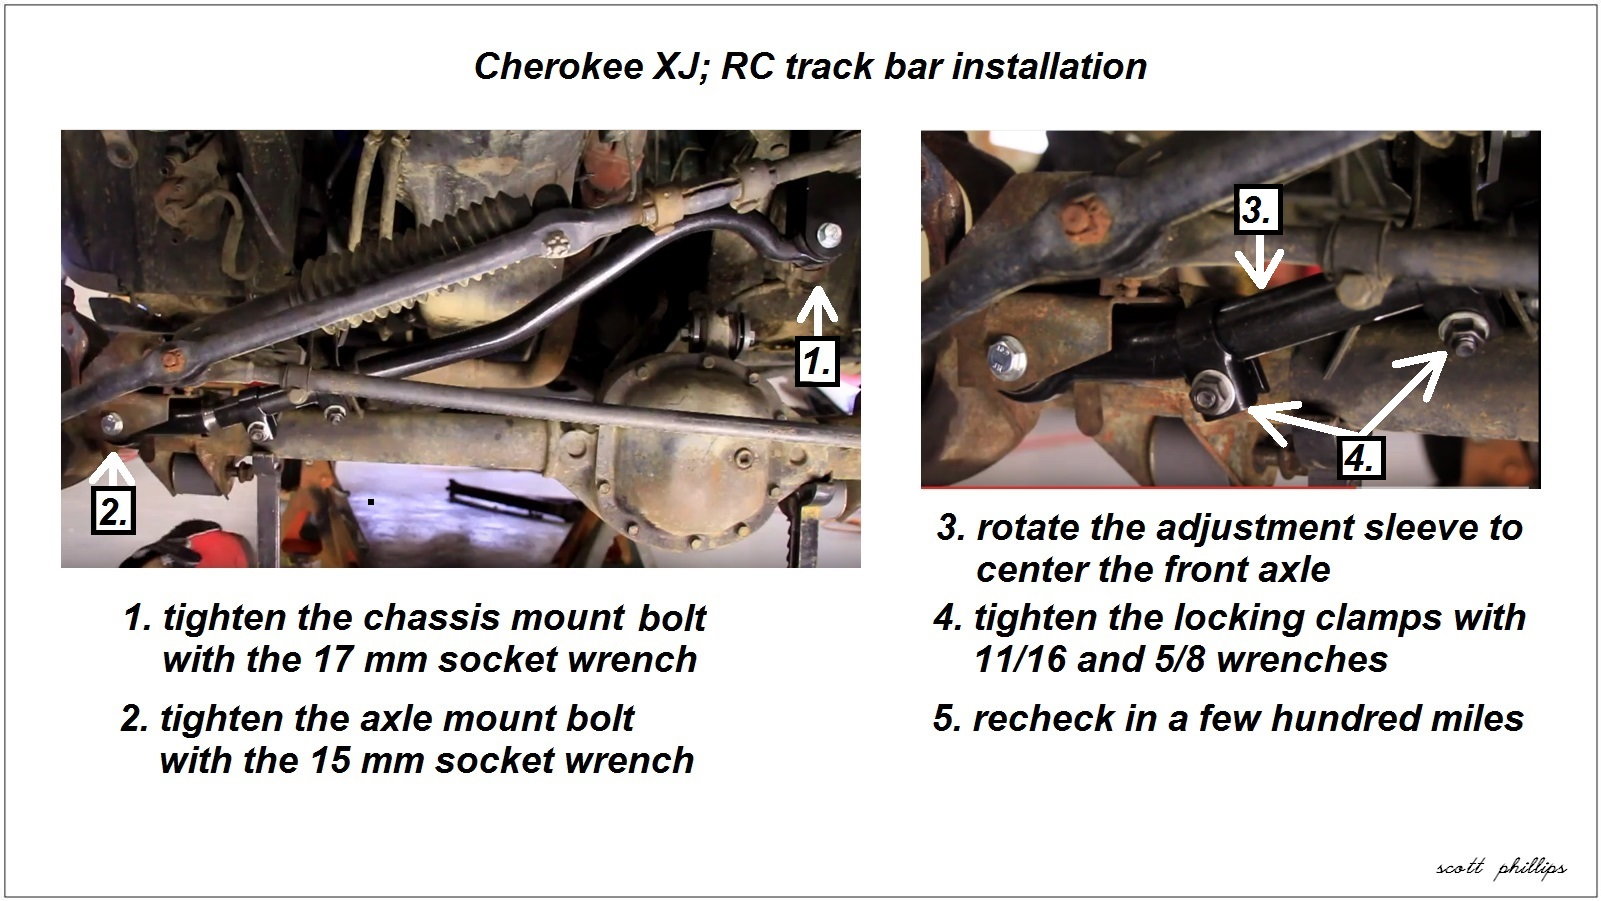
Step 6 – Install the RC track bar
- Attach the bar to the chassis mount and loosely snug up the bolt.
- Rotate the adjustment sleeve as needed and attach the bar to the axle mount. You can re-use the OEM captured nut plate if you wish.
- Use the 17mm socket wrench to tighten the chassis mounting bolt.
- Use the 15mm socket wrench to tighten the axle mounting bolt.
- Rotate the adjustment sleeve to make fine corrections to the axle center position.
- Use the 11/16 and 5/8 wrenches to tighten the clamps on the adjustment sleeve.
Pro Tip
Be certain to check the track bar fasteners for security and tightness after a few hundred miles and then on every oil change.
Featured Video: How to Install a Track Bar - Rough Country
Related Discussions
- Best Adjustable Track Bar - CherokeeForum.com
- Do I Need Adjustable Track Bar - CherokeeForum.com
- Track Bar Adjustment - CherokeeForum.com